Arec CI-333 User Manual Download Page 10

CI-403 / CI-333 Network Camera

10

11

The default network setting of the camera is DHCP, which means IP is assigned by a router 
or any DHCP server. To log in to the administration web, please connect the camera and your 

PC / Notebook or a DHCP server. Follow below steps to access the camera for the first time.
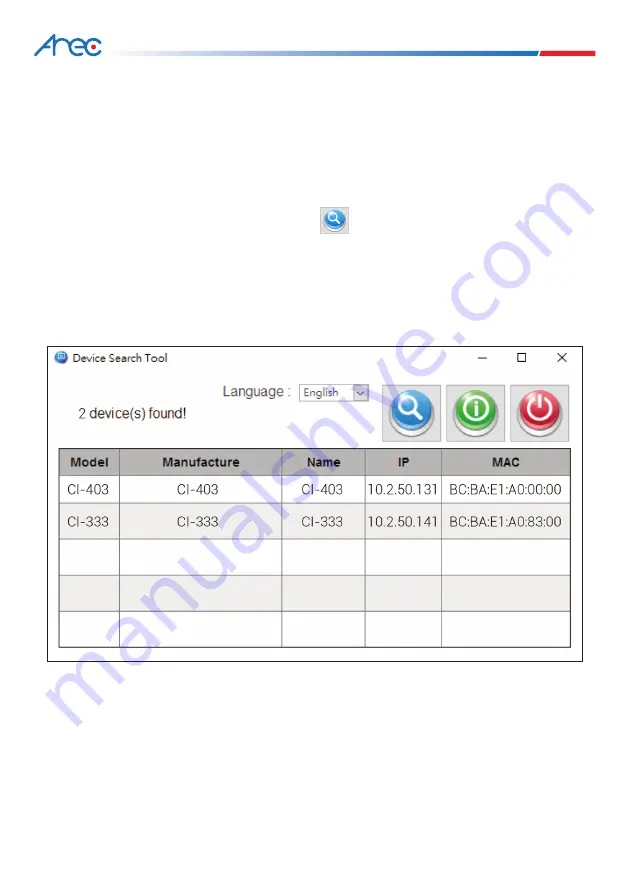
4. Access Camera

• Run the “Device Search Tool” utility, and click            button.
• The tool should find the network camera and show detailed information. Double click on the

   founded CI-403/ CI-333.

• An access window will pop-up and ask for user name and password.
• Enter the default user name and password admin/ admin in the dialogue. Note that user


name is case sensitive.

If no IP is assigned due to a DHCP server failure, or simply because the camera is not 
connected to a DHCP server, the Network Camera provides an alternate IP address: 
192.168.11.202

Therefore, to access the camera for the first time, please set the IP address of the PC as: 

192.168.11.XXX; for example: 

In the case where the DHCP server is unavailable

Summary of Contents for CI-333

Page 1: ...CI 403 CI 333 Network Camera AREC Inc All Rights Reserved 2019 l www arec com All information contained in this document is Proprietary User s Manual English...

Page 2: ...nts 1 3 Dimensions 1 4 Connectors 2 Camera Cabling 2 1 Power Connection 2 2 Ethernet Cable Connection 2 3 Alarm I O Connection 2 4 RS 485 Connection 3 System Requirements 4 Access Camera 5 Setup Video...

Page 3: ...ns such as entrance area warehouse loading bay and parking lot Multiple Progressive Scan CMOS Sensor support up to 4M Resolution Multi Exposure HDR Multi Codec Support H 265 H 264 MJPEG Low Latency St...

Page 4: ...age containing the following items listed below The dimensions of the camera are shown below Network Camera Power Terminal Block Power adapter Quick Guide 1 2 Package Contents 1 3 Dimensions CI 333 CI...

Page 5: ...9 BNC For analog video output 2 Network LEDs For network connection and activity indication 3 PoE Network RJ 45 For network and PoE connections 4 microSD Card Slot Insert the microSD card into the car...

Page 6: ...as it may not be able to support long term continuous data read write Please contact the manufacturer of the microSD card for information regarding the reliability and the life expectancy 7 BNC Conne...

Page 7: ...atus of both power and network activity indicator LEDs If either LED is unlit please check the corresponding connection NOTE The ITE is to be connected only to PoE networks without routing to the outs...

Page 8: ...to connect alarm devices to the IP camera 2 3 Alarm I O Connection 2 4 RS 485 Connection NOTE Do NOT connect external power supply to the alarm I O connector of the IP camera 1 Alarm In 2 2 Alarm In...

Page 9: ...430M 2 4 GHz 2 4 GB RAM Recommended 1 Intel Core i7 3770 CPU 2 93 GHz 2 8 GB RAM Operating System Windows VISTA Windows XP Windows 7 Windows 10 Web Browser Microsoft Internet Explorer 11 0 recommended...

Page 10: ...rk camera and show detailed information Double click on the founded CI 403 CI 333 An access window will pop up and ask for user name and password Enter the default user name and password admin admin i...

Page 11: ...ered for the security concerns For the initial access to the camera a client program DCViewer will be automatically installed to the PC when connecting to the camera If the web browser doesn t allow D...

Page 12: ...se Button Video Record Button Manual Trigger Button Manual Focus Adjustment Auto Focus Adjustment Viewer Window Main Tabs Language Selection Video Format Selection Live Video Pane Time Display Zoom Ad...

Page 13: ...f the user friendly browser based configuration interface Video Format can be found under Streaming Video Configuration The default value of video resolution is as below 5 Setup Video Resolution strea...

Page 14: ...to make multiple cameras having the same configuration 6 Configuration Files Export Import Users can save the system settings by exporting the configuration file bin to a specified location for future...

Page 15: ...and then double click on Apps In the Apps features list select DCViewer and click on the button Uninstall to uninstall the existing DCViewer To improve browser performance it is suggested to clean up...

Page 16: ...the Internet Explorer IE Step 2 Click on the Tools tab on the menu bar and select Internet Options Step 3 Click on the Security tab and select Trusted sites zone Click Sites and Add the CI 403 CI 333...

Page 17: ...ed in this document is Proprietary AREC have the right to change or improve product specifications without obligation to notify any user Go to www arec com get the latest information related to the pr...

Reviews: