background image


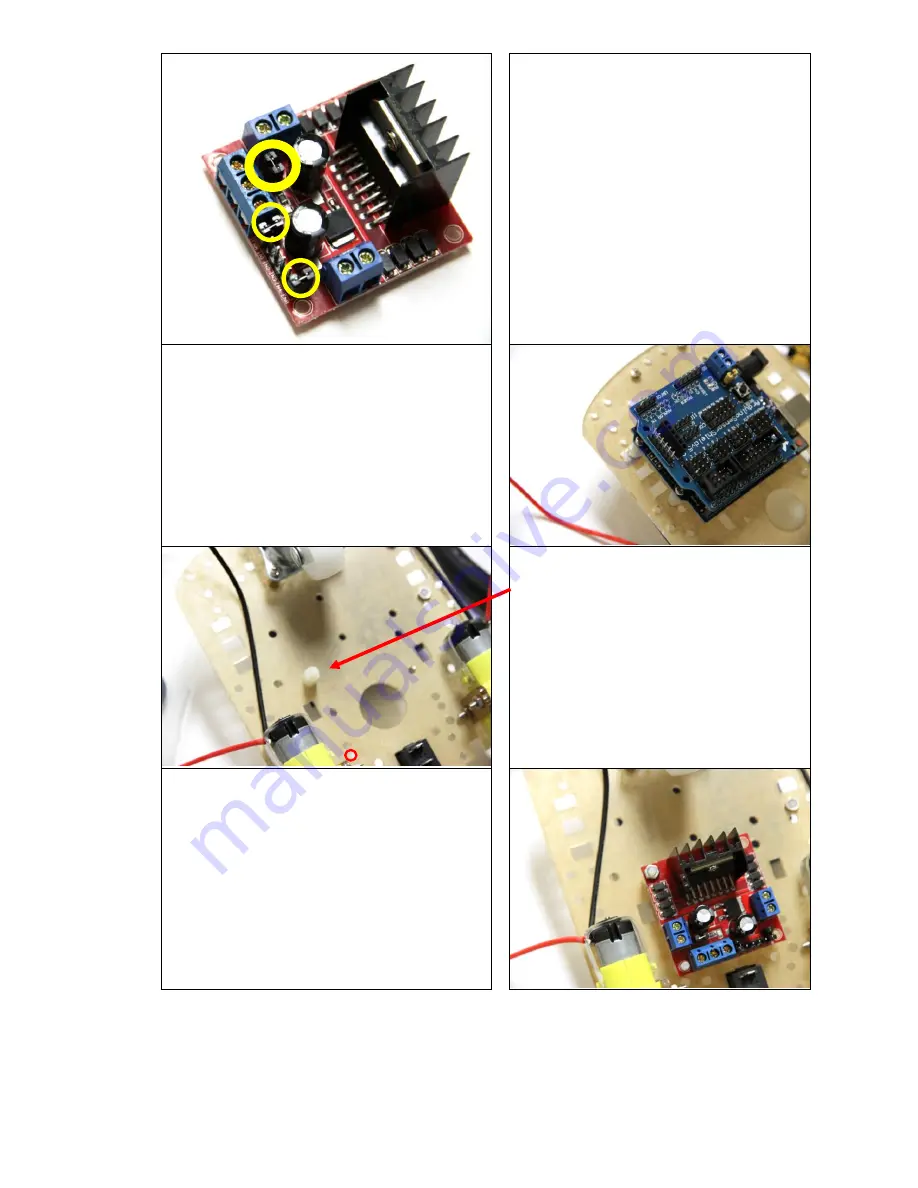
Verify the jumpers located with the 
yellow circle are also attached.  

Place the Shield over the arduino 
microcontroller as shown. 
 
A section below will explain how this shield 
works.  


Flip the car over where the motor and 
nylon wheels are located. You can see 
the nylon spacer for the h-bridge. 
 
Place another nylon spacer in the red 
circle and secure it on the other side 
with a phlips screw. 

It should look something like this when you 
place the h-bridge.  
 
Use only one hex screw to fasten the h-
bridge to the chassis. 


Summary of Contents for GK-KIT-003

Page 1: ...ARDUINO 2WD SMART ROBOT CAR KIT Level Beginner GK KIT 003...

Page 2: ...below L298N Dual H Bridge Motor Driver 1 Please see note about jumpers below Arduino Uno 1 40 Pin Breakable Headers 1 Not Required for this Kit Free Gift Servo Mounting Brackets 1 Ignore the Top plat...

Page 3: ...tranded 24AWG Wire Black and Red Set 2 Comes wrapped with Motors ON OFF Switch 1 Comes wrapped with Motors M3 Screw Spacer and Nut Set 1 FIT0066 Jumper Wire Set 1 Rainbow wires Nylon Coasting Wheel 1...

Page 4: ...Brass Sponge Optional Screwdriver Frame Assembly Unwrap the paper that has the frame motor battery holder and various components secured together Peel both sides the acrylic paper You can start from...

Page 5: ...from the frame and the black cable to the pin that is the closest to the frame You can also wire twist the cable onto the motor Place another Motor Bracket on the outside the grove will allow for the...

Page 6: ...on the other side using another standoff Do not use a hex nut This will act as a stress relief for the arduino and a mount on the other side for the H bridge Use two philips screw to fasten the arduin...

Page 7: ...n how this shield works Flip the car over where the motor and nylon wheels are located You can see the nylon spacer for the h bridge Place another nylon spacer in the red circle and secure it on the o...

Page 8: ...rs should align and fit Ensure by hand that the motor can turn left and right 90 or more if this is not possible remove and readjust before proceeding Take a small sharp screw and insert into the loca...

Page 9: ...n the bracket at an angle to access the screws Flip the unit and fasten the battery holder on the single standoff You can also insert the wheels now or later after completing the wiring Wiring Guide Y...

Page 10: ...Works The select jumper allows the voltage from the terminal block to enter and become regulated to 5VDC for the Arduino microcontroller If the jumper is not present you must connect a dc connector in...

Page 11: ...nto computer using the blue USB cable provided 2 Install the Software to read and write program to the chip from ARDUINO CC the program is free https www arduino cc download_handler php 3 Download the...

Reviews: