


- 5 -
2. Ports Connections and Buttons
Red LED: Unit is on
Built-in microphone Green LED: Power from AC adapter
F1, F2, F3 Buttons
Function buttons whose
functions are indicated
above each key on the
screen
Left
!!!!!!!!
Go back one directory
level/Fast review/decrease
recording level
ON
Turn on the Jukebox /
Long press to change to
external video
OFF/Escape
Turn off Jukebox or escape
from current operation
Expansion Port*
Remove rubber cap to reveal Mini-
Centronics port for add-ons such as
Camera, FM Remote control, Video
Recorder, Firewire interface, etc.
Up
"
"
"
"
Scroll upward/increase volume
Play/Pause/Resume
####
Play or Pause the current song or
video. Validate a selected option.
Right
########
Enter a directory/Fast
forward/increase recording level
Down
$
$
$
$
Scroll Downward/decrease
volume
*confirm availability of expansion options
DC In:
insert AC adapter jack
in here and plug to wall outlet.
USB port:
insert USB cord
mini jack here and attach other
end to computer USB port.
Model 20 has built-in USB 1.1
Models 1xx have built-in USB
2.0.
Ear AV out:
Composite video
output and analog stereo audio
(use ARCHOS AV cable), and
headphone jack.
Audio Stereo Analog Line-in &
Audio Stereo Digital Line-
In/out (use the yellow
connector for both digital
SPDIF in/out)
Don’t forget about the Interactive Manual on CD-ROM
Complete PDF
Manual on
included CD-ROM
- 6 -
3. Playing MP3 music
There are a couple of mp3 sample songs and a Playlist that were installed into your Jukebox in the
factory. Use the UP and DOWN arrows to locate a folder or song. Pressing PLAY at a folder will bring
you into that folder. Press LEFT to go back out of the folder up one level. Pressing PLAY at a Playlist,
will start playing the songs in the Playlist. Pressing Play at a song will play that song. If you hear
nothing at first, make sure you have adjusted the volume control on the headphone cord.
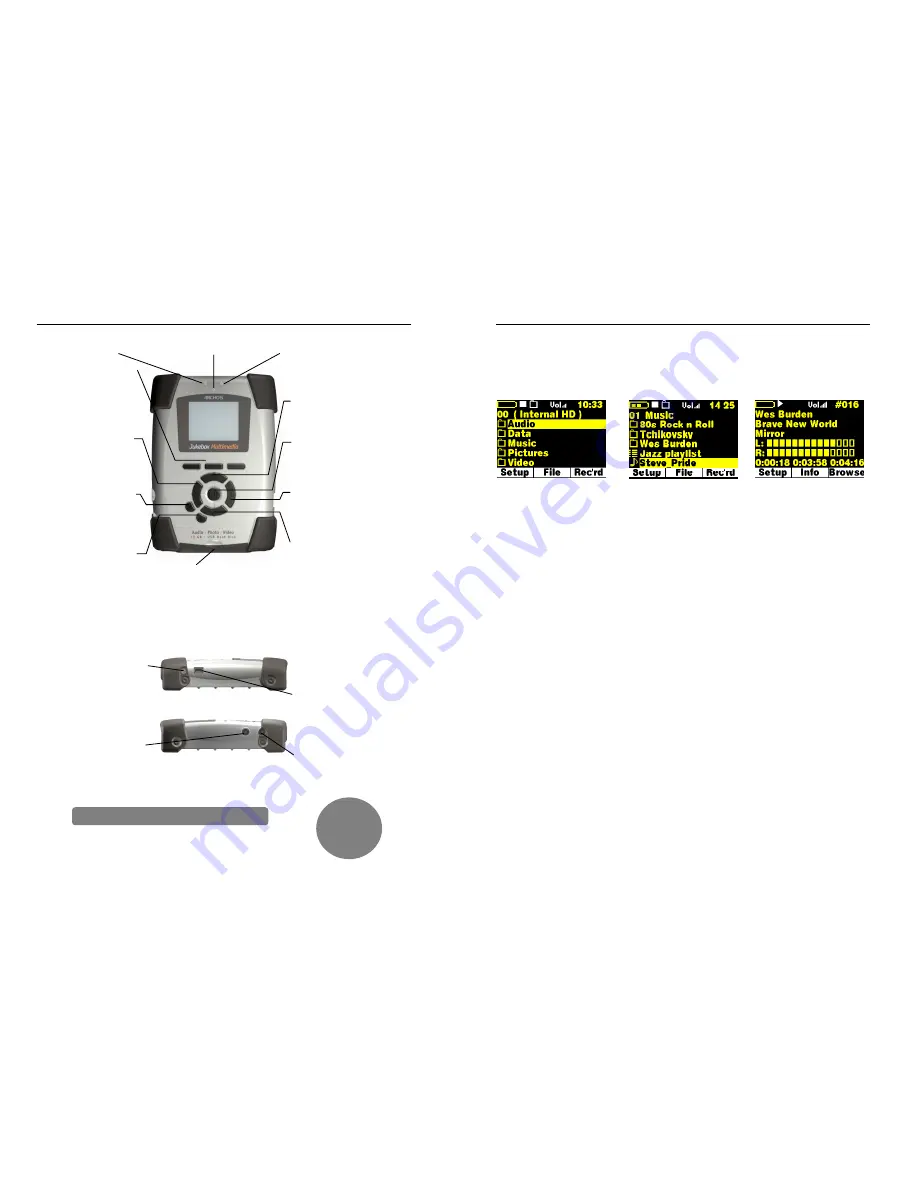
Typical root directory screen.
Notice the OO on the top left.
This indicates you are at the top
level. If you go into a folder, the
level will indicate 01.
In Browser mode, you will see
items with different icons such as
a folder: Tchaikovsky
a play list: Jazz Playlist
a song: Steve Pride
a video: (not shown above)
While the song plays, you will see
the ID3 tag information
Artist: Wes Burden
Album: Brave New World
Song title: Mirror
1) While song plays, use UP and DOWN buttons to adjust the volume
•
The UP and DOWN buttons control the volume while you listen
•
The Sound settings under Setup will change the sound quality as you listen
•
Use the PLAY/PAUSE button to pause a song and then again to restart the song
•
Click on the RIGHT and LEFT button to go to the next or previous song in the folder
•
Hold down on the RIGHT or LEFT button to fast forward or fast reverse through a song
2) Use OFF button as stop
•
The OFF button is also the stop button. Use it to stop what you are doing
•
In other situations, the OFF button acts as ESC and will bring you back one screen
3) Add a song to a Playlist by holding down on the PLAY button
•
While a song is highlighted in the Browser mode, hold down on play for 3 seconds
•
Move to the next song you want to put on the Playlist. You will notice that the previous song you_
had added to the Playlist is now a different color.
•
Repeat this process of selecting songs and adding files to the Playlist
•
When finished, click on [F2] File, then select Playlist and press play
•
You will see the contents of the current Playlist which is in the Jukebox memory
•
Click [F2] File again to be able to save this Playlist permanently to the hard drive
•
The Playlist also works with still images thus creating a slideshow
4) Use the included cable to play the Jukebox through your HiFi system
•
On your HiFi there are two RCA type connectors that say Aux in, CD in, or Video in
•
Connect the white and red leads of the supplied cable to these connectors. Leave the yellow alone.
•
Connect the other end to the Ear/AV out on the left side of the Jukebox Multimedia.
•
On the front of your stereo, select the auxiliary input or CD input
•
Press Play on the Jukebox recorder and adjust the Jukebox volume in order to supply your stereo
system with a signal that is neither too weak or too strong


