Microwave Oven / User Manual
34 / EN
Cihazı kaldırın ve kabinin içine yerleștirin.
Merkezlenmeli
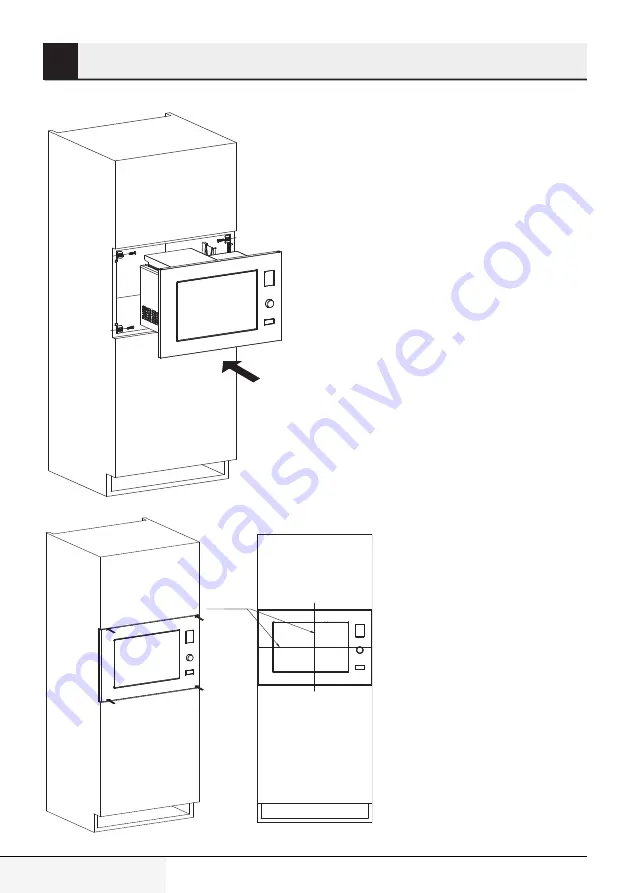
After locating the appliance
inside the cabinet, press the 4
corners of the frame to have the
tabs on the brackets seated on
the frame.
3
Installation
Page 1: ...MD 893 FG TR EN Mikrodalga f r n Kullanma k lavuzu Mikrodalga Izgara Mikrodalga Izgara Buz zme Durdur ptal Ba lat Zaman Saat A rl k Se imi...
Page 2: ...bilgi ve uyar lar dikkate alarak talimatlara uyun Bu kullanma k lavuzunun ba ka modeller i in de ge erli olabilece ini unutmay n Mo deller aras ndaki farklar k lavuzda a k bir ekilde belirtilmi tir Se...
Page 3: ...3 TR Mikrodalga F r n Kullanma K lavuzu NDEK LER 01M 8840821100 0119 01 T RK E 04 23 ENGLISH 24 43...
Page 4: ...ki i servis d nda ki ilerin yapmas tehlikelidir Cihaz sadece evde g dalar n haz rlanmas s t lmas ve buzla r n n z lmesi i in kullan lmak zere tasarlanm t r ticari mak satla kullan lmamal d r Kurallar...
Page 5: ...s na bilir Kab tutmak i in f r n eldi venleri gerekebilir Mikrodalga f r nlarda kullan ma uygun olduklar ndan emin olmak i in kaplar kontrol edilmelidir Cihaz ocak veya di er s reten cihazlar n zerine...
Page 6: ...s rt nmesini engelleyin Elektrik kablosunu s cak y zeylerden ve a k alevden uzak tutun Cihaz n kullan m esnas nda elektrik kablosunun yanl l kla ekilmesi veya birinin kabloya tak lma tehlikesinin olma...
Page 7: ...a layan d k gerilimli elektrik ebekesine do rudan ba l binalarda kullan lmak i in uygundur Cihaz al rken kapak veya d y zey s nabilir 1 1 2 r n g venli i Patlama tehlikesi oldu u i in s v lar veya di...
Page 8: ...eya tekrar s t mak i in kullanmay n Cihaz n arkas nda ve yanlar nda bulunanve gerekli hava sirk lasyonunun sa lanmas i in kabin duvarlar ile cihaz ara s ndaki min mesafenin korun mas n sa layan par al...
Page 9: ...malardan dolay ocuklar bu modlar sadece ye ti kin birinin g zetiminde kulla n lmal d r 1 4 AEEE Y netmeli ine Uyum ve At k r n n Elden kar lmas Bu r n T C evre ve ehircilik Bakanl taraf n dan yay mlan...
Page 10: ...2 Mikrodalga f r n n z 2 1 Genel bak 1 Kapak G venlik Kilidi Sistemi 2 F r n Cam 3 D ner tabla mili 4 D ner tabla deste i 5 Kapak a ma d mesi 6 Kumanda Panosu 7 Dalga K lavuzu dalga k lavuzunu rten m...
Page 11: ...tubetin veya y ksek nemin olu tu u yerlere veya kolay tutu an maddelerin ya n na koymay n Cihaz cam tepsisi d ner tabla deste i do ru konuma yerle tirilmeden al t rmay n Elektrik kablosunun hasars z o...
Page 12: ...ma K lavuzu 12 TR 3 1 2 Mikrodalga F r n Kabini m i n410 600 365 560 m i n330 80 er evenin braketlerini kabinin i ine hizalay n er evenin braketlerini kabinin i ine hizalay n Braketleri 4 vida ile 4x1...
Page 13: ...ikrodalga F r n Kullanma K lavuzu Cihaz kald r n ve kabinin i ine yerle tirin Merkezlenmeli Cihaz kabine koyduktan sonra er evenin 4 k esine bast ra rak braket zerindeki t rnaklar er eveye oturtun 3 K...
Page 14: ...lama fi li bir topraklama kablosu bulunmakta d r Cihaz do ru ekilde tak lm ve topraklanm bir duvar prizine tak lmal d r Elektri in k sa devre yapmas durumunda toprak lama sistemi elektrik ak m i in bi...
Page 15: ...n A a daki liste do ru kap se menize yard mc ola cak genel bir k lavuzdur Pi irme kab Mikrodalga Izgara Kombi Is ya dayan kl cam Evet Evet Evet Is ya dayan kl olmayan cam Hay r Hay r Hay r Is ya dayan...
Page 16: ...bas n Ayar d mesi Saati pi irme s resini men y ya da a rl gir mek i in d nd r n Otomatik pi irme fonksiyon se imi ayar d mesini saat y n n n tersine evirerek yap l r Durdur iptal Ayar iptal etmek ya...
Page 17: ...s n C M KRODALGA tu una basarak pi ir me s rerken pi irme g c n kontrol edebilirsiniz C Pi irme buz zme s resi sona er dikten sonra cihaz sinyal verir ve ekranda End Bitti g r n r bir ba ka fonksiyonu...
Page 18: ...nd rerek yiyecek kodunu se in Ekrandaki se ili sembol yanacakt r A IRLIK SE M tu una pe pe e basarak a rl k i in 400 gr girin BA LAT tu una bas n Otomatik Pi irme Men s Kod Yiyecek pi irme modu S t k...
Page 19: ...2 00 g r nene kadar evirin Ba lat tu una bas n Mikrodalga Izgara tu una bas m say s Kombinas yon Pi irme s resi Mikrodalga Grill 2X Co 1 30 70 3X Co 2 55 45 4 2 9 ocuk kilidi Cihaz n g zetim alt nda o...
Page 20: ...Temizlik ve bak m 9 A r g r lt n n nlenmesi i in silindir halkas ve cihaz zemini d zenli olarak temizlenmelidir Cihaz n alt y zeyini yumu ak bir deterjanla sil meniz yeterlidir Silindir halkas hafif...
Page 21: ...hizmet talebiniz oldu unda yukar daki telefon numaralar n dan a r Merkezimize ba vurunuz 4 Hizmet i in gelen teknisyene teknisyen kimlik kart n sorunuz 5 iniz bitti inde servis teknisyeninden Hizmet...
Page 22: ...da yer alan hususlara ayk r kullan lmas ndan kaynaklanan hasar ve ar zalar 6 Mal n 6502 say l T keticinin Korunmas Hakk ndaki Kanununda tarif edilen ekli ile ticari veya mesleki ama larla kullan m dur...
Page 23: ...esi durumunda sat c retici ile ithalat m steselsilen sorumludur 6 lgili mevzuatlarda belirlenen kullan m mr s resince mal n azami tamir s resi 20 i g n n ge emez Bu s re garanti s resi i erisinde mala...
Page 24: ...tions by paying attention to all the information and warnings in the user manual Remember that this user manual may also apply to other models Differences between the models are explicitly described i...
Page 25: ...ized persons service Any other approach is dangerous Your product is intended for cooking heating and thawing food at home It must not be used for commercial purposes Manufacturer shall not be held li...
Page 26: ...esigned to dry any living being Do not operate the appliance when empty Cooking utensil may get hot due to the heat transferred from the heated food to the utensil You may need oven gloves to hold the...
Page 27: ...iance with an extension cable Never touch the appliance or its plug with damp or wet hands Place the appliance in a way so that the plug is always acces sible Prevent damage to the power cable by not...
Page 28: ...generated and or used in the form of electromagnetic radia tion for the treatment of material and spark erosion equipment Class B equipment is suitable for use in domestic establish ments and establis...
Page 29: ...f the appliance which protect the minimum distances between the cabinet walls and the appliance in order to allow for the required air cir culation 1 2 Intended use This appliance is intended for buil...
Page 30: ...ing This appliance conforms to the WEEE regulation This appliance was manufac tured from high quality parts and materials which are recyclable and re usable For this reason do not dispose of this appl...
Page 31: ...oven 2 1 Overview 1 Door Safety Interlock System 2 Oven Window 3 Turntable shaft 4 Turntable support 5 Door opening key 6 Control Panel 7 Wave Guide please do not remove the mica plate that covers the...
Page 32: ...t put the appliance in places with moisture or high humidity or near inflammable materials Do not operate the oven without placing the turntable support to the correct position Make sure that power ca...
Page 33: ...User Manual 3 1 2 Microwave Oven Cabinet m i n410 600 365 560 m i n330 80 er evenin braketlerini kabinin i ine hizalay n er evenin braketlerini kabinin i ine hizalay n Braketleri 4 vida ile 4x16 sabit...
Page 34: ...Manual 34 EN Cihaz kald r n ve kabinin i ine yerle tirin Merkezlenmeli After locating the appliance inside the cabinet press the 4 corners of the frame to have the tabs on the brackets seated on the f...
Page 35: ...appliance should certainly be grounded This appliance has a grounding cable with a grounded plug The appliance must be plugged into a wall outlet installed and grounded correctly Grounding system allo...
Page 36: ...e foil and inner surface of the appliance Following list is a general guide that would help you select the right ware Cookware Microwave Grill Combination Heat resistant glass Yes Yes Yes Non heat res...
Page 37: ...tate this knob in order to set the time cooking time menu or weight Automatic cooking function is selected by turning the adjustment knob anti clockwise Stop cancel Press this key to cancel a setting...
Page 38: ...ower while cooking by pressing the MICROWAVE key C Oven gives a signal sound when cooking defrosting time is complet ed and End message is displayed on the display clear the display by pressing the ST...
Page 39: ...STOP CANCEL key Rotate the ADJUSTMENT knob anti clockwise to select the food code Selected symbol on the screen will be illuminated Press the WEIGHT SELECTION key repeatedly to enter 400 gr for weight...
Page 40: ...pressing the Microwave Grill key twice or three times Turn the ADJUSTMENT knob until 12 00 is dis played on the screen Press the START key Number of pressings for the Micro wave Grill key Combina tion...
Page 41: ...ould be cleaned regularly to avoid excessive noise It would be sufficient to wipe the lower surface of the ap pliance with a mild detergent Roller ring may be washed in warm soapy water or in a dishwa...
Page 42: ......
Page 43: ......
Page 44: ......