Aquatop RC-24G Owner'S Manual Download Page 6

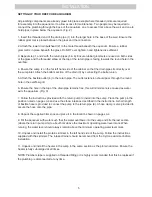
SETTING UP YOUR REEF CUBE AQUARIUM

All plumbing components are already glued into place except where threaded joints are required 

for assembly into the aquarium or to allow access for maintenance. Two people may be required to 

connect the plumbing through the base of the aquarium, one to access from above the weir and one to 

hold pipes in place below the aquarium. (Fig. 2)

1. Insert the threaded end of the drain pipe (1) into the larger hole in the base of the weir. Ensure the 

rubber grommet is placed between the glass and the connection.

2. Attach the lower drain bulkhead (2) to the male thread beneath the aquarium. Ensure a rubber

grommet is in place beneath the glass. Do NOT over tighten, hand tightened is sufficient.

3. Repeat step 1 and 2 with the return pipes (5 & 6). Ensure rubber grommets are used on both sides 

of the glass and the threaded elbow at the top of the return pipe is facing towards the round hole in the 

overflow.

4. Ensure the sump is on the far left hand side of the cabinet so that the drain pipe sits directly over 

the sump inlet. Attach the bottom section of the drain (3) by connecting the barrel union.

5. Attach the flexible outlet (4) to the return pipe. The outlet extension should pass through the round 

hole in the overflow grill.

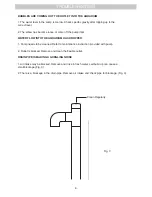
6. Ensure the hole in the top of the drain pipe remains free, this will minimize noise caused as water 

exits the aquarium. (Fig. 3)

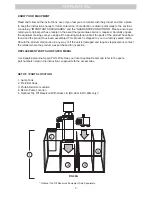
7. Follow the instructions provided with the return pump to install into the sump. Place the pump in the 

position noted on pages 3-4 and use the elbow intake as described in the instructions. A short length 

of flexible hose is provided to connect the pump to the return pipe (6). A hose clamp is also provided to

secure the hose onto the pipe.

8. Unpack the supplied filter sock and place it in the location shown on pages 3-4.

9. Fill the aquarium with water such that the water overflows into the sump and fills the last section 

(where the return pump sits) to about 5cm above the maximum operating water level mark. When 

running, the water level should always remain above the minimum operating water level mark.

10. Unpack and install the protein skimmer in the left hand side of the sump. Follow the instructions 

supplied with the skimmer. The intake strainer should be removed from the Xyclone skimmer before 

installation.

11. Unpack and install the heater in the sump in the same section as the protein skimmer. Ensure the 

heater is fully submerged at all times.

NOTE: Plumbers tape is supplied on threaded fittings; it is highly recommended that this be replaced if 

the plumbing is disconnected at any time.

INSTALLATION

5

Summary of Contents for RC-24G

Page 1: ...COMPLETE AQUARIUM SYSTEM RECIFE SERIES OWNER S MANUAL ...

Page 2: ...CTIONS 1 The product must be placed on a level surface at all times 2 Use specified voltage 3 A drip loop must be used with all electrical aquarium devices A drip loop is a self made part of the cord hanging below the receptacle See Fig 1 To guard against injury basic safety precautions should be observed including the following READ ALL SAFETY INSTRUCTIONS BEFORE USE Please read this instruction ...

Page 3: ...ds and plugs are dry before plugging in the power cord 10 Keep children away from this product 11 Do not use chemicals or solvents when cleaning use warm water only NITROGEN CYCLE NOTE Before adding aquatic creatures to your new aquarium please be aware that there are changes in the water parameters that occur within 2 4 weeks of a new tank setup that can create a toxic environment for healthy fis...

Page 4: ... Please ensure you retain your original purchase receipt in the event that guarantee service is required Carefully unpack the aquarium making sure you keep all the packing material until all the parts of the product have been found and the product has been assembled This product is shipped to you in a factory sealed carton Should the product malfunction in any way or if the unit is damaged and req...

Page 5: ...t with sump in place and the plumbing components Place the cabinet in position and carefully place the aquarium on the cabinet Ensure the aquarium is centered on the cabinet The protein skimmer mounts on the designated glass partition specified in sump diagrams below RC 40G RC 24G Sump Placement SUMP SETUP MODEL VARIATIONS RC 32G 5 4 ...

Page 6: ...hould pass through the round hole in the overflow grill 6 Ensure the hole in the top of the drain pipe remains free this will minimize noise caused as water exits the aquarium Fig 3 7 Follow the instructions provided with the return pump to install into the sump Place the pump in the position noted on pages 3 4 and use the elbow intake as described in the instructions A short length of flexible ho...

Page 7: ...PLUMBING DIAGRAM INSTALLATION Fig 2 1 4 5 6 2 3 6 ...

Page 8: ...ly units The plugs sockets are marked with blue and white rings to denote which power supply connects to which cable Ensure these are connected correctly 2 Connect the power supply units to the power outlets and switch the power on Switch the light units on using the switches on the side of the light unit 7 ...

Page 9: ... FLOW INTO THE AQUARIUM HAS DROPPED 1 Pump needs to be cleaned Refer to maintenance instruction provided with pump 2 Outlet is blocked Remove and clean the flexible outlet DRAIN PIPE IS MAKING A GURGLING NOISE 1 Air intake may be blocked Remove and rinse in fresh water salt build up can cause a small blockage Fig 3 2 There is a blockage in the drain pipe Remove air intake and check pipe for blocka...

Page 10: ...Light 20W White Temp 12 000K Blue Wavelength 465nm Model RC 32G Tank Capacity 32 Gal Sump Capacity 10 Gal LED Light 30W White Temp 12 000K Blue Wavelength 465nm Model RC 40G Tank Capacity 40 Gal Sump Capacity 12 Gal LED Light 30W White Temp 12 000K Blue Wavelength 465nm Model RC 48G Tank Capacity 48 Gal Sump Capacity 14 Gal LED Light 40W White Temp 12 000K Blue Wavelength 465nm NOTE Please refer t...

Page 11: ... not cared for properly ie warping or discoloration from water damage or salt residue and or 4 The product has been transported without proper packaging WARRANTY LIABILITY DISCLAIMER In no event will Aquatop be liable for any consequential or incidental damages including but not limited to lost sea life personal injury property damage equipment damage lost profits lost wages lost savings lost inco...

Page 12: ...Recife Manual 2016 aquatop com ...

Reviews: