


AquaTerra OWNER'S MANUAL
230V Systems
Locating the Spa Serial Number:
The spa serial number label is located inside the equipment compartment. Equipment
compartment access panel is below the spas 4-button topside control panel. Write your spa
information in the space provided.
DATE PURCHASED:
PURCHASED FROM:
SPA MODEL:
SERIAL NUMBER:
Please read this Owner’s Manual carefully, as it is designed to provide you with the information
you will need to ensure the safe, secure use of your spa.
IMPORTANT:
AquaTerra reserves the right to change specifications
and/or design without notification and without any obligation.
SPA SPECIFICATIONS
Model
Spa
Seating
Length Width
Height
Dry
Weight
Gallons
Electrical
Specs 60Hz
Fairfax™
6 person
84"
84"
36"
818 LBS.
330
230V
Fairfax™ NL
6 person
84"
84"
36"
818 LBS.
330
230V
Ventura™
6 person
89"
89"
36"
918 LBS.
380
230V
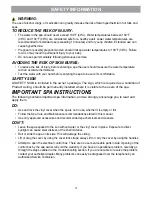
CAUTION
DO NOT OPERATE SPA BEFORE READING THIS MANUAL
Failure to read this manual and follow its instructions may result in unsafe operation and or
permanent damage to your portable spa.
Most cities, counties, states, and countries require permits for exterior construction and electrical
circuits. In addition, some communities have codes requiring residential barriers such as fencing
and/or self-closing gates on the property to prevent unsupervised access to a pool or spa by
children. Be sure to check with your local agencies for specific requirements.
If you need additional information and/or assistance, please consult your local contractor.
Owner's Record
Thank you for choosing an AquaTerra Spa.
Visit our web site at
AquaTerraspas.com
. for
more information including service parts.
See Page 7
Summary of Contents for Fairfax
Page 1: ...OWNER S MANUAL 230V 60Hz Model...
Page 24: ...21 304275 17 E 5 17...


