aquanique QDLS12B Instruction Sheet Download Page 5


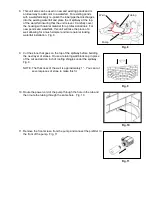
12. Connect the tubing to the pump and place it in the tub.  Fig. 12 


Fig. 12 


13. Fill the tub with water.  Fig. 13 


         Fig. 13 
 

14. Connect the spillway to the transformer by pushing the plug into the 

transformer socket until it is firmly seated. Hand tighten the nut from 
the plug to the socket.  Fig. 14 


Fig. 14 


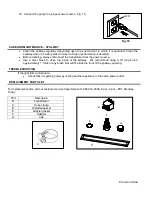
15. Plug the transformer into a properly grounded electrical outlet.   

Fig. 15 


Fig. 15 


Transformer 

Plug from 

Lighted 


GFCI 


Summary of Contents for QDLS12B

Page 1: ...before installation and or maintenance Replace the entire light transformer assembly if damage is found CAUTION Use a proper power source as indicated on the transformer label Keep the cord away from...

Page 2: ...TRUCTIONS 1 Select a level location to build the Lit Waterfall kit Begin building the kit by placing the tub on the ground and building the stones around it It is very important that the stones are le...

Page 3: ...alling with this kit using connection a is preferred For other installs use b Fig 5 6 Tighten the hose clamp using a flathead screwdriver Fig 6 Fig 6 7 Place the spillway onto the wall Then continue b...

Page 4: ...ng for a much simpler and more natural looking waterfall installation Fig 8 Fig 8 9 Cut the stone that goes on the top of the spillway before building the next layer of stones Or use a retaining wall...

Page 5: ...3 Fig 13 14 Connect the spillway to the transformer by pushing the plug into the transformer socket until it is firmly seated Hand tighten the nut from the plug to the socket Fig 14 Fig 14 15 Plug the...

Page 6: ...clean the inside of the spillway We recommend using a 10 long brush approximately 1 thick or any brush that will fit inside the front of the spillway opening TROUBLESHOOTING If the light fails to ill...

Page 7: ...products or parts subject to this warranty For products damaged in transit a claim should be filed with the carrier Disclaimer Any oral statements made about the product by the seller the manufacturer...

Reviews: