www.Aquaglide.com
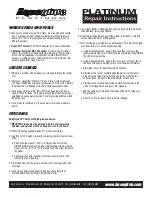
WORK SPACE AND TOOLS
1. Take care to position yourself in a clean, dry area with good ventila-
tion. For proper curing of adhesives, temperature should remain
above 10°C (50 F). In most cases you will need enough room to
inflate the product.
2.
Repair Kit Contents:
PVC Patch material, PVC Glue, Instructions.
3.
Additional items that MAY be needed:
Air pump, sharp scissors
and/ or razor knife, dish washing liquid, water, small bowl or spray
bottle, 120 Grit sandpaper, solvent such as MEK (Methyl Ethyl
Ketone) or rubbing alcohol, china marker, small ‘chip’ brush or dis-
posable paint brush, clean dry cloth.
LOCATE LEAK(S)
1. If there is a problem with air leaks, you will need to locate the leak(s)
first.
2. Inflate your Aquaglide
®
Platinum™ product fully. Some small leaks
can close themselves at lower air pressures, so it is best to maintain
full pressure by re-inflating periodically while checking for leaks.
3. Use a soapy water solution (50%/ 50% dish soap & water) and a
cloth to check for leaks. Work slowly around the product spraying or
swabbing-on soapy water solution. Look for growing bubbles, which
indicate a leak.
4. Once a leak is confirmed, dry the area well, mark it and prepare to
patch.
PATCHING
Reinforced PVC Patch with high-grade adhesive.
** IMPORTANT: leaks must be patched with the item completely
deflated, and patches must be allowed to cure for 24 hours.
1. DEFLATE your Aquaglide
®
Platinum™ product completely.
2. Carefully cut PVC patch material to size using sharp scissors or razor
knife.
a. Patch should be least 3 - 5cm (1-2”) larger than hole IN ALL
DIRECTIONS around any air leak. This means a minimum patch
size of 5cm x 5cm (2” x 2”) for a pinhole leak. The larger the patch,
the better.
b. Square patches with rounded corners are usually best, as this
reduces the risk of peeling.
3. Dry-fit the patch over the area to be repaired to ensure good fit and
coverage.
4. Use a clean 120 grit sand paper to rough up the surface to be
patched AND ALSO the back of the patch material.
5. Use solvent (MEK or Rubbing Alcohol) and a fresh cloth to clean the
sanded areas, removing all debris.
6. Dry-fit the patch again and use china marker (provided) to carefully
outline where the patch will be located.
7. Next, use the glue (provided). Use a disposable ‘chip’ brush to spread
glue if needed. Try to work neatly and quickly.
a. Using disposable brush, apply a thin, even layer of glue to the
repair area making sure to cover the area completely. Stay INSIDE
the china marker outline.
b. Using disposable brush, apply a thin, even layer of glue to the to
the back of the patch making sure to cover the area completely.
c. Allow glue to cure for approximately 60 seconds.
d. Starting at one corner, carefully align the patch over the repair
area using the china marker outline as a guide. Once the two
surfaces touch, the bond will be immediate, so take care.
e. Starting at one corner and working outward, carefully apply the
patch to the repair area using very firm pressure.
f. Rub the entire patch area and the edges of the patch using very
firm pressure.
g. Allow to cure for at least 24 hours before inflating.
North Sports, Inc. #1 North Shore Dr, SE White Salmon, WA 98672 TEL: (509) 493-4938 FAX: (509) 493-4966


