4
Set Up Instructions
Refer to previous page for location of filter
components.
1. Consider where you are going to place the
aquarium. Keep it away from direct light or
areas with large temperature fluctuations.
2. Place the aquarium on a flat level surface
strong enough to support its weight. We
recommend a genuine aquarium cabinet (sold
separately) rather than general household
furniture.
3. The filter unit comes preassembled with the
exception of the heater and pump.
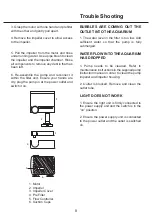
4. Install the heater in the filter
as shown on the previous page.
Follow the instructions supplied with the
heater to set the temperature. DO NOT turn
the heater on when it is not submerged.
5. Remove the pump from its box and locate
the straight outlet (as shown in the pump
instructions). Place the pump in the filter as
shown in the diagram on page 3. Align the
pump outlet with the outlet hole in the front of
the filter and push the straight outlet into the
pump. Ensure the pump is secured firmly using
the suction cups on the rear of the pump.
6. Install the substrate heat cable. Follow
the instructions supplied with the heater.
If the substrate heater is not going to be
used in conjunction with a thermostat (not
recommended), it should be used on a timer
that switches on and off at 1 hour intervals
to prevent overheating of the substrate and
subsequent damage to plants.
7. Wash the substrate that will be used in the
aquarium. In order to do this, place a portion
of the substrate into a bucket and run water
through it, churning with your hand. Continue
until the water running out of the bucket is
clear. Place the washed substrate into the
aquarium.
8. Add any rocks or ornaments into the
aquarium. Do not place any rocks or heavy
ornaments directly on top of the substrate
heater.
9. It is now time to fill the aquarium with water.
Ensure the correct dosage of water conditioner
is used whenever adding new water to the
aquarium.
10. Dose the Plant Food and Iron Supplement
following the directions on the respective
labels. Refer to the Maintenance instructions
on page 4 and the product labels for
directions with respect to ongoing dosage of
supplements.
11. Install the CO
2
kit. Follow the instructions
supplied with the kit. For maximum efficacy,
the diffuser should be located near the bottom
of the aquarium, in an area where water flow
is significant. Do not place the diffuser near
the filter inlet as the flow of water through
the inlet will release excess dissolved CO
2
counteracting the function of the diffuser.
12. Ensure all power cables are dry and plug
the heater, substrate heat cable and pump
cables in at the power outlet. Switch the power
on.
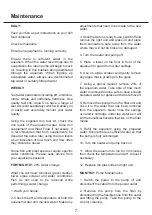
13. Place the glass lid on the top of the
aquarium by:
a. Attach the lid brackets to the sides of the
glass lid.
Summary of Contents for Flora 36
Page 11: ......


