3
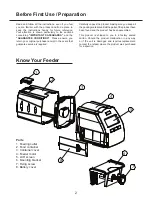
1. Remove the battery cover and insert 2 AA batteries
(not supplied).
2. Press the Manual button to ensure the feeder
operates correctly. Pressing the Manual button will
rotate once. Replace the battery cover.
Manual
Minute
Hour
+
_
Set
Feeding Cycle
Setting
3. Mount the feeder on the side of your aquarium by
first sliding the mounting bracket onto the feeder motor
and then placing the feeder on the side of the aquarium
and securing the fixing screw so that the feeder is firmly
attached.
4. Press and hold the Set button for 3 seconds. The
hour display will start flashing. Set the time by pressing
the “+” and “-” buttons to adjust the hour (using 24 hour
time) and then pressing Set to switch to minutes.
5. Press Set again to move to the first feeding time. The
hour display will start to flash again as well as the first
feeding cycle box. Set the feeding time the same way
as the clock was set - pressing set to move from hour
to minute.
6. Press set again and only the feeding cycle box will
flash by pressing “+” or “-”, the number of rotations per
feed can be set. This allows different quantities to be fed
at different times. When the box is empty, the feeding
time will not be used. This is to allow any number of
feeding times between 1-5 to be used per day with up
to 3 serves per feed.
7. Press Set again to move to the 2nd feeding time and
repeat the process.
8. Remove the feeder from the mounting bracket
by sliding it forwards (in the direction of the screen).
Remove the food container and open the container
cover. Fill the feeder with the food you wish to use. Re-
assemble the feeder and place it back on the mounting
bracket.
9. Adjust the feeding outlet to set the quantity of food
that will be fed for each rotation of the feeder. Pressing
the Manual button will allow you to check the quantity
is correct.
1. Use dry food only.
2. Keep the feeder away from splash/spray caused
by airstones or filter outlets. Water will cause foods to
clump and may prevent food from exiting the feeder.
3. Avoid high temperatures, they my cause feeder to
malfunction.
4. Maintain the food level between Max and Min Level.
5. Should the feeder malfunction or batteries fail, Aqua
One can not and will not be held accounatble. Use
of the feeder is at your own risk. Replace batteries if
the LCD screen begins to fade or feeder rotates more
slowly than usual.
5. Do not allow the unit to be submerged in water or
become wet.
6. No loss of livestock can be claimed against the
manufacturer for improper use.
Operating Instructions
Tips


