background image

6

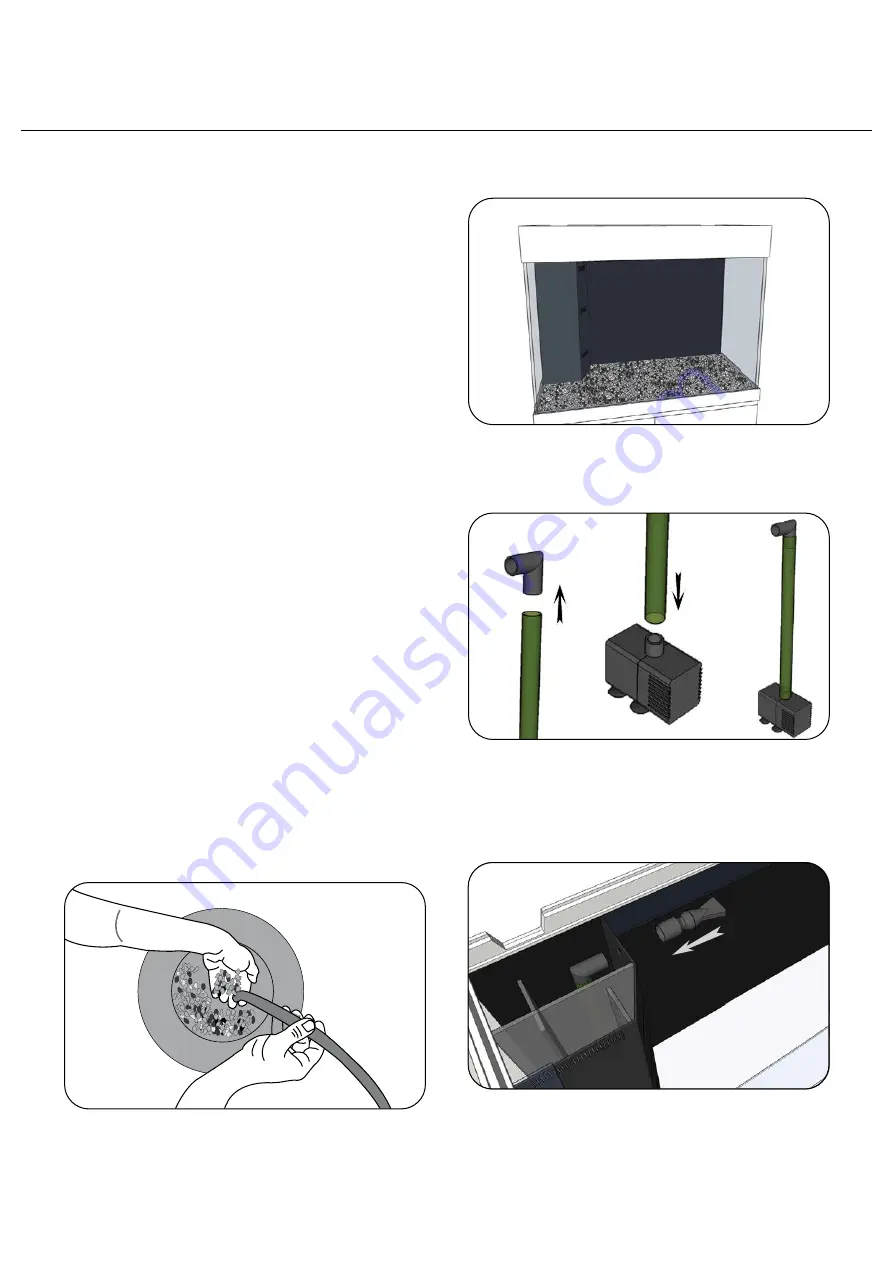
Gently pour the gravel into the aquarium and 
spread it out by hand.


6. Unpack the Filter Pump, Elbow, Duckbill and 
Riser Hose. Attach the hose to the Elbow and 
Pump. 


7. Lower the pump into the filter chamber. Push 

the open end of the elbow into the return hole 
and attach the duckbill to the elbow through the 
other side. 


8. Rinse the Media Baskets in clean tap water. 
Move the baskets around in the water to ensure 
that all of the media has been rinsed.  Place 

them into the filter chamber as shown.


Setup Instructions

Please check that all parts and equipment are 
present and not damaged before setting up your 
aquarium.

It is a good idea to rinse any ornaments in 
clean water before using in an aquarium. 
For advice on how to treat natural materials, 
seek advice from your aquarium specialist. 
 
All equipment and accessories should only 
be used for the aquarium and should be 

purchased  specifically  for  aquarium  use. 

Do not use any chemicals or detergents to 
clean anything intended for the aquarium. 

1. Consider where you are going to place the 
aquarium. Keep it away from direct light or areas 

with large temperature fluctuations. 

2. Assemble cabinet according to instructions 
supplied with the cabinet.

3. Place the cabinet on a level surface strong 
enough to support the weight of all equipment. 
Note that water is heavy (1kg per litre) – the 
complete aquarium may weigh more than 250kg 
when set up.
 
4. Unpack the aquarium and place onto the 
cabinet. Using a clean, damp cloth, wipe the 
inside of the aquarium to remove any dust. 

DO NOT USE ANY CHEMICALS OR 

DETERGENTS 

5. Rinse gravel (sold separately) with tap water in 
a clean bucket. 


To do this, place a small amount in the bucket 
and rinse under the tap or with a garden hose. 
Use one hand to churn the gravel over until the 
water runs off clear.

Summary of Contents for Aquatica 160

Page 1: ...Inspiring Excellence in Fish Keeping Aquatica 160 240 Instruction version 4 12 2017 www aquaone com au ...

Page 2: ...2 This page is intentionally left blank ...

Page 3: ...wet do not unplug the appliance Disconnect the fuse or circuit breaker that supplies the power to the appliance then unplug and examine for presence of water in the socket 5 Always unplug the appliance from the electrical outlet when not in use before putting on or taking off parts before any type of maintenance or cleaning 6 Never yank the cable to pull it from the socket Pull the plug carefully ...

Page 4: ...e product was purchased for inspection Before First Use Preparation Aqua One Spare Parts Replacement Parts Filter Media Use Aqua One Genuine Spare Parts Only See your local Aqua One Dealer and look for the number listed below for the spare part you require Alternatively you will find these numbers on the silver label located on the product Aquatica Sponge 15ppi 25174s Aquatica Sponge 35ppi 25175s ...

Page 5: ...r Chamber 3 Media Chamber 4 Filter Intakes 5 Duckbill Outlet 6 Elbow 7 Riser Hose Know Your Filter 8 Pump 9 Heater 10 Media Basket 15ppi Sponge 11 Media Basket 35ppi Sponge 12 Media Basket Carbon 13 Media Basket Ceramic Noodles Transformer 2 1 3 4 4 5 5 6 7 8 10 11 12 13 9 ...

Page 6: ...All equipment and accessories should only be used for the aquarium and should be purchased specifically for aquarium use Do not use any chemicals or detergents to clean anything intended for the aquarium 1 Consider where you are going to place the aquarium Keep it away from direct light or areas with large temperature fluctuations 2 Assemble cabinet according to instructions supplied with the cabi...

Page 7: ...just under the glass brace To do this either use buckets or a garden hose secured in the aquarium See page 8 for location of glass brace 12 Treat the new water with a water conditioner such as Aqua One Water Conditioner and also use a bio supplement such as Aqua One Biostarter sold separately 13 Place lid supports onto the glass lids Place lids onto the aquarium as shown on page 8 14 Place light a...

Page 8: ...8 1 2 3 4 Set Up Instructions 1 2 3 4 Lid Placement Light and Lid Flap Placement Glass Brace Feeder Holes ...

Page 9: ... 1 2 3 4 5 6 1 2 3 4 5 6 7 the aquarium Remember to empty some water from the aquarium before adding anything to it REMEMBER LIVE PLANTS NEED TO BE FED An aquarium safe plant fertiliser should be used LIGHTING It is recommended that the light is turned completely off for at least 8 hours per day to allow the fish a proper night period More than 10 hours of full light daily can encourage excessive ...

Page 10: ...enough water to replace the amount removed with Aqua One Water Conditioner Sold separately as per the instructions on the bottle Let the water sit for at least 10 minutes 8 Refill the aquarium gently with the new water 9 Turn the filter back on and ensure that water is flowing through the filter outlet 10 Turn the heater back on 11 Add a filter bio supplement such as Aqua One Bio Start 12 Replace ...

Page 11: ...quipment Applicable in the European Union and other European countries with separate collection systems This symbol on the product or on its packaging indicates that the product must not be disposed of with normal household waste Instead it is your responsibility to dispose of your waste equipment by arranging to return it to a designated collection point for the recycling of waste electrical and ...

Page 12: ...l liquid spillage or submersion of goods not designed to sustain such use or duress 2 3 Where inspections reveal goods are in normal working order including where noise or vibration is consistent with normal goods operation 2 4 Attempted repairs or modifications by unauthorised persons including but not limited to the drilling of holes in the aquarium glass by unauthorised persons 2 5 Where the go...

Reviews: