background image

4–10

PacketMax 5000 Installation and Operation Manual,   10007678 Rev J

Chapter 4.  Installing the Base Station ODU Radio and Antenna

The IF cable between the BS and BSR carries a multiplexed signal along with the DC 
voltage.


They are identified below and the user should pay particular attention to the 

choice of IF cable,


in field deployments as the cable loss is a function of length, fre-

quency and quality.

Following are the various signals the IF cable carries between BS and BSR.


DC voltage.


20 MHz reference signal.


70 MHz IF signal (bi-directional).


Telemetry link (260 and 420 MHz) for communication between BS-BSR and 
BSR-BS (bi-directional).

When choosing IF cable of any given length and quality, the user should look at the 
maximum allowable loss of the cable that is recommended below for reliable opera-
tion of the system. The below table allows sufficient margin for surge protectors and 
connectors. 

Table 4-1

 is based on a nominal Base Station Radio operating voltage of 

52 Volts DC and 75% duty cycle.

Apart from the above recommended cable loss characteristics, the RF shielding capa-
bility of the cable should be least 90 dB or better. As a last note, choice of quality 
connectors and cables with good weatherability and outdoor rated is highly recom-
mended for reliable performance of the system.

Typical cable lengths for LMR Cables from Times Microwave, Inc

Following are the assumptions in coming up with the prescribed lengths.


     Two surge protectors are used each with ~ 0.1 dB loss at 70 MHz.


     Connectors on either end have a loss of ~ 0.1 dB each.


     PM 3000 BS outputs a nominal voltages of 52V at the IF port.

Table 4-1

Maximum Allowable Cable Loss for IF Cable

Parameter

Value

DC Resistance inner +Outer conductor.

Maximum of 22 ohms

Loss at 20 MHz

Maximum of 20 dB

Loss at 70 MHz

Maximum of 9 dB

Loss at 260 MHz

Maximum of 20 dB

Loss at 420 MHz

Maximum of 20 dB

Cable Return Loss from 20 – 500 MHz

20 dB Typ

Table 4-2

LMR Cable Types and Maximum Lengths

Cable Type

Max Length with surge protectors for

PM BSR

LMR-200-75

100 meters

Summary of Contents for PacketMAX 5000

Page 1: ...PacketMax 5000 Installation and Operation Manual 10007678 Rev J Aperto PacketMAX PacketMAX 5000 April 2008 ...

Page 2: ...pecifications subject to change Aperto PacketWave PacketMax and WaveCenter are trademarks of Aperto Networks All other trademarks used herein are the property of their respective owners Aperto Networks 598 Gibraltar Drive Milpitas CA 95035 USA Phone 408 719 9977 Fax 408 719 9970 www apertonet com ...

Page 3: ...ents EN 301 753 EN301 489 4 EN60950 We hereby declare that all essential radio test suites have been carried out and that the above named product is in conformity to all the essential requirements of Directive 1999 5 EC The conformity assessment procedure referred to in Article 10 and detailed in Annex III or IV of Directive 1999 5 EC has been followed with the involvement of the following Noti fi...

Page 4: ... The objectives of the Directive are to reduce the environmental impacts of WEEE by promoting re use and recycling as an alternative to disposal From 13 August 2005 product placed on the EU market is required to be marked with the symbol shown below This symbol indicates that end of life electronic equipment generated within the EU should not be mixed with other types of waste or placed in the gen...

Page 5: ...ions of the Packet Max 5000 hardware components Chapter 3 Installing the Base Station IDU Provides step by step procedures for installing the PacketMax Base Station Indoor Unit Chapter 4 Installing the Base Station ODU Radio and Antenna Provides step by step procedures for installing the PacketMax Base Station Outdoor Unit Radio and Antenna Chapter 5 Commissioning the Base Station Illustrates how ...

Page 6: ...e for this Manual This manual is intended for system designers and planners base station installers system operators and others requiring or desiring information about the PacketMax 5000 BS and the PacketMax System It provides information specific to the Packet Max system but cannot and should not be considered a tutorial on relevant technol ogies and practices NOTE It is highly recommended that a...

Page 7: ...ns of the tool manufacturers All outdoor installation including equipment mounting and cabling should be per formed by trained microwave radio technicians familiar with usual and customary practices and procedures Take extreme care to avoid contacting any overhead power lines lights and power circuits while you are installing outdoor equipment Contact with any of these objects could cause injury o...

Page 8: ...cations not expressly approved by Aperto Networks could void the user s authority to operate the equipment Units sold in the United States can only be used in the FCC specified band of 5 725 to 5 850 GHz Because Aperto cannot be responsible for improper installation or use of its equip ment failure to follow these and other published cautions and warnings may void your equipment warranty What is n...

Page 9: ...tion Radio ODU For technical specificaions on 5 8 GHz radio see PM BSR 58 Radio Specifications External Synchronization Support See Synchronizing Multiple BSs at a Site Point to Point Mode Pont to Point Mode allows you to increase the number of supported hosts up to 7500 For more information on Point to Point Mode please refer to the Point to Point Mode section Revision History 0984 ...

Page 10: ...Preface Preface vi PacketMax 5000 Installation and Operation Manual 10007678 Rev J ...

Page 11: ...Point to Point Mode 1 10 Features of PacketMax System 1 11 The PacketMax System s IP Network 1 11 Services 1 12 MIBs 1 13 Service Offerings and QoS 1 14 ARQ Feature 1 16 3 DES Encryption 1 17 Certificates and Management 1 18 Upgrades 1 19 Chapter 2 Base Station Components PacketMAX Base Station 2 2 5 Slot ATCA Chassis 2 3 Wireless System Controllers 2 5 Major Differences Between WSC S 24 and WSC 4...

Page 12: ...ing the Antenna 4 2 Installing the Base Station Radio ODU 4 2 3 3 and 3 5 GHz BSR Package Contents 4 2 5 8 GHz BSR Package Contents 4 3 Preparing and Mounting the 3 3 and 3 5 GHz BSR 4 4 Preparing and Mounting the 5 8 GHz BSR 4 6 Using the BSR with the Antenna and IDU 4 8 Grounding the PacketMax System 4 14 Chapter 5 Commissioning the Base Station Summary of Configuration of Base Station 5 2 Estab...

Page 13: ...ries C 1 PacketMax Base Station Spares and Accessories C 4 Appendix D System Specifications Physical interfaces of PM 5000 12 sector D 2 Physical interfaces of PM 5000 4 sector D 5 QoS and Networking Parameters D 7 Dimensions and Weight D 8 Environmental D 8 Radio Specifications D 9 PM BSR 33 and PM BSR 35 Radio Specifications D 9 PM BSR 58 Radio Specifications D 12 Antenna Specifications D 16 Ant...

Page 14: ...Table Of Content TOC 4 PacketMax 5000 Installation and Operation Manual 10007678 Rev J ...

Page 15: ... PM 5000 A 3 Table A 3 WSC related Alarms Events in PM5000 A 5 Table A 4 SS related Alarms A 6 Table A 5 CPE ID and Description A 7 Table A 6 CPE Mac address and Description A 8 Table B 1 Base Station Unit CLI Commands B 3 Table C 1 PacketMax 5000 Multi Sector Base Station IDU Factory Integrated Build to order Systems C 1 Table C 2 PacketMax 5000 Multi Sector Base Station IDU A LA CARTE SPARES C 2...

Page 16: ...ble D 16 General Specifications D 12 Table D 17 Transmitter Specifications D 13 Table D 18 Receiver Specifications D 13 Table D 19 Receiver Sensitivity D 13 Table D 20 Channel Interference D 14 Table D 21 General Specifications D 14 Table D 22 5 8 GHz BSR Dimensions D 14 Table D 23 Environmental Specifications D 15 Table D 24 Antenna Specifications D 16 Table D 25 Maximum Pout Point to Multi Point...

Page 17: ...alled as QWC card 2 19 Figure 2 13 Fan PM 5000 2 19 Figure 2 14 Connecting to the RS 232 Craft Port 2 20 Figure 2 15 DB 9 Female and RJ 11 Male pinout 2 21 Figure 2 16 DC input Rear of the PM 5000 2 23 Figure 2 17 AC input Rear of the PM 5000 2 24 Figure 2 18 Base Station Radio 2 25 Figure 3 1 Package Contents 3 3 Figure 3 2 Mounting Base Station PM 5000 3 4 Figure 3 3 Ground lug on the Base Stati...

Page 18: ...ure 5 5 label on MSC Card 5 5 Figure 5 6 Determining the right MAC address 5 6 Figure 5 7 Port selection 5 7 Figure 5 8 Rebooting BS 5 8 Figure 5 9 General session page WSC upgrade 5 10 Figure 5 10 Startup session page WSC upgrade 5 11 Figure 5 11 Ftp page WSC upgrade 5 11 Figure 5 12 Telnet page WSC upgrade 5 12 Figure 5 13 General session page MSC upgrade 5 13 Figure 5 14 Startup session page MS...

Page 19: ...ides a description of the PacketMax Broadband Multiservice Wire less Access System including system architecture functionality features benefits as well as hardware and software components This chapter covers the following topics Conceptual Overview of the PacketMax System Bridge Mode and VLAN Mode of Base Station Features of PacketMax System 1 ...

Page 20: ...rd level Currently it has 4 ports and abundant processing power and bandwidth There is a high capacity non blocking backplane with 2 56 Gbps of switching capacity Figure 1 1 shows the PacketMax overview A PacketMax System can include PacketMax infrastructure products such as base stations and point to multi point systems PackeMax 5000 Base Station supporting multiple wireless sectors Base Station ...

Page 21: ... band line of sight and local conditions Consult Aperto Networks Customer Service for more details A cell can employ multiple Base Station Thus a single cell can serve thou sands of subscribers Subscriber data rates can be individually configured The ratio of downstream to upstream traffic can be adjusted The PacketMax System ensures that a wireless network can grow to thousands of subscribers in ...

Page 22: ...he standard frequency bands used var iously throughout the world for licensed or unlicensed wireless broadband networking The PacketMax products operate in 3 3 3 5 5 8 GHz Frequency Bands 1 1 3 PacketMax Network Connectivity The PacketMax Base Station network connectivity has been highlighted in Figure 1 2 This system demonstrates a bridge mode type of setting for the PacketMax system as follows T...

Page 23: ...also be used to pass IN BAND management traffic Only one of these Backhaul ports will be part of the Bridge and is user configurable In Bridge mode consider the pointers listed as below Do not connect both the Management and the Backhaul port to the network Connecting these ports will cause a loop as both the ports are part of the Bridge CPE01 10 226 0 101 CPE02 10 226 0 102 CPE03 10 226 0 103 CPE...

Page 24: ...the Data Traffic in the VLAN Mode the VLAN IDs are configured when provision ing SS using EMS 1 2 2 1 VLAN Configurations In the PacketMax system there are two types of management configurations based on the network design on the PM5000 and they are Out of band Management Users can choose the management port on the MSC of the PM 5000 sys tem management traffic All other traffic will pass through t...

Page 25: ...HCP packets from to BS or SS Figure 1 3 displays DHCP TFTP over man agement port a management interface set up Figure 1 3 Out of band Management 1 2 2 3 Inband Management with Management VLAN The date traffic are segmented by traffic VLANs and is implemented by the backhaul ports Inband management This VLAN carries inbound traffic The Backhaul Interface can be either Fast Ethernet or Gigabit inter...

Page 26: ...tified with a VLAN ID it can be mapped onto an individual Service Flow enabling individualized QoS on a per customer basis A VLAN Classifier is a set of rules that determine how the PM 100 PM 300 assigns a VLAN ID and priority to a packet based on a wide range of packet parameters such as Source or destination IP address es Source or destination MAC address es IP TOS TCP UDP Port numbers NOTE VLAN...

Page 27: ...ack ets One SS is configured to tag all incoming packets with ID 101 and the other with ID 102 The PacketMax products MSC and SS are configured to be managed using VLAN ID 100 Hence another Port on the VLAN switch is configured to tag all packets coming from the EMS Server with VLAN ID 100 to the Base Sta tion Management interface on the MSC Figure 1 5 VLAN Application 1 2 2 6 Looping Prevention T...

Page 28: ...spectrum usage they are ideal for such applications as high speed backhaul of Wi Fi hotspot networks higher capacity alternatives to T1 E1 connections and building to building connec tions in the enterprise environments Features that support Point to Point applications include Support for 3 3 3 5 and 5 8 GHz frequency bands High interference immunity Exceptional wireless range up to approximately ...

Page 29: ... backhaul channel is part of a subnet which includes A gateway to the outside world Internet or private network Access to a DHCP server either the DHCP server or a DHCP relay agent must be on the same subnet as the BS s backhaul interface Access to a TFTP server identified by the DHCP server Each wireless interface is the gateway for a subnet comprising itself its Sub scriber Stations and perhaps ...

Page 30: ...HCP relay agents in the SS By manual assignment by the ISP 1 3 2 Services Each Base Station Unit requires access to DHCP and TFTP servers to boot up prop erly Access to additional servers is required for the support of specific features 1 3 2 2 TFTP Server For the PacketMax System the main function of the TFTP server is to store the system configuration files and download them on request Each Base...

Page 31: ...anagement Protocol is an industry standard for manage ment of computer networks PacketMax Base Station Units and subscriber Indoor Units include built in SNMP agents These agents can be accessed by SNMP man agement applications such as WaveCenter EMS Pro NOTE PacketMax SNMP agents use SNMP v 2 syntax for objects 1 3 3 MIBs Each PacketMax BS and SS includes a SNMP agent supporting the following MIB...

Page 32: ...BS uses the unsolicited grant mechanism to schedule fixed size grants at a recur ring interval with as little latency as possible Thus UGS is suitable specifically for voice and other applications with similar real time requirements NRT service flows are given a guaranteed minimum amount of bandwidth and can be offered as a higher priced tier of service Note that the configured band width is a min...

Page 33: ... any Classifier rule So if the users do not want to define specific Classifier rules for each type of traffic pattern then they can choose a Service Flow as the Default Service flow by adding a Default Classifier for that Flow Only 1 Default Service Flow should be defined for each direction i e one for the Upstream and another one for the Downstream Figure 1 7 PacketMax Service Flows CID CID CID C...

Page 34: ...eception of ARQ blocks in terms of block sequences The standard does not specify any rules on the usage of the four different feedback types and leaves it open to implementation Aperto s implementation of the ARQ feed back mechanism relies on a proprietary scheme which allows to optimally select the feedback type based on the block error pattern or in some cases to combine more than one types in o...

Page 35: ...3 An Authorization Key AK is used to decrypt the Traffic Encryption Keys TEKs using PKM protocol The AK is periodically refreshed and is encrypted using 3DES 4 In the BS the TEKs are generated and send to SS using the 3DES encryption format The SS decrypts these TEKs using a Key Encryption Key KEK gen erated from the AK If the BS encrypts the TEK using the RSA Public Key of SS then the SS decrypts...

Page 36: ...en the security process The Aperto WiMax Root Certificate is a Self Signed certificate issued by the Aperto Certifying Authority CA The CA is stored in the BS The X 509 certificates are injected into the subscriber station devices at manufacturing time and can later be upgraded from the EMS The Root Certificate is the same across all Base Stations and shall be available on MSC as the Certificate V...

Page 37: ... upgrades are In a redundant BS configuration the certificates need to be installed using the LAN upgrade tool Once the user has a device which is certified the LAN upgrade and Bulk Upgrade tool has to be used to upgrade the certificates 1 3 8 Upgrades There are two types of upgrades that can be done using the EMS and they are Bulk Upgrade The bulk upgrade feature of EMS allows the users to upgrad...

Page 38: ...1 20 PacketMax 5000 Installation and Operation Manual 10007678 Rev J Chapter 1 Overview Of Base Station ...

Page 39: ...ities necessary to complete the installation for PacketMax This chapter contains the following topics PacketMAX Base Station 5 Slot ATCA Chassis Wireless System Controllers Main System Controller Card MSC Redundancy AC Supply Power LEDs and ESD connector Hot Swap Maintaining Proper Chassis Air FLow Fan Unit Serial Cable Pinout PacketMax 5000 Rear Panel AC Power Connection Base Station Radio 2 ...

Page 40: ...ontroller Cards QWCs Base Station Radio Connection One or two for redundancy Main System Controller MSC Card Serial port for CLI management The Front Panel of the PacketMax 5000 has Wireless System Controllers WSC and Main System Controllers MSC with their ports and interfaces Access to Modular Fan Unit Access to Modular AC Power supplies at the bottom Figure 2 1 shows the front view of the a Pack...

Page 41: ...e Station system assigns a logical port number for each WSC and is based on this card s physical slot location in the chassis The logical port number acts as the internal address for the card and is used in the CLI SNMP and EMS management interfaces Table 2 B lists and defines the logical port number assignments for the WSC S 48 s installed in a QWC Table 2 A Slot Positioning Requirements for MSC ...

Page 42: ...s and port numbers of a 4 sector base station and Figure 2 2 shows a 12 sector base station Please note that the port numbers are labelled according to software configuration of the device NOTE In Element Management System and CLI while configuring please enter the right port number Filler panels PN PM 5000 FRONT PANEL should be inserted in to any unused slots Build to order systems will include f...

Page 43: ...hat are configurable in the system Automatic Retransmission request ARQ which is a fast retransmission proto col at layer 2 that allows the MAC to recover burst errors and thus to improve user throughput and overall system capacity Parameters such as modulation FEC encoding burst size retransmission pol icy and transmit power Quality of Service QOS Radio Control The PHY level features include Soft...

Page 44: ...ferences Between WSC S 24 and WSC 48 Table 2 D lists the major differences between the WSC S 24 and the WSC 48 which installs in a QWC Figure 2 4 and Figure 2 5 illustrates the WSC S 24 and WSC 48 respectively 2 3 2 One Port WSC S 24 The one port WSC as in 4 sector BS Figure 2 4 PacketMax Interface of WSC Card WSC 24 Table 2 D Major Differences between WSC S 24 and WSC 48 s WSC S 24 WSC 48 Occupie...

Page 45: ...tep in the Hot Swap Card Removal Proce dure and that it is now safe to remove the WSC card from the PM5000 chassis 2 Indicates that the WSC card is not operational due to a problem OFF Unit is operational when PWD Led is ON Minor LED Indicates that the WSC card is operational but a problem has been detected ON Indicates that the WSC card is opera tional but a problem has been detected TheWSC card ...

Page 46: ... to the WSC ports and connected Base Station Radios Implements functions such as shelf manager Table 2 F WSC 48 Faceplate Features Function Description Main Management RS 232 Serial Management Port port used to connect to host computers This is for Internal use only Radio IF Radio IF Port Establishes connection to the Base Station Radio LEDs on card RX ON Indicates the base station is receiving tr...

Page 47: ...e third and final step in the Hot Swap Card Removal Proce dure and that it is now safe to remove the WSC card from the PM5000 chassis 2 Indicates that the WSC card is not opera tional due to a problem OFF Unit is operational when PWD Led is ON Minor LED Indicates that the WSC card is operational but a problem has been detected ON Indicates that the WSC card is operational but a problem has been de...

Page 48: ...alled in the chassis External clock input output ports enable the MSC card to synchronize either with other PacketMAX Base Stations installed at the same location or with a external clock source like a GPS receiver Thus the MSC monitors controls and assures proper operations of the modular base station chassis The Networking functions include Management Backhaul and data aggregation Synchronizatio...

Page 49: ...unications management and control among the distributed con trollers and to an overall system manage A high level high speed services for boards that need TCP IP based manage ment services such as remote booting SNMP management and other IP based services Table 2 H covers the faceplate features and Figure 2 6 shows the MSC card Figure 2 6 PacketMax Interface of MSC card Table 2 H MSC Faceplate Fea...

Page 50: ...Master Mode When there is just one MSC installed in the system the MSC card will always be in Master Mode SYNC LED Indicates the synchronization mode of the MSC Card OFF Indicates No Power ON Indicates MSC Card is operating in Sync Mas ter Mode ON BLINKING Indicates MSC Card is operating in Sync Slave Mode When in Sync Master Mode the MSC Card is using its internal clock for SYNC and 10 MHz for fr...

Page 51: ...cond it is also used to indicate the final step in the Hot Swap Card Removal Procedure ON 1 Indicates completion of the third and final step in the Hot Swap Card Removal Procedure and that it is now safe to remove the MSC card from the PM5000 chassis 2 Indicates that the MSC card is not operational due to a problem OFF Unit is operational when PWR Led is ON MINOR LED Indicates that the MSC card is...

Page 52: ... cards Standby cards do not support services until they transition to the active state Figure 2 7 shows MSC Redundancy Figure 2 7 Redundant MSC 2 5 1 Redundancy support MSC Redundancy support for PM 5000 is as follows A Redundant system should have QWC with WSC 48 Single slot WSC 24 Redundancy is not supported The shelf manager version should greater than or Equal to 17 for MSC and QWC cards The M...

Page 53: ...upplies installed for redundancy 2 7 Power LEDs and ESD connector When power supply A and B are turned on indicates green or off not lit the Power Supply LEDs as indicated in Figure 2 9 display the status of the power supplies Figure 2 9 Front panel Power Supply LEDs and the ESD Connector AC to DC Power Supply AC Power Good LED Handle DC Power Good LED EJectors AC2 Redundant Indicates green when P...

Page 54: ...igned to prevent against accidental enabling of the Hot Swap function through normal handling of the system NOTE Before you eject and handle and PM5000 card please be sure to put on a anti static wrist strap and attach it to one of the ESD connectors on the PM5000 See Figure 2 9 Doing this will help prevent accidental ESD dam age to the card Sequence of LEDs 1 H S LED 2 Blinking H S LED 3 OSS LED ...

Page 55: ...he card to be removed from the system NOTE If you loose the sequence at any time repeat again from Step 1 Figure 2 10 Ejector for hot swapping WSC Card 2 8 2 WSC S 24 Hot Swap To remove the WSC S 24 cards safely for hot swap follow the instructions below 1 Push in the right hand side ejector arm vertically located at end of the card shown in Figure 2 10 and hold them until the blue H S LED light t...

Page 56: ...tors but not all they way back such that the card gets ejected and wait until the blue H S LED light blinks A blinking H S LED signifies successful completion of the prior steps If you wait too long to pull out both ejector arms the cycle will abort and you will have to repeat this step from the beginning 3 Push in and hold BOTH ejector arms on until the red OSS LED turns ON At this time the card ...

Page 57: ...m the fan units blow only over the inserted cards It is critical to have front panels inserted into every open slot Figure 2 11 shows the picture of en empty card inserted in to a base station slot in a PM 5000 four sector BS while Figure 2 12 shows the 12 sector BS 2 10 Fan Unit The PM 5000 uses a hot swappable modular fan unit P N PM5000 FAN 1 that can be replaced while the system is running To ...

Page 58: ... and no flow control 2 Using the serial cable included with the PM 5000 system See Figure 2 14 con nect the cable to the DB9 serial port on your computer and to the RS 232 RJ11 Jack on the PM 5000 system Operation of the CLI which can also be accessed from the Ethernet port using Telnet is discussed in Appendix C of this manual Please refer to PacketMax CLI Reference Manual for further information...

Page 59: ...he antenna and issuing CLI commands 2 11 1 Serial Connection Instructions Table 2 I shows the pinout of the serial connection needed to build a serial cable Table 2 I Serial Cable Connector Pinouts Figure 2 15 shows a DB 9 and RJ11 Cable Pin out Figure 2 15 DB 9 Female and RJ 11 Male pinout DB9 Female Connector on computer RJ11 Male Connector on the MSC card 1 2 3 3 2 4 5 5 6 7 8 9 ...

Page 60: ...tation grounding lug and earth ground the other side of the cable 2 12 2 DC Power Connection A DC powered PacketMAX 5000 includes two redundant 3 pin terminal blocks on the rear panel These terminals are labeled and GND DC Power is provided externally to the base station if DC chassis is being used and there is no power supply provided in the chassis To apply power to the PacketMAX 5000 screw in s...

Page 61: ...320 plug This port also contains an On Off switch Figure 2 17 shows the AC input in PacketMax 5000 If two AC power supplies are in use only then the users can have power redundancy In the case that one AC chassis is in use at least one AC power supply is required NOTE If you are using DC power to the BS both power connectors on the back of the BS have to be connected to power outlets for the power...

Page 62: ...this fuse blow determine and correct the cause if possible Then replace the fuse as follows 1 Disconnect the BS s AC power cord 2 Remove the fuse holder 3 Remove the fuse from the clips that hold it and verify that the fuse has blown 4 Place a new fuse in the clips 5 Snap the fuse holder into the opening in the rear panel 6 Reconnect the Base Station Unit s power cord 2 14 Base Station Radio The B...

Page 63: ...dulated signal and the telemetry signals The telemetry signals are used for communication between BSR and WSS for controlling the RF parameters and also for reporting radio status NOTE A 1 m cable would have a loss of 0 5 dB For more details on cable losses please refer to the Maximum Allowable Cable Loss for IF Cable section See Chapter 3 Installing Radios and Antennas for information and details...

Page 64: ...2 26 PacketMax 5000 Installation and Operation Manual 10007678 Rev J Chapter 2 Base Station Components ...

Page 65: ...ualified professionals following all safety and other requirements and acting in accordance with standard practices and procedures Failure to meet safety requirements and or use of non standard practices and procedures could result in personal injury and or damage to equipment All of the instructions presented in this chapter are discussed in more detail in subsequent chapters of this manual and i...

Page 66: ...s Ideal 35 418 Crimp Tool for LMR300 400 connectors Times Micro wave CT 300 400 3190 406 DEBURRING TOOL FOR LMR400 500 600 Times Micro wave DBT 01 Cable Preparation Tool for LMR 400 attachment of CRIMP style connectors Times Micro wave ST 400EZ Plastic Pipe Scissors Cutter Capacity 1 1 4 Inches Replaceable Stainless Steel Folding Cutting Blade Rigid BK125S Type F Male Connectors Times Micro wave E...

Page 67: ...erto Networks Customer Service can provide training and assistance if needed C Make sure all subscriber sites have an appropriate radio antenna support or mounting location WARNING Each Base Station is required to have lightning protection Instruc tions and specific example of lightning protection equipment is con tained in the Surge Protection document This document is included in the CD that shi...

Page 68: ...w on to the rack Figure 3 2 Mounting Base Station PM 5000 C Ground the Base Station i Using the ground lug located in the lower left side of the back panel See Figure 3 3 ground the base station using either a 10 or 12 Gauge standard insulated copper wire ii Be sure to observer all grounding and lightning requirement as described in Chapter 4 Table 3 B Parts List and Part Numbers Parts Part Number...

Page 69: ...d installing the MSC and WSC cards be sure to ground your self by attaching a ESD strap to your wrist and connecting it to one of the ESD connectors See Figure 3 4 Figure 3 4 Ground Strap Connector Front and Rear Panel D Install WSC cards in to the slots 2 3 4 or 5 of the PM 5000 chassis Figure 3 6 shows 3 WSC card and 2 MSC cards E Similarly each WSC S 24 has two ejector arms See Figure 3 6 locat...

Page 70: ...er can be used to further secure the card if required F Install MSC has two ejector arms as well cards in to slot 1 and 2 Figure 3 6 shows insertion of the MSC card Figure 3 5 Insterting WSC MSC and filler panels in to PM 5000 4 sector Figure 3 6 Insterting WSC MSC and filler panels in to PM 5000 12 sector MSC ESD Connector Ground WSC 24 Filler Panels MSC ESD Connector Ground QWC WSC S 24 ...

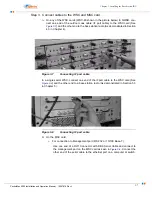
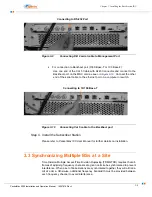
Page 71: ...ed in Section 4 3 in Chapter 4 Figure 3 7 Connecting IF port cable In a single sector WSC connect one end of the IFport cable to the WSC card See Figure 3 8 and the other end to a base station radio As demonstrated in Section 5 3 in Chapter 5 Figure 3 8 Connecting IF port cable B On the MSC card i For connection to Management port RS 232 or 10 100 Base T Use one end of a RJ11 Connector with DB 9 S...

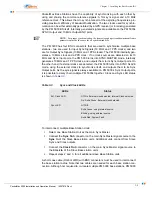
Page 72: ...gure 3 10 Connecting Cat 5 cable to the Backhaul port Step 4 Install the Subscriber Station Please refer to PacketMax 100 User Manual for further details on installation 3 3 Synchronizing Multiple BSs at a Site Time Division Multiple Access Time Division Duplexing TDMA TDD requires that all frames of adjoining frequency channels at a given cell site be synchronized to prevent interference When a s...

Page 73: ...10 MHz and 1 PPS clocks and outputs them to its Sync Output ports On the other hand if external clocks are detected the PM 5000 turns into SYNC SLAVE mode using the external clocks to synchronize itself and outputs them to its Sync Output ports As the sync signal is always available on PM 5000 s Sync Output ports it is possible to daisy chain multiple PM 5000s together Clock and Sync LED status is...

Page 74: ...stalling the Base Station IDU can support external clock resources like those generated from a GPS receiver that meet the requirements NOTE A 1 m cable would have a loss of 0 5 dB For more details on cable losses please refer to the Maximum Allowable Cable Loss for IF Cable section ...

Page 75: ...ax base station antennas and radios are designed for mounting outdoors on common antenna masts and include mounting brackets for such mounting Differ ent mounting hardware can be substituted as appropriate for your antenna support This chapter consists of the following topics Radio Compatibility Installing the Antenna Installing the Base Station Radio ODU Grounding the PacketMax System 4 ...

Page 76: ...ns when installing WARNING Be sure that the antenna mounting system is appropriate for the weights and wind resistance of all of the antennas and radios to be installed on it and for local environmental conditions WARNING Outdoor installation procedures should be performed by quality pro fessionals following all safety and other requirements and acting in accordance with standard practices and pro...

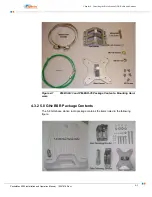
Page 77: ...8 Rev J Chapter 4 Installing the Base Station ODU Radio and Antenna Figure 4 1 PM BSR 33 and PM BSR 35 Package Contents Mounting Hard ware 4 3 2 5 8 GHz BSR Package Contents The 5 8 GHz base station radio package contains the items listed in the following figure ...

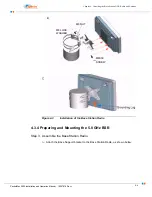
Page 78: ...rews B Attach the grounding lug to the radio as shown in Figure 4 2 PM BSR 33 and PM BSR 35 NOTE The grounding lug does not exist on the BSR the customer must install it C Provide a proper grounding conductor NEC Section 810 21 long enough to reach from the Outdoor Unit to the earth ground Color of the insulator of Ground ing conductor should be Green with Yellow strip The size of the grounding wi...

Page 79: ...tion Radio A Unscrew the Warm Gear Clamps Slip it in the Arm Bracket holes B Wrap it around the pole and screw it tightly C Insert M5 screws through the bracket to the unit Tighten the screws D Attach Arm Bracket to the Base Support Insert M8x40 mm screw no washer required on this end from one end of the bracket and insert M8 Flat Washer M8 Lock Washer and M8 Hex nut in the respective order from t...

Page 80: ...ing the Base Station ODU Radio and Antenna Figure 4 3 Installation of the Base Station Radio 4 3 4 Preparing and Mounting the 5 8 GHz BSR Step 3 Assemble the Base Station Radio A Attach the Base Support bracket to the Base Station Radio as shown below M8 NUT M8 LOCK WASHER M8X50 SCREW B ...

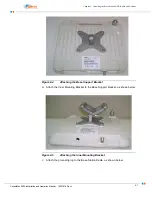
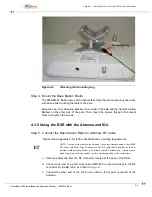
Page 81: ...lling the Base Station ODU Radio and Antenna Figure 4 4 Attaching the Base Support Bracket B Attach the Inner Mounting Bracket to the Base Support bracket as shown below Figure 4 5 Attaching the Inner Mounting Bracket C Attach the grounding lug to the Base Station Radio as shown below ...

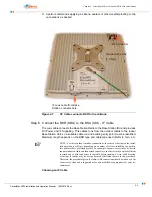
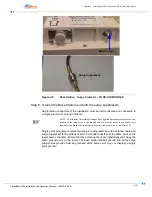
Page 82: ...with the Antenna and IDU Step 5 Connect the Base Station Radio to Antenna RF Cable Please follow Appendix C for further specifications on cabling requirements NOTE To connect the radio to the antenna Aperto recommends using a short LMR 600 Cable with Male Type N connectors The RF cable should be made as short as possible without sharp bends to minimize cable RF attenuation Aperto recom mends apply...

Page 83: ... and cable type used Refer to Table 4 2 NOTE For these outdoor to indoor connections the order of the steps in the instal lation procedure will vary depending on a number of factors including site particu lars and installers preferred practice For example in some cases it may be best to run unterminated cable and then attach connectors in others it may be more efficient to attach one or both conne...

Page 84: ...based on a nominal Base Station Radio operating voltage of 52 Volts DC and 75 duty cycle Apart from the above recommended cable loss characteristics the RF shielding capa bility of the cable should be least 90 dB or better As a last note choice of quality connectors and cables with good weatherability and outdoor rated is highly recom mended for reliable performance of the system Typical cable len...

Page 85: ...n the card for the appropriate Radio port on the Base Station Unit G Dress the indoor portion of the cable as appropriate H Seal the entry of the radio signal and control cables to the building as appropriate Step 7 Connect Surge Suppressors To connect the relevant Base Station Sector to its BSR requires three lengths of cable plus two lightning surge suppressor units Figure 4 1 shows the illustra...

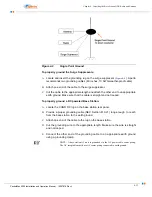
Page 86: ...currents the con nection of the suppressor to the ground network must be as short as possible less than 50cm and have the largest possible cross sectional area at least 4mm 2 Single point grounding requires that the grounding leads from the antenna radio and surge suppressor for a particular sector be bonded together at the same point on the tower down conductor Ensure that the components of any i...

Page 87: ...earth ground Make sure that the cable is straight and not looped To properly ground a DC powered Base Station A Locate the CGND DC lug on the base station rear panel B Provide a proper grounding cable NEC Section 810 21 long enough to reach from the base station to the earth ground C Attach one end of the cable to the lug on the base station D Cut the grounding wire to the appropriate length Make ...

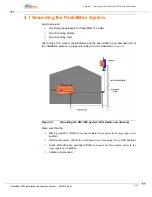
Page 88: ...tenna and the base station is an essential part of the installation process A proper grounding circuit is illustrated in Figure 4 1 Figure 4 1 Grounding the PM 3000 System IDU Radio and Antenna Make sure that the IDU is grounded Refer to Ground the Base Station and both the surge suppressors section ODU is grounded Refer to Attach Bracket and Grounding Wire to BSR section Surge Protectors are grou...

Page 89: ...agement System EMS and finally verifying operations This chapter covers the following topics Summary of Configuration of Base Station Establishing an Ethernet Connection with Cat 5 Cable Establishing a Serial Connection to the Base Station Configuring DHCP Obtaining the MAC Address of the Base Station Selecting Management or Data Traffic Provisioning the Base Station with WaveCenter EMS Rebooting ...

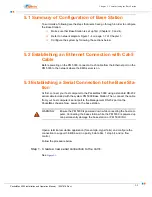
Page 90: ...S server is on 5 3 Establishing a Serial Connection to the Base Sta tion At first connect your host computer to the PacketMax 5000 using a standard RS 232 serial cable included with the system PM 5000 Base Station Then connect the cable from your host computer s serial port to the Management RS 232 port on the PacketMax chassis Now power on the base station WARNING Ensure the PM 5000 is powered do...

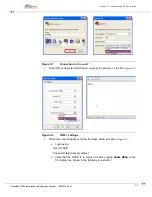
Page 91: ... Set COM1 settings to 38 400 baud no parity 8 data bits 1 stop bit Figure 5 2 Figure 5 2 COM 1 settings 2 When the console appears follow the steps below as seen in Figure 5 2 a Login using User ID ISP Password isp Case Sensitive b Verify that the DHCP is in Server mode by typing show dhcp at the CLI prompt as shown in the following screenshot ...

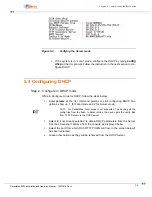
Page 92: ...Enter params at the CLI command prompt to start configuring DHCP Two options show up 1 for Local mode and 2 for Server mode NOTE For PacketMax Local mode is not supported The device gets the config files from the flash In Server mode the device gets the config files from TFTP Server via the DHCP server 2 Select 2 if not already selected to obtain DHCP parameters from the Server See the screenshot ...

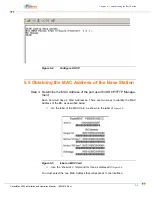
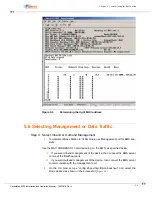
Page 93: ...ine the MAC Address of the port used for DHCP TFTP Manage ment Each Card will have 4 MAC Addresses There are two ways to identify the MAC Address of the BS as described below On the label of the MSC Card as shown in the label of Figure 5 5 Figure 5 5 label on MSC Card Use the show msc command for this as displayed in Figure 5 6 You must select the one MAC Address that corresponds to the Interface ...

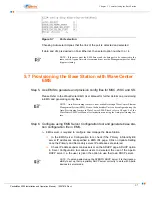
Page 94: ...tion in VLAN mode use Management port for EMS sep erate Use the MAC ADDRESS for Commissioning on the EMS as specified below If you want inband management of the device then connect the EMS server to one of the Backhaul ports If you want outband management of the device then connect the EMS server to communicate with the management port 2 On the CLI prompt type config dhcp dhcp tftp on backhaul and...

Page 95: ... System EMS Hence the Subscriber Unit can be configured using the Auto Provisioning feature in WaveCenter EMS Please refer to Chapter 4 of the WaveCenter EMS User Manual for instructions on using the Auto provisioning fea ture Step 6 Configure using EMS Server Configuration tool and generate base sta tion configuration file in EMS A EMS server is required to configure and manage the Base Station I...

Page 96: ...de the default gateway could be the IP address of the Base Sta tion s Wireless Subsystem WSS that the Subscriber Unit connects to Config ure atleast one upstream and one downstream Service Flow in the Subscriber Unit Configuration file NOTE In EMS SS configuration System pane check the configure DHCP box to switch to server mode Refer to Chapter 4 in the WaveCenter User Manual for details on SS co...

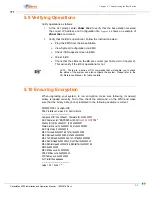
Page 97: ...igure the system Please refer to the CLI Reference Manual for further details 5 10 Ensuring Encryption When upgrading your system to run encryption make sure following or newer binary is loaded correctly To do this check the command on the WSC and make sure that the binary date in red indicated in the following example is current PM5000 WSC 1 dumpArcCB PSAP Interface Version 2 3 Control Block Comp...

Page 98: ...ade utility to upgrade a BS 5 11 1 WSC upgrade To upgrade WSC 1 Log on to the PM 5000 WSC card using a ftp server For example WS_FTP is used here Enter the Profile Name Host Name Address and user name pass word The user name is target wsc card number for example target 1 Figure 5 9 shows the general session properties screen on WS_FTP Click OK Figure 5 9 General session page WSC upgrade 2 Copy the...

Page 99: ...le to the tffs0 of the WSC Card Figure 5 11 shows the ftp screen once the transfer is done 5 Click on the Close button and then click on the Exit button on the WS_FTP client Figure 5 11 Ftp page WSC upgrade 6 Open the telnet session by going on command prompt to the PM 5000 WSC card Type telnet Host Address For example telnet 10 226 0 5 5001 at the C prompt Figure 5 12 displays the telnet session ...

Page 100: ...mmand prompt sysBootImangePut tff0o bootrom_wsc bin 9 Exit from the telnet session 10 Repeat steps 1 9 for upgrading all WSC cards Figure 5 12 Telnet page WSC upgrade 5 11 2 MSC Upgrade To upgrade MSC 1 Log on to the PM 5000 MSC card using a ftp server For example WS_FTP is used here Enter the Profile Name Host Name Address and User ID Pass word The user name is target Figure 5 9 shows the general...

Page 101: ... files to the PM 5000 MSC Card in tffs0 folder Figure 5 14 displays this startup session page Click on OK The WS_FTP screen opens Figure 5 14 Startup session page MSC upgrade 3 Select the Customer_CD PacketMax directory and click on the bootrom folder and copy bootrom_msc bin file to the tffs0 of the MSC Card 4 Go to the msc folder and copy msc1_0_0 D file to the tffs0 of the MSC Card ...

Page 102: ...he WSC card number and the Login prompt will appear The Login is isp and password is isp The PM 5000 command prompt will show up when login is successful 9 Program the MSC bootrom by typing sysBootImangePut tffso bootrom_wsc bin at the command prompt The password prompted for is otre paotrepa Figure 5 16 displays the telnet session A message shows Are you sure you want to continue Y N Type Y It ma...

Page 103: ...5 15 PacketMax 5000 Installation and Operation Manual 10007678 Rev J Chapter 5 Commissioning the Base Station Figure 5 16 Telnet page MSC upgrade ...

Page 104: ...5 16 PacketMax 5000 Installation and Operation Manual 10007678 Rev J Chapter 5 Commissioning the Base Station ...

Page 105: ... or closed depending on the state and are entirely under software control The default is no alarm state This includes both power off and power on not the initialized state Figure A 1 shows the telco port Figure A 1 Telco Port and Alarm port on the MSC Card Following are the electrical specifications The alarm signals are connected to a set of dry relays that should be capable of carrying up to 75 ...

Page 106: ...y be as high as 12mA with no damage resulting from a reversal in polarity A 2 PacketMax 5000 and PacketMax 100 Alarms Table A 2 shows the MSC Alarms that are generated in the base station Table A 3 shows the WSC Alarms that are generated in the base Station NOTE Events are highlighted in brackets in the following tables Table A 1 Pin Description of Telco Pin Description 1 Minor Reset 2 Minor Reset...

Page 107: ...C Link Down Indicates that MSC WSC Card is either inserted or removed Fan 1 Issue EVENT FAN 1 ShM This indicates Fan 1 is NOT working Replace the Fan card Contact Aperto Fan 2 Issue EVENT FAN 2 ShM This indicates that Fan 2 NOT working Contact Aperto Temperature Change EVENT ROOM TEMP CHANGE EVENT CPU TEMP CHANGE Room or CPU Temperature is either above or below accept able levels FTP Download Fail...

Page 108: ...s is UP Mgmt Port Link Status is DOWN Link Up Mgmt Port Operat ing in Full Duplex Mode Link Up Mgmt Port Operat ing in Full Duplex Mode Link Up Mgmt Port Operat ing at 100 Mbps Link Up Mgmt Port Operat ing at 10Mbps One of the following on the management port has changed Speed Mode Duplex If not indicated check network MSC Backhaul Port Mode Change 1G Backhaul Link Down 1G Backhaul Link Up 10 100 ...

Page 109: ...ble to download WSC configuration file from the TFTP server Check Network topol ogy Make sure that TFTP server is acces sible from Base Sta tion WSC Cfg File Parse Status WSC Cfg File Parse Failure WSC Cfg File Successfully Parsed Config file is not generated correctly Re check your config uration WSC Configured Card not Present WSC Port No Port No is Configured but NOT Present WSC card is not ava...

Page 110: ...d Reconfigure the radio check radio SS Added SS d Added On WSC Port d Event SS Removed SS d Removed On WSC Port d Users has powered off the SS or the SS cannot talk to the Base Station Check SS configura tion Table A 3 WSC related Alarms Events in PM5000 Continued Table A 4 SS related Alarms Alarm Type Alarm Message in EMS Cause Resolution Ethernet Port Link Change SS Uplink Ethernet Port Change C...

Page 111: ... CPE Id CpeId CPE CFG File Parse Failed File Name CPE Mac Addr Mac Addr CPE Id CpeId SS Added On WSC Port portNo CPE Mac Addr Mac Addr CPE Id CpeId S Removed On WSC Port portNo CPE Mac Addr Mac Addr CPE Id CpeId Uplink Burst Profile Changed Old Value Old Value New Value New Value CPE Mac Addr Mac Addr CPE Id CpeId Ranging Aborted CPE Mac Addr Mac Addr CPE Id CpeId Downlink Burst Profile Change Old...

Page 112: ...ddr Description CPE Mac Addr Mac Addr Wait for DSA DSC Acknowledge Timer Expired CPE Mac Addr Mac Addr Initial Ranging Success CPE Mac Addr Mac Addr Ranging Aborted CPE Mac Addr Mac Addr Re Range Request CPE Mac Addr Mac Addr SS search for preamble Timer expired CPE Mac Addr Mac Addr Wait for DCD Timer expired CPE Mac Addr Mac Addr Wait for Broadcast Ranging Timer expired CPE Mac Addr Mac Addr Wai...

Page 113: ...received CPE Mac Addr Mac Addr DSD REQ received CPE Mac Addr Mac Addr DSD RSP received CPE Mac Addr Mac Addr SBC REQ queued CPE Mac Addr Mac Addr REG REQ queued CPE Mac Addr Mac Addr Establishing provisioned connection CPE Mac Addr Mac Addr Wait for DSA DSC DSD Response Timer Expired CPE Mac Addr Mac Addr Wait for Trasaction End Timer Expired CPE Mac Addr Mac Addr Wait for DSA DSC Acknowledge Time...

Page 114: ...A 10 PacketMax 5000 Installation and Operation Manual 10007678 Rev J Chapter A Event Reporting ...

Page 115: ...agement interface B 1 Accessing the CLI To access and use the Base Station Unit s command line interface 1 Telnet to the Base Station Unit s IP address or connect directly to the RS 232 craft port 2 At the Login prompt enter ISP There is also a Debug logon level which is re served for Aperto use NOTE All CLI entries including logon level and password are case sensi tive 3 At the Password prompt en...

Page 116: ...tion and Operation Manual 10007678 Rev J Chapter B Command Line Interface CLI Figure B 1 Examples of BS Command Line Interface CLI B 2 Commands PacketMax 5000 CLI commands are defined in Table B 1 All commands are case sensitive ...

Page 117: ...t will change to include that partial command in parentheses For example CLI show CLI show If a partial command is typed and is pressed options for the next part of the com mand will be listed and the prompt will change to include that partial command fol lowing For example CLI show In either case the user then enters the rest of the desired command NOTE When the prompt includes part of a command ...

Page 118: ...tered incor rectly Not applicable for BS command applies to SS CLI only Passwords are not the same when setting a password two password entries do not match NOTE The highest priority in Aperto Networks system is passing of traffic The command line interface will be slow to respond if all bandwidth on the ports is flooded This will most likely happen in denial of service attacks from the users and ...

Page 119: ...sories Table C 8 identifies accessories that will simplify cable installation Table C 1 PacketMax 5000 Multi Sector Base Station IDU Factory Integrated Build to order Systems Part Number Product Description PM5000X BASE CHASSIS DC2 PM 5000 CHASSIS DC Power Option NR Includes ATCA Chassis CD ROM Fan Unit PM5000X BASE CHASSIS AC PM 5000 CHASSIS AC Power Option NR Includes ATCA Chassis CD ROM Fan Uni...

Page 120: ...MSC Card GBE Copper 10 100 1000 NR SPARE Includes Software License for 100 CPEs PM5000X WSC S 24 SPARE PM 5000 WSC Wireless System Controller NR SPARE PA FUSE PM 5000 Replacement Fuse for PM 5000 IDU AC Chassis Table C 3 PacketMax 5000 CPE Upgrade Licenses Part Number Product Description CLK PM5000 B PM5000 Mode B up to 200 CPE License CLK PM5000 C PM5000 Mode C up to 400 CPE License CLK PM5000 D ...

Page 121: ...0 to F product maximum CPE License Upgrade CLK PM5000 E F PM5000 Mode E 1200 to F product maximum CPE License Upgrade Table C 3 PacketMax 5000 CPE Upgrade Licenses Part Number Product Description Table C 4 PacketMax Base Station Radios for PM5000 Part Number Product Description PM BSR 35X PacketMAX 3 4 3 6GHz Base Station Radio PM BSR 33X PacketMAX 3 3 3 4GHz Base Station Radio PM BSR 58 PacketMAX...

Page 122: ...A CONN LMR400 F Connector for LMR400 75 Cable Female F Type PA TOOLS LMR400 Cable Install Kit LMR400 75 Crimp Tool Cable Prep and Debugging Tool PM BSR MOUNT Pole mounting bracket for Base Station Radio PA CABLE LMR400 01 IF Cable outdoor rated high quality coax 1000 feet PA CONN LMR400 F F Type Connectors one connector two needed for IF Cable Table C 5 PacketMax Base Station Antennas Part Number ...

Page 123: ...ion PM5000 CHASSIS AC PM 5000 AC Chassis with Fan Unit Note Does not include an AC power supply PM5000 AC 220 1 PM 5000 AC Power Supply SPARE PM5000 FAN 1 PM 5000 Fan Unit Module w filter and filter carrier SPARE PM5000 FANFILTER 10PK PM 5000 Fan Air Filter 10 pack PM5000 FRONTPANEL PM 5000 Front Panel Filler Panel PM5000 FRONTPANEL 5PK PM 5000 Front Panel Filler Panel 5 pack ...

Page 124: ...C 6 PacketMax 5000 Installation and Operation Manual 10007678 Rev J Chapter C Cables Spares and Accessories ...

Page 125: ...ations System Specifications This appendix provides complete system specifications such as the following Physical interfaces of PM 5000 12 sector Physical interfaces of PM 5000 4 sector QoS and Networking Parameters Dimensions and Weight Radio Specifications Transmit Output Power Regulations D ...

Page 126: ...net Header and excluding the FCS RJ45 Shielded Main Manage ment RS 232 Serial RS232 RJ11 SYNC Main Main Sync Input Pulse Per Second PPS 1 Hertz TTL Voltage Levels BNC Input Male 50 Ohm SYNC PW1000 Out Main Sync Output Pulse Per Second PPS 1 Hertz TTL Voltage Levels Use this port to Daisy Chain to Another PM5000 Unit or Future PM3000 device Note This port is also reserved for synchronization with P...

Page 127: ...LF MAN AGER TELCO Dry Relay Alarm Ports Mini Sub D 15 Pin Female SHELF MAN AGER 10 BaseT 10 Base T Ethernet Not Supported For Internal Use Only RJ45 Shielded SHELF MAN AGER RS232 Serial RS232 Port Not Supported For Internal Use Only Audio Jack Female 3 5mm WSC 48 IF IF Port for Connection to Base Station Radio 20 MHz Reference Signal 70 MHz IF Signal 260 and 420 MHz Telemetry 52 Volt DC Output Vol...

Page 128: ...RF Antenna Port Type N Female 50 Ohm IF IF Port 70 MHz IF Signal and 24 Volt DC Output Volt age Type F Male 75 Ohm Maximum IF Cable Length LMR600 Heliax 250 Meters LMR400 200 Meters Management Serial Management Port Not Supported For Internal Use Only Mini Sub D 9 Pin Table D 1 Specifications for Interfaces of PM 5000 12 sector ...

Page 129: ...n Man agement 10 100 Base T 100 10 Base T Ethernet Maximum IP Packet Size 1 548 bytes including the Ethernet Header and excluding the FCS RJ45 Shielded Main Man agement RS 232 Serial RS232 RJ11 SYNC Main Main Sync Input Pulse Per Second PPS 1 Hertz TTL Voltage Levels BNC Input Male 50 Ohm SYNC PW1000 Out Main Sync Output Pulse Per Second PPS 1 Hertz TTL Voltage Levels Use this port to Daisy Chain ...

Page 130: ...imum rated conditions for extended periods may affect device reliability Power consumption for the PacketMax 5000 base station is a function of the number of provisioned MSC cards backhaul as well as provisioned WSC channel elements Base Sta tion Radio Antenna RF Antenna Port Type N Female 50 Ohm IF IF Port 70 MHz IF Signal and 24 Volt DC Output Voltage Type F Male 75 Ohm Maximum IF Cable Length L...

Page 131: ...r SS Unmanaged SS 15 9 Max User Service Flows unidirectional per SS Managed SS 14 8 Max User Service Flows per Wireless Sector Unidirectional Unmanaged 7 680 n a Max User Service Flows per Wireless Sector Unidirectional Managed 7 168 n a Max QoS Classifiers per Wireless Sector WSC 8 000 n a Max QoS Classifiers per BSU 96 000 n a Max QoS Classifiers per SS Downstream 16 n a Max QoS Classifiers per ...

Page 132: ...IS AC 30 13 6 19 x 17 x 8 6 482 x 431 x 218 PM5000 BASE CHASSIS AC2 33 15 19 x 17 x 8 6 482 x 431 x 218 PM5000 MSCC 5 2 3 12 6 x 11 75 x 1 3 320 x 298 x 33 PM5000 WSC S 24 5 2 3 12 6 x 11 75 x 1 3 320 x 298 x 33 PM5000X BASE CHASSIS DC2 27 12 2 19 x 17 x 8 6 482 x 431 x 218 PM5000X BASE CHASSIS AC 30 13 6 19 x 17 x 8 6 482 x 431 x 218 PM5000X BASE CHASSIS AC2 33 15 19 x 17 x 8 6 482 x 431 x 218 PM...

Page 133: ...ions 4 6 1 2 Transmitter Specifications Table D 9 Transmitter Specifications General Specifications Frequency Range 3 300 to 3 400 GHz and 3 400 to 3 600 GHz Channel Bandwidth 3 0 3 5 5 0 5 5 and 7 0 MHz Antenna Port Return Loss 10 db Access Method TDD Transmitter Specifications Output Power Guaranteed avg Pout QPSK3 4 20 dBm 16 QAM3 4 20 dBm 64 QAM3 4 20 dBm Frequency Step Size 250kHz Transmit Po...

Page 134: ...ions Rx Input Dynamic Range 65 dB Max Rx Input Power Operational 30dBm Max Rx Input Power No Damage 0dBm Phase noise 10 KHz offset 85 dBc Hz 100 KHz offset 100 dBc Hz 1 MHz offset 105 dBc Hz Rx Noise Figure Hi signal input 30 dBm 36 dB Lo signal input 70 dBm 4 5 dB Sensitivity 3 5 MHz 5 5 MHz 7 0 MHz Future QPSK 1 2 92 1 90 0 89 0 QPSK 3 4 89 6 87 5 86 5 16QAM 1 2 86 6 86 6 83 5 16QAM 3 4 83 1 81 ...

Page 135: ...3000 because these radios support the higher DC voltage input range The usage of radios that only support up to General Specifications Power Consumption 30 Watts IF Frequency 70 MHz Connectors IF Female Type F Connectors Antenna Female Type N Pole Mount Dimension Max Min 2 5 inches to 4 5 inches Base Station IDU and BSR Part Numbers Weight Lbs Kg Dimensions inches Dimensions millimeters PM BSR 33 ...

Page 136: ...ifications Table D 16 General Specifications Operating Temperature 35 C TO 60 C Storage Temperature 40 C to 125C Storage and Transit Altitude ASTM D6653 Relative Humidity 0 100 Operating Altitude 10 000 feet Wind 125mph Water IP65 Humidity 5 95 Dust IP65 Salt MIL STD 883E 3 23C for 96hrs Transit and Vibration ASTM D3580 Spurrious Emissions IAW CEPT ERC REC 74 01E Safety Standards EN 609501 1 2002 ...

Page 137: ...dBm Frequency Step Size 500kHz Transmit Power Accuracy 1dB Max output power 3dB over full range Manual SW TX Attenuation 30dB Frequency Stability 4 ppm Phase noise 10 KHz offset 82 dBc Hz 100 KHz offset 96 dBc Hz 1 MHz offset 105 dBc Hz Receiver Specifications Rx Input Dynamic Range 60 dB Max Rx Input Power Operational 35dBm Max Rx Input Power No Damage 0dBm Phase noise 10 KHz offset 85 dBc Hz 100...

Page 138: ...radios support the higher 16QAM 1 2 83 90 5 81 5 86 6 16QAM 3 4 80 87 4 78 0 82 3 64QAM 2 3 76 83 6 74 0 78 2 64QAM 3 4 74 81 4 73 0 73 7 Modulation 3 5 MHz 5 0 MHz 5 5 MHz 7 0 MHz 1st Adjacent Channel 2nd Adjacent Channel 16QAM 3 4 13dB 32dB 64QAM 3 4 6dB 25dB General Specifications Power Consumption 30 Watts IF Port Frequencies 70 MHz Reference SIgnal 30 MHz Signal 280 420 Telemetry signal Conne...

Page 139: ... radio 4 6 2 15 Environmental Table D 23 Environmental Specifications Operating Temperature 35 C TO 60 C Storage Temperature 40 C to 125C Storage and Transit Altitude ASTM D6653 Relative Humidity 0 100 Operating Altitude 10 000 feet Wind 125mph Water IP65 Humidity 5 95 Dust IP65 Salt MIL STD 883E 3 23C for 96hrs Transit and Vibration ASTM D3580 Spurrious Emissions IAW CEPT ERC REC 74 01E Safety St...

Page 140: ...n 16 dBi Beamwidth Azimuth Elevation 60º 8º Polarization Dual PWA3300D 90 sector 90º Frequency range 3 3 3 8 GHz Nominal Gain 15 5 dBi Beamwidth Azimuth Elevation 90º 8º Polarization Dual Country US PWA3500V 120 sector 120º Frequency range 3 3 3 8 GHz Nominal Gain 13 dBi Beamwidth Azimuth Elevation 120º 7º Polarization Vertical PWA3500V 360 sector 360º Frequency range 3 4 3 7 GHz Nominal Gain 10 d...

Page 141: ... 5 725 5 875 GHz Maximum Gain 16 dBi 17dBi typical Beamwidth Azimuth Elevation 90º 8º Polarization Dual PWA5800V 360 sector 360º Frequency range 5 725 5 875 GHz Maximum Gain 12 dBi Beamwidth Azimuth Elevation 360º 4 8º Polarization Vertical Table D 24 Antenna Specifications Antenna Type Antenna Gain 3 and 5 MHz Channels 5 MHz Channels 7 MHz Channels Omni 13 dBi 22 dBm 20 7 dBm 19 7 dBm Panel 16 5 ...

Page 142: ...w of the Wave Center EMS Pro For more information on WSS configuration refer to Configuring a Wireless Subscriber Sector WSS section of the WaveCenter EMS Pro User Manual The following table lists the EIRP limits for various countries EIRP Limit dBm Band US Canada EU 902 928 MHz 36 NA 2 4 2 4835 GHz Point to Multipoint 36 20 2 4 2 4835 GHz Point to Point When G 6 36 When use the following equation...

Page 143: ...E 1 PacketMax 5000 Installation and Operation Manual 10007678 Rev J Certifications E 1 PacketMax 5000 Wimax Forum Certificate E ...

Page 144: ...ided with the package Redistribution and use in source and binary forms with or without modification are permitted provided that the following conditions are met 1 Redistributions of source code must retain the copyright notice this list of conditions and the following disclaimer 2 Redistributions in binary form must reproduce the above copyright notice this list of conditions and the following di...

Page 145: ...INESS INTERRUPTION HOWEVER CAUSED AND ON ANY THEORY OF LIABILITY WHETHER IN CONTRACT STRICT LIABILITY OR TORT INCLUDING NEGLIGENCE OR OTHERWISE ARISING IN ANY WAY OUT OF THE USE OF THIS SOFTWARE EVEN IF ADVISED OF THE POSSIBILITY OF SUCH DAMAGE The licence and distribution terms for any publically available version or derivative of this code cannot be changed i e this code cannot simply be copied ...

Page 146: ...E 4 PacketMax 5000 Installation and Operation Manual 10007678 Rev J Chapter E Certifications ...

Page 147: ...t Frequency Check AIM has the correct values for all these factors and if they are correct then check the settings in WSS config file in EMS Incorrect Channel Width Incorrect BS ID BS wireless port is not operational The SS is out of range from the BS and is not able to receive any signal from the BS Move the SS to a different location and try again SS is not receiving IP address from the EMS serv...

Page 148: ...ake sure that there is only one dhcp in the server Radio does not initialize WSC and BSR are not connected prop erly Check to see if the cable is properly connected to the WSC and BSR Check to see it meets the distance and cabling specifications listed in this man ual Use a known good WSC or BSR to isolate the failing portion TFTP failure Config files are not in the right location and Backend Serv...

Page 149: ... Indicates red only when the system is out of service Out of service indicates red when the shelf manager detects that there is a problem For example the power is missing or the MSC card has functionality issues Remove the card only when OOS shows red This indicates that the card it is safe to remove Minor LED Does not indicate orange This LED indicates an orange color only when something is not w...

Page 150: ...F 4 PacketMax 5000 Installation and Operation Manual 10007678 Rev J Chapter F Troubleshooting ...

Reviews: