51
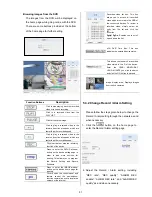
Browsing images from the DVR
The images from the DVR will be displayed on
the home page while going online with the DVR.
There are some buttons provided at the bottom
of the home page for further setting.
Description
Click to stop playing back the recorded
video or to cease recording.
Click to a recorded video from the
PLAY LIST.
Click to freeze the image.
Click to play a recorded video in the
forward direction at speeds which are
faster than the recorded speed.
Click to play a recorded video in the
reverse direction at speeds which are
faster than the recorded speed.
Click to activate or stop the recording
function of the device.
Press to enter the SETUP window,
and open the device setting page in
order to add more devices for
viewing. This allows you to program
the Record Setting and Record
Schedule.
Press to enter the IMAGE window
and open the device home page for
viewing.
Click to open the control panel and
remote control the pan/tilt/zoom
function camera live over a local area
network or the Internet
Recorded video list box. This box
allows you to access all recorded
video which are stored in the HDD of
the connected devices. To review a
recorded video, simply select an
entry from the list and click the
button.
PgUp/ PgDn
: Enables you to scroll
up and down the list.
4CH DVR Time Box. This box
indicates the selected device status.
This allows you to search a recorded
video stored in the D of the device.
Enter the YEAR/ MONTH/DAY
HOUR: MINUTE you wish to search
and click the GO button to proceed.
Image display area: Displays images
from the 4ch cameras.
5.3.2 Change Record / Alarm Setting
Please follow the steps given below to change the
Record / Alarm setting through the network as and
when necessary.
1. Click the
button on the home page to
enter the Record / Alarm setting page.
2. Adjust the Record / Alarm setting, including
“REC rate”, “REC quality”, “ALARM REC
enable”, “ALARM REC rate”, and “ALARM REC
quality” as and when necessary.
Function Buttons
Summary of Contents for DVR-3024M
Page 2: ......


