background image

BOARD SETTING 


GP-3472/GP-3474/GP-3476 POS Terminal


15


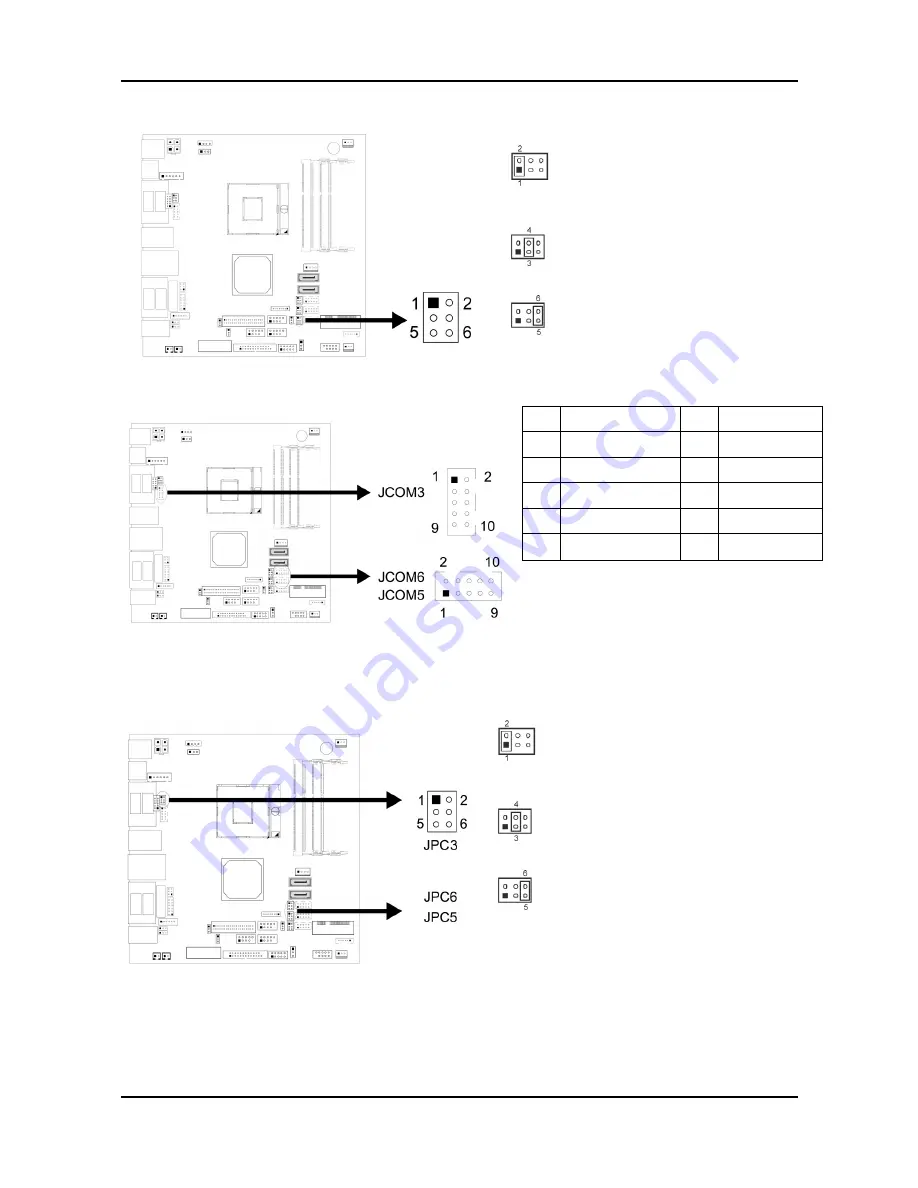
    JPC4

Serial Port Voltage Switch Jumper for JCOM4  


Pin 1-2 Close: Pin 9=0V  


Pin 3-4 Close: Pin 9=5V (Default) 


Pin 5-6 Close: Pin 9=12V 


JCOM3 / JCOM5 / JCOM6: Serial Port Headers 

Pin  Assignment Pin 

Assignment 

1 DCD 

2 RXD 

3 TXD 

4 DTR 

5 GND 

6 DSR 

7 RTS 

8 CTS 

9 0V/5V/12V  10 

NA 


JPC3 / JPC5 / JPC6: Serial Port Voltage Switch Jumper for JCOM3 
/ JCOM5 / JCOM6 


Pin 1-2 Close: Pin 9=0V (Default) 


Pin 3-4 Close: Pin 9=5V 


Pin 5-6 Close: Pin 9=12V 


Summary of Contents for GP-3462

Page 1: ...http www appostar com Grand POS GP 3472 GP 3474 GP 3476 User s Manual Edition Jan 2015 Version 1 0 ...

Page 2: ...disposed of their w recycling ut where city office product G s Comm d found to of the FCC ainst har rates uses sed in acc dio comm ot occur rference to equipment one or m ceiving an etween the to an outl ected xperienced ty of the FC harmful in y interfere ration ement on ensure he same rical an the produ of with o waste eq of waste to send y e your h GP 3472 G missio o comply w C Rules T rmful in...

Page 3: ...t to make improvements to this publication from time to time in the contents hereof without obligation of the manufacturer to notify any person of such revision or changes Copyright This work is copyrighted Reproduction or retransmission of this documentation in whole or in part without prior written permission from the manufacture is a violation of copyright law 2015 APPOSTAR Technology Co Ltd Al...

Page 4: ...if it is dropped damaged or broken The following instructions will help you to make better use of this product 1 Keep the machine away from locations subject to high humidity dust or temperatures that exceed the specification Refer to SEC 1 4 Specification 2 Clean the product only by using a dry cloth or a cloth soaked with detergent Never use thinner or other volatile solvents for cleaning 3 At t...

Page 5: ...INSTALLATION 7 2 1 MAGNETIC STRIPE READER MSR INSTALLATION 7 2 2 VFD LCD CUSTOMER DISPLAY INSTALLATION 8 2 3 SECOND LCD INSTALLATION 9 CHAPTER 3 SOFTWARE INSTALLATION 10 3 1 MAINBOARD DRIVER INSTALLATION 10 3 2 PERIPHERAL DEVICE DRIVER INSTALLATION 12 CHAPTER 4 BOARD SETTING 12 4 1 MAIN BOARD JUMPER SETTING 12 CHAPTER 5 TROUBLESHOOTING 14 ...

Page 6: ...meet t gy saving f Grand P and solid color opti eration en wing items act the de it 2 e User G T OVER One POS the trend low noi POS is sk d stand ons for t nvironmen s are con ealer from Power A 5 Drive r s Manua GP 3472 G RVIEW Terminal for gree se operat killfully em gives yo he front nts ntained in whom yo Adapter r CD l included GP 3474 GP W which is n product tion and mbedded ou flexible pane...

Page 7: ...PRODUCT OVERVIEW GP 3472 GP 3474 GP 3476 POS Terminal 3 1 2 Appearance Front View Rear View 15 LCD touch panel Front bezel Base MSR module optional I O Cover Hinge cover Storage for power adaptor ...

Page 8: ...PRODUCT OVERVIEW 4 GP 3472 GP 3474 GP 3476 POS Terminal Side View Tilt angle 0 85 degree Left View 85 Quick access slot for USB Type A ...

Page 9: ...nector e dual port with D J 45 Conne 2 0 A type ector x 4 n with Audi el port with F Connect sion with the before use D SSD bra al on N x 2 ck 12V DB9 M ector io h tor e LAN port e acket the H o Po Sw VGA PS LA Audi DC O Sto the COM 5 HDD SSD c P ort witch P A OUT D s S 2 P M AN R io out L J Output 1 orage H r is protecte can be easily PRODUCT O Descri Power on o DB15 F VG second disp PS 2 Keybo M...

Page 10: ... PS 2 Keyboard or Mouse VGA Port 1 x VGA DB15 Audio Port 1 x Line in 1x Line out Speaker 2 x Integrated 1 5W Stereo Speaker Ethernet Port 1 x RJ45 10M 100M 1G Base T Parallel Port 1 x Bi directional Parallel Standard USB Port 3 x USB 2 0 2 x USB 3 0 Type A DC output Jack 1 x 12V 2 5A Power Button 1 x power on off switch Optional Peripheral Magnetic Card Reader ISO 7811 option 1 2 3 track Finger Pr...

Page 11: ... the system is powered off and the power cord is disconnected to prevent possible damage to the product 2 1 Magnetic Stripe Reader MSR Installation An optional MSR can be installed at right side of GP 3462 Step 1 Remove the cover from the MSR expansion slot Step 2 Connect the MSR cable correctly Step 3 Fix the MSR module in position with 2 screws ...

Page 12: ... Customer Display Installation Step1 Use flat screw driver to remove the stand cover and break up the lid at the bottom of the cover Step2 Fit in the bracket and screw it tight Step3 Install the VFD onto the bracket and lead the cable through the stand to the RJ45 COM port ...

Page 13: ...se flat screw driver to remove the stand cover and break up the lip at the bottom of the cover Step2 Fit the bracket in position with 2 screws Step3 Reinstall the stand cover Step4 Hang the LCD onto the bracket and REMEMBER to screw it tight Step5 Connect the VGA and power cable to the main screen ...

Page 14: ...utomatically detect it and the Appostar Driver Installer appears on the screen If not locate the Setup exe file at CD and double click it to execute the one step driver installation Follow the on screen instructions to complete the installation 3 1 Mainboard Driver Installation a Please select your model name and click NEXT to continue b Click Drivers icon on the upper left corner to continue c Se...

Page 15: ...POS Terminal 11 f Select Install this driver software anyway in Windows Security window to continue the installation procedure g Select Install in Windows Security window to continue the installation procedure h Select Yes to reboot system ...

Page 16: ... COM Driver Installation a Click Peripheral Devices b Click Touch Panel c Click Next on the Welcome screen to continue d Ignore the Install PS 2 interface driver option Click Next to continue e Select the Install RS232 interface driver option Click Next to continue f Select the None option and click Next to continue ...

Page 17: ...ort Multi Monitor System option Click Next to continue h Select the Destination Folder or use the default one listed i Type a Folder name or use the default one listed Click Next to continue j A progress window appears Please wait k Click Yes The installation completes in seconds ...

Page 18: ...maging the motherboard Clear CMOS Procedures 1 Remove AC power line 2 Set the jumper to Pin 2 3 close 3 Wait for five seconds 4 Set the jumper to Pin 1 2 close 5 Power on the AC 6 Reset your desired password or clear the CMOS data Serial Port Voltage Switch for COM1 COM2 through BIOS setting Enter BIOS Advanced F81866 Super IO Configuration UART1 RI Function for COM1 or UART2 RI Function for COM2 ...

Page 19: ... 4 Close Pin 9 5V Default Pin 5 6 Close Pin 9 12V JCOM3 JCOM5 JCOM6 Serial Port Headers Pin Assignment Pin Assignment 1 DCD 2 RXD 3 TXD 4 DTR 5 GND 6 DSR 7 RTS 8 CTS 9 0V 5V 12V 10 NA JPC3 JPC5 JPC6 Serial Port Voltage Switch Jumper for JCOM3 JCOM5 JCOM6 Pin 1 2 Close Pin 9 0V Default Pin 3 4 Close Pin 9 5V Pin 5 6 Close Pin 9 12V ...

Page 20: ...2 If the touch panel can detect the finger touch but the cursor is drifting use the touch tool from the Driver CD to execute calibration or draw test The Integrated VFD LCD display is not working properly 1 Make sure the power switch under the display panel is turned on 2 Make sure the contrast setting is properly adjusted 3 Make sure the RJ45 connector is firmly connected to the COM2 RJ45 port at...

Reviews: