background image

Prepare A Key

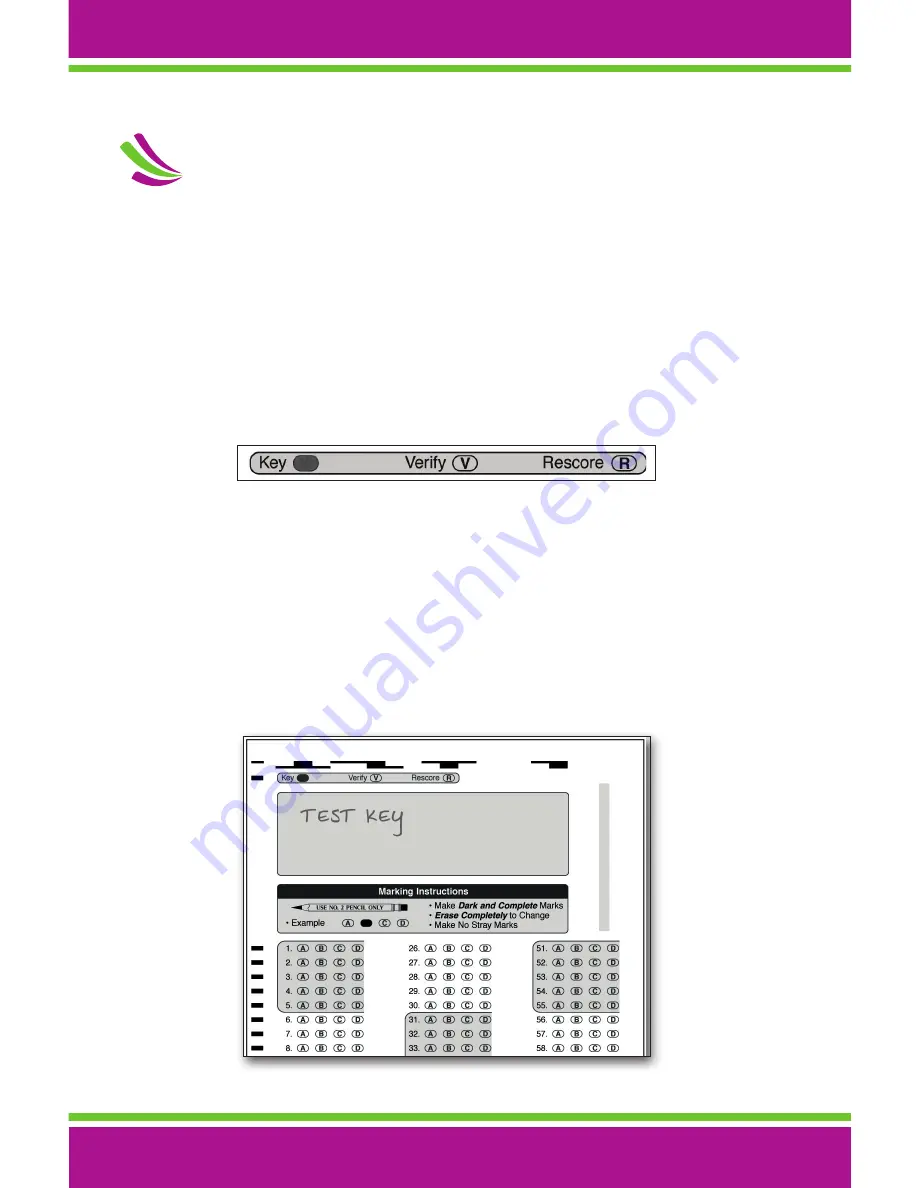
To designate an answer sheet as a key, mark the Key bubble [K] in the keyline as 

shown below.  
When the Verify [V] option is marked on the keyline, correct answers are printed 

on individual student answer sheets.  If the Verify [V] bubble is not marked, a dash 

(-) prints next to incorrect responses.

Mark the Rescore [R] bubble in the keyline to rescore a previously scored test.  

Rescoring a test automatically enables the verify option.

After marking the keyline, fill in the correct answer for each question on the test.  

Multiple marks may be keyed as the correct answer for a question.  Questions 

keyed with multiple marks will be indicated with an ‘X’ printed next to the question 

for verification purposes.

 How To:

7

6

Summary of Contents for Datalink 3000

Page 1: ...Users Manual 800 827 9219 apperson com ...

Page 2: ... Collection and Exporting Using DataLink Connect 5 Additional DataLink Connect Features 5 Test Scoring in Stand Alone Mode 6 How To 7 Prepare A Key 8 Calibrate Your Scanner 9 Clean Your Scanner 9 Summary Display 9 Troubleshooting 9 Your answer sheets are not feeding into the scanner 10 Inconsistent scoring or marks are not detected 11 Poor Print Quality 11 Ordering Supplies 12 FCC Compliance 12 In...

Page 3: ...y to process barcoded answer sheets About DataLink Connect Software DataLink Connect is software that comes included with every DataLink 3000 scanner You do not have to install DataLink Connect to use your scanner but it should be installed for users who want electronic access to their test results as well as a variety of reporting including detailed item analysis and exporting options DataLink Co...

Page 4: ...vot the locking arm in the downward position Insert print cartridge in front of cartridge harness and slide backward into the harness figures 2 and 3 3 Lift the locking arm and press it firmly into place figure 4 4 Make sure the locking arm is pressed firmly downward 5 Repeat for other two cartridges and close the printer cover Figure 1 Figure 2 Figure 3 Figure 4 Quick Start Setting Up Your Scanne...

Page 5: ... support page at www apperson com Next Steps 1 Plug the supplied power cable into your scanner and into a power source The display should read Ready offline Test Scoring 2 Calibrate the scanner by placing the calibration sheet face up in the scanner and pushing the scan pause button Once the calibration sheet has been properly scanned the display should read calibrated Press the reset button and p...

Page 6: ...e Scan Pause button on the scanner or click on the Scan icon to feed the key 5 The keyed questions will be displayed in the scanner results window and marked on the sheet by the scanner 6 Place the stack of completed answer sheets in the input tray in the same orientation the key was placed Press the Scan Pause button to score the answer sheets 7 After you have completed scanning your answer sheet...

Page 7: ... Additional DataLink Connect Features Keys can be stored and edited electronically as well as downloaded directly to the scanner Using Preferences you can reset many of the default options including launching in Data Collection mode versus Test Scoring mode You can also set your primary export format options Your student database can be imported using an Excel file which includes student ID first ...

Page 8: ... The key must be placed face up with the top edge of the key leading into the scanning channel To prepare a key refer to section titled Prepare A Key on page 7 1 Press the Scan Pause button to feed the key 2 Examine the key and you will notice the scanner has printed the answer next to each question for verification The number of questions keyed is displayed and also printed on the answer sheet af...

Page 9: ...ed a dash prints next to incorrect responses Mark the Rescore R bubble in the keyline to rescore a previously scored test Rescoring a test automatically enables the verify option After marking the keyline fill in the correct answer for each question on the test Multiple marks may be keyed as the correct answer for a question Questions keyed with multiple marks will be indicated with an X printed n...

Page 10: ...0 RR 02 11 A0788 Technical Support 800 827 9219 Form 28820 rev 02 11 Calibration Sheet 1 Insert calibration sheet into the input tray The calibration sheet should be the only form in the tray 2 Press the Scan Pause button to feed the sheet 3 Remove calibration sheet from the exit tray and insert back into it s protective clear sleeve Save for future use If the calibration sheet is reverse fed into...

Page 11: ...mation in this order 1 Scanner serial number and firmware version number 2 Barcode firmware version 3 Total number of sheets scanned 4 Total number of scanned sheets since last calibrated 5 Total number of scanned sheets since maintenance was last performed Troubleshooting If you are experiencing inconsistent operation or irregularities with your scanner try re calibrating the scanner using the ca...

Page 12: ...hanism Remove the stack of answer sheets and lift the scanner cover Inspect the feed roller and adjoining paper entry path to ensure there is nothing blocking the path The top roller should lie flush on the lower roller see figure 7 Using your fingers gently turn the upper and lower rollers to ensure they turn freely It is normal to feel a little resistance when turning the lower roller There may ...

Page 13: ...lean My Scanner and page 8 Calibrate My Scanner Poor Print Quality 1 Lift the print cartridge cover 2 Locate and remove the print cartridge that is printing poorly 3 Cover the nozzle and gently oscillate to redistribute the ink Wipe the nozzle side to side with a paper towel Inspect the plate to ensure all dust has been removed figure 8 4 Place the print cartridge in its slot Make sure the print c...

Page 14: ...ss A digital device pursuant to Part 15 of the FCC Rules Operation is subject to the following two conditions 1 This device may not cause harmful interference and 2 This device must accept any interference received including interference that may cause undesired operation Industry Canada Regulations This Class A digital apparatus meets all requirements of the Canadian Interference Causing Equipmen...

Page 15: ......

Page 16: ...800 827 9219 apperson com DataLink 3000 3000M 04 12 ...

Reviews: