
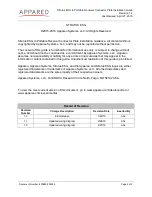

Stratus ESG to Portable Receiver Connector Plate Installation Guide
Revision 1.2
Last Revised: April 27, 2016
Document Number: 600890-000054
Page 4 of 5
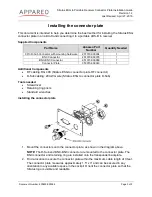
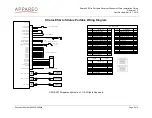
3. Wire the connector plate from the transponder to the connector plate following the wiring
diagram on the next page and using the cabling specified under “Additional
Components” above. There is a 3 foot maximum cable length.
4. Connect the ADS-B In receiver to the connector plate. If you are connecting a Stratus
portable receiver, an interface cable kit is available for purchase through approved
Appareo dealers.
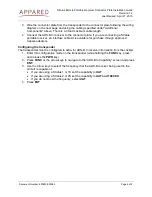
Configuring the transponder
The transponder must be configured to allow for ADS-B In receiver information from the cockpit.
1. Enter into configuration mode on the transponder (while holding the
FUNC
key, press
and release the
PWR
key).
2. Press
FUNC
or the arrow keys to navigate to the “ADS-B In Capability” screen and press
ENT
.
3. Use the arrow keys to select the frequency that the ADS-B receiver being used in the
aircraft is capable of.
•
If you are using a Stratus 1 or 1S set the capability to
UAT
.
•
If you are using a Stratus 2 or 2S set the capability to
UAT and 1090 ES
.
•
If you do not know the frequency, select
UAT
.
4. Press
ENT
.


