background image


RADIO OPERATION 
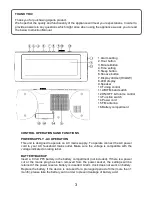
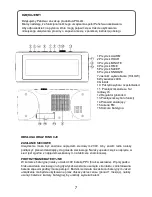
1.Slide the FUNCTION SWITCH (13) to ON position and rotate the VOLUME CONTROL 
(12) to turn on the radio. 
2.Adjust  the  VOLUME  CONTROL  (12)  to  the  desired listening level  and  select desired 
station with the TUNING CONTROL (10) and BAND SELECTOR (11). 
Loose  the  cable  antenna  and  adjust  the  direction  to  get  the  best  reception  if  the  radio 
could not get a clear station. Use a built-in directional antenna to receive a signal for AM. 
The best place to locate the unit is near to window, and you can change unit position for 
better reception. 
3.To turn off the radio, slide the FUNCTION SWITCH (13) to OFF position. 
 
CLOCK SETTING 
Time and alarm setting could be operated under any mode. 
Time setting: Press and hold the TIME SET (4) button and then press the HOUR (2) or 
MINUTE (3) button for hour and minute adjustment of the time. 
Alarm setting: Press and hold ALARM SET (1) button and then press the HOUR (2) or 
MINUTE (3) button for hour and minute adjustment of the time. 
 
WAKE TO MUSIC 
Press and hold the ALARM SET BUTTON (1) and then press


a HOUR (2) or MINUTE 

(3)  button  to  set  the  desired  wake  up  time.  Release  the  ALARM  SET  BUTTON  (1)  to 
show the current time. 
Repeat  the  steps  of  “RADIO  OPERATION”  to  determine  your  desired  station  and 
listening  level.  Slide  the  FUNCTION  SWITCH  (13)    to  AUTO  position.  The  alarm 
indicator will on. The radio will play your desired station and listening level automatically 
at the preset alarm time. Push the Function Switch to OFF position to turn off the radio 
alarm. 
 
WAKE TO BUZZER 
Repeat  the  steps  of  “WAKE  TO  MUSIC”  to  adjust  the  alarm  time,  and  then  rotate  the 
VOLUME  CONTROL  (12)  clockwise  until  a  clicking  sound  is  heard.  Your  will  be 
awakened by the buzzer alarm. 
Push the FUNCTION SWITCH (13) to OFF position to turn off the buzzer alarm. 
 

SNOOZE FUNCTION 
When  you  want  a  few  extra  minutes  of  sleep  after  the  alarm  wakes  you,  press  the 
SNOOZE  BUTTON  (6),  the  music  or  buzzer  alarm  will  be  off  and  turn  on  again  in 
approximately  9  minutes.  Push  the  FUNCTION  SWITCH  (13)  to  OFF  to  turn  off  the 
snooze function. 
 
SLEEP TO MUSIC 
Slide  the  FUNCTION  SWITCH  (13)  to  the  position  either  OFF  or  AUTO.  Press  the 
SLEEP BUTTON (5) once and you will have 59  minutes listen to the radio (the default 
setting). 
If  you  want  to  increase  or  reduce  the  automatic  shut  off  time,  hold  down  the  SLEEP 
BUTTON (5) and press HOUR (2) or MINUTE (3) to adjust as required. The maximum 
sleep time is 1 hour and 59 minutes. 
 
GO TO SLEEP AND WAKE TO MUSIC 
Repeat  the  steps  of  “WAKE  TO  MUSIC”,  then  press  SLEEP  BUTTON  (5)  to  set  for 
desired  time  of  radio  playing  before  sleep.  The  radio  will  stop  as  your  setting  of  sleep 
time automatically and will play again at your preset wake up time. 

Summary of Contents for YR-52B

Page 1: ...YR 52B YR 52W YR 52BM YR 52WM Clock radio Radiobudzik ...

Page 2: ...zed Service Station or a Central Service more information see the Warranty Card Never use the appliance in a manner inconsistent with the intended use and this Manual Use only original accessories Never immerse the appliance in water or any other solution The manufacturer is not liable for any damages that may arise as a result of installation and use of the car audio system not in accordance with...

Page 3: ...rating label BATTERY BACKUP Insert a 9 Volt PP3 battery in the battery compartment not included If there is a power cut or the mains plug has been removed from the power socket the settings will be retained if the power reserve battery is inserted Alarm clock does not work on battery Replace the battery if the device is not used for a prolonged period of time more than 1 month please take the batt...

Page 4: ...listening level Slide the FUNCTION SWITCH 13 to AUTO position The alarm indicator will on The radio will play your desired station and listening level automatically at the preset alarm time Push the Function Switch to OFF position to turn off the radio alarm WAKE TO BUZZER Repeat the steps of WAKE TO MUSIC to adjust the alarm time and then rotate the VOLUME CONTROL 12 clockwise until a clicking so...

Page 5: ...IFICATION Power requirement AC 230V 50Hz DC backup 9V battery 1xPP3 Power consumption AC 4 W Operation Temperature 5 C 35 C Receiving Bands FM AM Tuning range FM 88 108MHz AM 540 1600kHz Speaker Impedance 8 Ω ...

Page 6: ...zenia Wszelkich napraw może dokonywać jedynie Autoryzowany Punkt Serwisowy lub Serwis Centralny dokładne dane znajdują się w Karcie Gwarancyjnej Nigdy nie należy używać urządzenia w sposób niezgodny z jego przeznaczeniem i niniejszą instrukcją Należy używać tylko oryginalnych akcesoriów Nigdy nie należy zanurzać urządzenia w wodzie lub jakimkolwiek innym roztworze Producent nie ponosi odpowiedzial...

Page 7: ...DTRZYMANIE BATERYJNE W komorze bateryjnej należy umieścić 9V baterię PP3 brak w zestawie W przypadku braku zasilania sieciowego lub gdy wtyczka zostanie usunięta z kontaktu zainstalowana bateria zapewni podtrzymanie pamięci Budzik nie działa na zasilaniu bateryjnym Jeżeli urządzenie nie będzie użytkowane przez dłuższy okres czasu ponad 1 miesiąc należy usunąć baterie z komory bateryjnej by uniknąć...

Page 8: ...uj pożądany czas budzenia odpowiednio godziny oraz minuty Zwolnij przycisk ALARM 1 by wyświetlić aktualny czas Następnie powtórz kroki z punktu RADIO by wybrać stację radiową oraz pożądany poziom głośności radia Przesuń PRZYCISK WYBORU FUNKCJI 13 w pozycję AUTO Na wyświetlaczu zostanie zapalona lampka potwierdzająca włączenie alarmu O wyznaczonym czasie budzenia radio automatycznie zacznie nadawać...

Page 9: ... głośników 8 Ω UWAGI Urządzenie zasilane jest napięciem 230V 50Hz Jeżeli radio nie jest używane przez dłuższy okres czasu należy odłączyć wtyczkę z gniazda sieciowego Nie należy narażać urządzenia na działanie wilgoci Wyłącznik urządzenia jest zamontowany na obwodzie wtórnym i nie odłącza całego urządzenia od zasilania sieciowego w pozycji WYŁ Upewnij się że wszystkie połączenia są wykonane popraw...

Page 10: ...kt o tych samych lub lepszych parametrach funkcjonalnych 6 Gwarancją nie są objęte a mechaniczne uszkodzenia produktu b obniżanie się jakości produktu spowodowane naturalnym procesem zużycia np ścieranie się zewnętrznej powłoki produktu zarysowanie itp c naturalne zużycie materiałów eksploatacyjnych d czynności przewidziane w instrukcji obsługi do wykonywania których zobowiązany jest Użytkownik we...

Page 11: ...eniem się wystawianiem na działanie ekstremalnych warunków termicznych lub atmosferycznych albo też gwałtowne zmiany tych warunków powodują utratę uprawnień do bezpłatnego serwisu gwarancyjnego Niniejsza Gwarancja nie wyłącza nie ogranicza ani nie zawiesza uprawnień kupującego wynikających z niezgodności produktu z umową Serwis Apollo Electronics Sp z o o ul Poleczki 13 02 822 Warszawa e mail serw...

Page 12: ......

Page 13: ...0 478 ...

Reviews: