background image


ENG 

SAFETY INSTRUCTIONS 


  Instruction manual is an integral part of the product. 

  Carefully read and follow the below manual before use.  

  Get acquaintance with the technical data, available in the chapter Specification or on the rating 

plate, prior to connect the appliance to the electrical source of power.  

  Keep this Instruction Manual and the Warranty Card along with the proof of purchase for any 

claims. 

  Before use check if the appliance is not damaged. Particular attention must be paid to the power 

cord. Should any component, including the power cord, be damaged the appliance must not be 
used.  

  Never attempt any repairs of the appliance. Any repairs must be performed by an Authorized 

Service Station or a Central Service (more information see the Warranty Card). 

  Never use the appliance in a manner inconsistent with the intended use and this Manual.  

  Never immerse the appliance in water or any other solution.  

  The manufacturer is not liable for any damages that may arise as a result of installation and use 

of the car audio system not in accordance with the technical specification described in this 
manual. 

  Never open nor remove the housing, as doing so may cause electric shock. 

  Ensure unobstructed clearance around the appliance. 

  Do not place the appliance on soft surfaces, carpets, or similar surfaces that could block 

ventilation from the bottom.  

  The ventilation should not be impeded by covering the housing. 

  Do not expose the appliance to rain or an environment where it may be splashed by water or 

other liquids. 

  Do not place containers or objects containing liquid (e.g. vases) on top of the appliance.  

  Keep the appliance away from naked flames (e.g. burning candles). 

  Install the appliance on a stable, flat surface. 

  When unplugging the power supply cord, be sure to grasp the power supply plug; never pull on 

the cord itself. 

  Never plug in nor remove the power supply plug with wet hands, as doing so may cause electric 

shock. 


Cable should be protected against physical and mechanical damage (e.g. bending). 


Keep out of reach of children. Children should not play with tuner and packaging.  
Protect the device from 

  Switch off the power, and unplug the power supply plug for safety cleaning purposes when 

cleaning.  

being dropped. 

  When cleaning do not  use abrasive sponges, substances and products containing solvents, 

benzene or alcohol

  Switch off the power, and unplug the power supply plug for safety purposes during storm or 

before leaving the appliance unused for an extended period. 


According to provisions of the Law of 1 July 2005 on Waste Electrical and Electronic Equipment it 
is forbidden to dispose of waste equipment marked with crossed out wheeled bin together with 
other wastes. The user who intends to dispose of such an equipment is obliged to deliver the 
waste electrical or electronic equipment to the waste equipment collection points. Such points are 
established by i.a. retailers and wholesalers of the equipment and the commune organizational 
units operating in waste collection business. The above legal obligations have been introduced to 
reduce the amount of waste electrical and electronic equipment and to ensure appropriate 

standard for collection, recovery and recycling of waste equipment. Proper fulfillment of those obligations is of 
particular importance when the waste equipment contains hazardous components of particularly adverse effect 
on environment and human health. Weight: 0,5kg. 


Summary of Contents for AHD-100

Page 1: ...HDMI AHD 100 TV tuner DVB T Tuner telewizyjny DVB T Instruction Manual 3 Instrukcja obs ugi 19...

Page 2: ...ts reserved Any reproduction reprint adaptation or translation without permission is prohibited Niniejszy produkt spe nia wszystkie wymogi i przepisy obowi zuj cych dyrektyw Unii Europejskiej Deklarac...

Page 3: ...estions which might arise when using the appliance we ask you to read the below Instruction Manual TABLE OF CONTENTS SAFETY INSTRUCTIONS 4 FRONT PANEL 5 REAR PANEL 5 REMOTE CONTROL 6 CONNECTION 8 INST...

Page 4: ...nce Keep the appliance away from naked flames e g burning candles Install the appliance on a stable flat surface When unplugging the power supply cord be sure to grasp the power supply plug never pull...

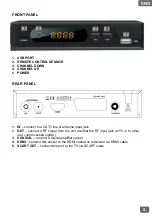
Page 5: ...CATV line or antenna input jack 2 OUT connect a RF signal from the unit to either the RF input jack on TV or to other unit unprocessed signal 3 COAXIAL connect a digital amplifier output 4 HDMI connec...

Page 6: ...6 ENG REMOTE CONTROL...

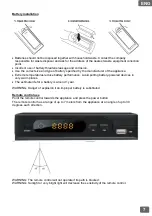
Page 7: ...atures reduce battery performance Avoid putting battery powered devices in very warm places The estimate life for a battery is around 1 year WARNING Danger of explosion if an improper battery is subst...

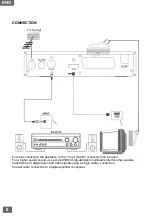
Page 8: ...SCART connection can be used For a higher quality sound use a direct HDMI high definition multimedia interface that enables transmission of digital audio and video signals using a single cable connec...

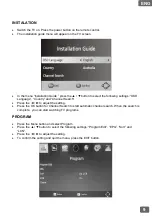
Page 9: ...guage Country and Channel Search Press the to adjust the setting Press the OK button for Channel Search to start automatic channel search When the search is complete you can start watching TV programs...

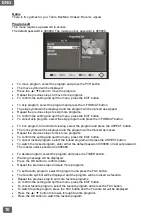
Page 10: ...yed and the program will be marked as locked Repeat the previous steps to lock more programs To confirm the setting and quit the menu press the EXIT button To cancel locked program select the locked p...

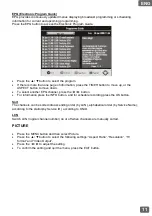
Page 11: ...er EPG channel press the button For information press the INFO button and for schedule recording press the OK button The channels can be sorted into ascending order by LCN alphabetical order by Servic...

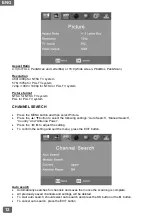
Page 12: ...and then select Picture Press the button to select the following settings Auto Search Manual Search Country and Antenna Power Press the to adjust the setting To confirm the setting and quit the menu...

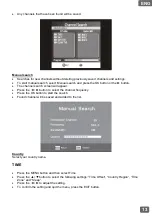
Page 13: ...nel search screen will appear Press the button to select the channel frequency Press the OK button to start the search Found channel will be saved and added to the list Select your country name Countr...

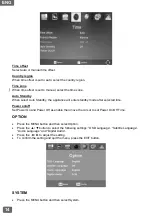
Page 14: ...mode after selected time Auto Standby Set Power On and Power Off as enable then move the cursor to set Power On Off Time Power on off OPTION Press the MENU button and then select Option Press the but...

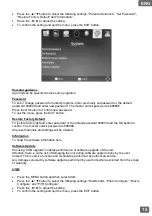
Page 15: ...000000 and the OK button to confirm The master unlock password is 888888 Restore Factory Default All preset channels and settings will be deleted To show the software information here Information Choo...

Page 16: ...lide show interval to 1 8sec Photo Aspect ratio Keep to play picture in its original aspect Discard to play picture in full screen mode Select size Available settings are Small Normal and Big Movie Se...

Page 17: ...ed event press the Timer button to view the list of scheduled events Press the arrow button to display the event to be deleted and press the Timer button to delete To delete a recording file press the...

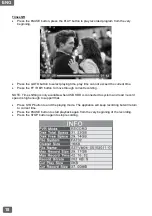
Page 18: ...EW button to move through current recording NOTE Time shifting is only available when USB HDD is connected to system and read record speed is high enough to support that Press STOP button to end the p...

Page 19: ...3 MPEG 2 Layer 2 WMA surround sound supported up to 7 1 Output format 480i 480p 576i 576p 720p 1080i 1080p Output port HDMI SCART Coaxial L R SCART USB2 0 Supported capacity up to 500GB Supported med...

Page 20: ...mog pojawi si w trakcie u ytkowania niniejszego urz dzenia prosimy o zapoznanie si z poni sz instrukcj obs ugi SPIS TRE CI WSKAZ WKI BEZPIECZE STWA 21 PRZEDNI PANEL 22 TYLNY PANEL 22 PILOT ZDALNEGO ST...

Page 21: ...rzedmiot w zawieraj cych p yny np wazony Nie zaleca si umieszczania w pobli u urz dzenia r de otwartego ognia takiego jak np pal ce si wiece Urz dzenie powinno sta na p askiej stabilnej powierzchni Ni...

Page 22: ...OFF TYLNY PANEL 1 IN wej cie sygna u telewizji kablowej lub kabla antenowego 2 OUT wyj cie antenowe do telewizora lub innego odbiornika sygna nieprzetworzony 3 COAXIAL wyj cie d wi ku cyfrowego 4 HDM...

Page 23: ...23 PL PILOT ZDALNEGO STEROWANIA...

Page 24: ...nale y chroni przed nadmiernym ciep em pochodz cym od s o ca ognia itp Czas pracy baterii wynosi zwykle ok 1 roku ywot baterii jest uzale niony od stopnia intensywno ci ich eksploatacji U ycie pilota...

Page 25: ...po czenie za pomoc z cza cyfrowego HDMI Nale y pod czy wyj cie sygna u HDMI OUT w urz dzeniu do wej cia HDMI IN w telewizorze za pomoc kabla posiadaj cego z cza HDMI Urz dzenie posiada cyfrowe wyj cia...

Page 26: ...przycisk w dokona wyboru warto ci ustawie Wyszukiwanie program w nale y zatwierdzi przyciskiem OK wy wietli si okno Wyszukiwanie program w i urz dzenie rozpocznie automatyczne wyszukiwanie program w...

Page 27: ...e oznaczony jako zablokowany Powt rzy powy ej opisane kroki aby zablokowa wi cej program w Nacisn przycisk EXIT aby zapisa zmiany i wyj z menu Aby odblokowa program nale y wybra zablokowany program i...

Page 28: ...INFO aby wy wietli informacje o numerze kana u nazwie stacji telewizyjnej czasie trwania i tytule obecnie nadawanego programu oraz po nim bezpo rednio nast puj cego Nacisn przycisk OK aby nagra obecn...

Page 29: ...nale y dokona wyboru odpowiednich ustawie Wyszukiwanie automatyczne Wyszukiwanie r czne Kraj i Zasilanie anteny Za pomoc przycisk w dokona wyboru warto ci ustawie Automatyczne skanowanie cz stotliwo...

Page 30: ...w Nacisn przycisk lub aby wybra program Nacisn przycisk OK aby rozpocz wyszukiwanie r czne Znalezione kana y zostan zapisane i dodane do listy Doprecyzowanie ustawie regionalnych poprzez ustawienie o...

Page 31: ...nkcja Auto Standby umo liwia zaprogramowanie przej cia urz dzenia w stan u pienia po wybranym Auto Standby okresie czasu Uaktywnij funkcj W cz Wy cz nast pnie przesu kursor w celu ustawienia czasu w c...

Page 32: ...konanych przez u ytkownika ustawie i program w Przywr ustawienia fabryczne Poda has o fabryczne 000000 has o g wne do odblokowania 888888 lub poprzednio ustawione has o i potwierdzi przyciskiem OK Wy...

Page 33: ...stawi czas prezentacji poszczeg lnych zdj w trakcie pokazu od 1sek do 8sek na jedno zdj cie Konfiguracja zdj W pozycji Zachowaj format zdj cia oznacza wy wietlanie zdj cia w proporcjach 16 9 Je eli zd...

Page 34: ...isk REC ponownie aby dokona wyboru czasu d ugo ci nagrania Nacisn przycisk INFO podczas nagrywania aby wy wietli informacj o ilo ci wolnego miejsca na no niku systemie plik w nazwie powstaj cego pliku...

Page 35: ...iekt rych plik w nawet gdy s w odpowiednim formacie UWAGA Je eli zu ycie energii urz dzenia USB jest wy sze ni 500mA nale y zastosowa zewn trzny zasilacz AC DC do zasilenia urz dzenia USB Zatrzymanie...

Page 36: ...e Obs ugiwana rozdzielczo 480i 480p 576i 576p 720p 1080i 1080p Wyj cie wideo i audio HDMI SCART Coaxial L R SCART Obs ugiwana pojemno urz dzenia USB 500GB Obs ugiwane formaty AVI MKV Xvid MPEG4 TS TP...

Page 37: ...wykonywania kt rych zobowi zany jest U ytkownik we w asnym zakresie np wymiana materia w eksploatacyjnych itp e wady spowodowane niew a ciwym lub niezgodnym z instrukcj obs ugi u ytkowaniem produktu...

Page 38: ...PL KARTA GWARANCYJNA...

Reviews: