background image

APC-3918P User Manual   

72 

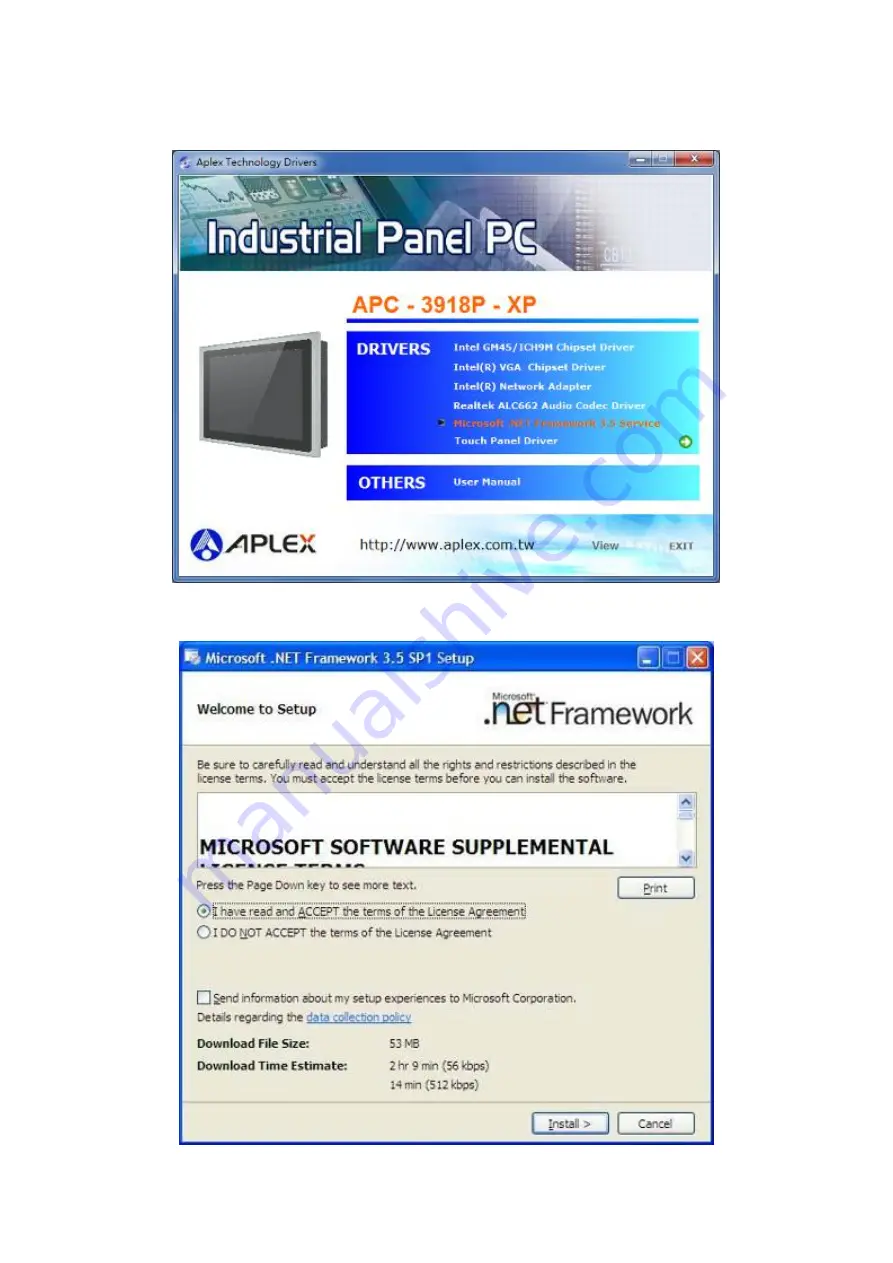
4.5 Microsoft .NET Framework 3.5 Service Installation 

To install the Microsoft .NET Framework 3.5 Service, please follow the steps below.


Step 1.

 Access the driver list as shown below.    Select 

Microsoft .NET Framework 3.5 Service.


Step 2.

 Select

 I have read and ACCEPT the terms of the License Agreement. 

Click Install to 

continue. 


Summary of Contents for APC-3918P

Page 1: ......

Page 2: ...e _ Revision Jan 2013 V1 0 2013 Aplex Technology Inc All Rights Reserved Published in Taiwan Aplex Technology Inc 15F 1 No 186 Jian Yi Road Zhonghe District New Taipei City 235 Taiwan Tel 886 2 82262881 Fax 886 2 82262883 E mail aplex aplex com tw URL www aplex com tw ...

Page 3: ...operated in a commercial environment Operation of this equipment in a residential area is likely to cause interference in which case the user at his own expense will be required to take whatever measures may be required to correct the interference Disclaimer This information in this document is subject to change without notice In no event shall Aplex Technology Inc be liable for damages of any kin...

Page 4: ...vent your systems from damage Avoid your system from static electricity on all occasions Prevent electric shock Don t touch any components of this card when the card is power on Always disconnect power when the system is not in use Disconnect power when you change any hardware devices For instance when you connect a jumper or install any cards a surge of power may damage the electronic components ...

Page 5: ...allations 15 2 2 1 Jumpers Setting and Connectors 15 Chapter 3 BIOS Setup 3 1 Operations after POST Screen 33 3 2 BIOS SETUP UTILITY 34 3 3 System Overview 34 3 4 Advanced Settings 35 3 5 Advanced PCI PnP Settings 44 3 6 Boot Settings 47 3 7 Security Settings 49 3 8 Advanced Chipset Settings 50 3 9 Exit Options 57 Chapter 4 Installation of Drivers 4 1 Intel Chipset Driver 60 4 2 Intel R VGA Chipse...

Page 6: ...218 Dimensions 8 Figure 1 2 Front View of APC 3918P 12 Figure 1 6 Rear View of APC 3918P 12 Figure 1 7 Panel mounting of APC 3918P 13 Figure 1 8 VESA mounting of APC 3918P 13 Figure 2 1 Mainboard Dimensions 14 Figure 2 2 Jumpers and Connectors Location_ Board Top 15 Figure 2 3 Jumpers and Connectors Location_ Board Bottom 16 Figure 5 1 Birdeye s View of Control Board 74 ...

Page 7: ...PIO 1 x USB 2 0 connector with cap at front panel 1 x 3 Pin DC Power input terminal block Storage 2 x 2 5 SATA HDD one HDD as standard two HDDs as option for RAID 1 x External CF Slot for option Extension 1 x PCI for option OSD Control Brightness Screen and Touch on off Power on off CD DVD R Device 1 x Slim CD DVD RW Device for option Not available if 2 HDD and CF have been used Wireless LAN mini ...

Page 8: ...r Supply 9 32V DC Construction Aluminum front bezel and steel chassis IP Rating Front Panel IP65 Mounting Panel VESA 100x100 Mount Dimensions WxHxD 484x400x83 Net Weight 11 8kgs Operating Temperature 10 50 Storage Temperature 20 60 Relative Humidity 10 90 40 non condensing Certificate CE FCC Class A ...

Page 9: ...APC 3918P User Manual 8 1 2 Dimensions Figure 1 1 Dimensions of APC 3918P ...

Page 10: ...HDD Step 1 There are 2 screws to deal with when enclosing or removing the HDD bracket Step 2 There is 1 screw to deal with when enclosing or removing the HDD Tray Step 3 Gently remove the screw and draw the HDD bracket out as shown in the picture ...

Page 11: ...918P User Manual 10 Step 4 Tighten four screws as shown in the picture F Screw M3 5L 120 Step 5 Push into the HDD bracket as shown in the picture Step 5 That s how it should look after it has been installed ...

Page 12: ...th when enclosing or removing the chassis Step 2 Now slide the add on into the PCI slot making sure the golden part faces the slot When the part that is interfaced together come into the right contact slightly push the add on into the rail of the slot After sliding the add on into the PCI expansion slot get the one screw as circled tightened to finish the connection ...

Page 13: ...ocket P Core 2 Duo Processor up to Intel P8600 2 4GHz processor The industrial panel PC also features one PCI expansion slot for option three COM ports four USB 2 0 ports two 2 5 HDD one external CF slot for option and 9 32V DC etc It is ideal for use as a PC based controller for Automotive Logistic Process Materials Handling and Kiosk applications Figure 1 2 Front View of APC 3918P Figure 1 3 Rea...

Page 14: ...3918P panel PC is designed to be panel mounted as shown in Figure 1 7 Just carefully place the unit through the hole and tighten the given 10 screws from the rear to secure the mounting Figure 1 4 Panel mounting of APC 3918P Figure 1 5 VESA mounting of APC 3918P ...

Page 15: ...APC 3918P User Manual 14 Chapter 2 Hardware 2 1 Mainboard Figure 2 1 Mainboard Dimensions ...

Page 16: ...the needs of different customers Also it features dual 1000M LAN port 6 COM port and one Mini PCIE configuration To satisfy the special needs of high end customers PC104 port capable of adjusting IO voltage richer extension functions The product is widely used in various sectors of industrial control 2 2 1 Jumpers Setting and Connectors Figure 2 2 Jumpers and Connectors Location_ Board Top ...

Page 17: ...m 1 JP2 2 0mm Pitch 1X2 Pin Header ATX Power and Auto Power on jumper setting JP2 Mode Open ATX Power Close Auto Power on Default 2 RTC SRTC 2 0mm Pitch 1X2 Pin Header CMOS clear jumper CMOS clear operation will permanently reset old BIOS settings to factory defaults RTC SRTC CMOS ...

Page 18: ...the system again d When entering the POST screen press the F1 or DEL key to enter CMOS Setup Utility to load optimal defaults e After the above operations save changes and exit BIOS Setup 3 BAT1 1 25mm Pitch 1X2 box Pin Header 3 0V Li battery is embedded to provide power for CMOS Pin Signal Name Pin1 VBAT PIN2 Ground 4 DCIN 5 08mm Pitch 1x3 Pin Connector DC9V DC32V System power input connector Pin...

Page 19: ...System power output connector Pin Power output Pin1 Ground Pin2 Ground Pin3 DC 12V Pin4 DC 12V 6 ATX option 2 0mm Pitch 1X3 box Pin Header connect PSON and 5VSB and Ground signal support ATX Power model Reserved Pin Signal Name Pin1 ATX PSON PIN2 ATX Ground PIN3 ATX 5VSB 7 CPU1 Socket P installing the CPU Socket ...

Page 20: ...ocket DDRIII memory socket the socket is located at the Top of the board and supports 204Pin 1 5V DDRIII 800 1066MHz FSB SO DIMM memory module up to 8GB 10 CRT1 CRT DB15 Connector Video Graphic Array Port provide high quality video output they can not work at the same time for CRT1 and VGA1 11 VGA1 CRT 2 0mm Pitch 2X5 Pin Header Video Graphic Array Port Provide 2x5Pin cable to VGA Port they can no...

Page 21: ...nal support DC or PWM mode mode select at BIOS CMOS menu 13 LVDS1 1 25mm Pitch 2x20 Connector For 18 24 bit LVDS output connector Fully supported by Intel GM45 chipset the interface features dual channel 18 24 bit output Signal Name Pin Pin Signal Name VDD5 2 1 VDD5 Ground 4 3 Ground VDD33 6 5 VDD33 LB_D0_N 8 7 LA_D0_N LB_D0_P 10 9 LA_D0_P Ground 12 11 Ground LB_D1_N 14 13 LA_D1_N LA_D1_P 16 15 LA...

Page 22: ...emporarily to realize system startup shutdown or awaken the system from sleep state 15 JCOM1 2 0mm Pitch 2x3 Pin Header COM1 jumper setting pin 1 6 are used to select signal out of pin 9 of COM1 port JP3 Pin Function Close 1 2 COM1 RI Ring Indicator default Close 3 4 COM1 Pin9 5V option Close 5 6 COM1 Pin9 12V option 16 COM1 Type DB9 Rear serial port standard DB9 Male serial port is provided to ma...

Page 23: ...ort is provided to make a direct connection to serial devices Pin Signal Name 1 DCD Data Carrier Detect 2 RXD Received Data 3 TXD Transmit Data 4 DTR Data Terminal Ready 5 Ground 6 DSR Data Set Ready 7 RTS Request To Send 8 CTS Clear To Send 9 RI Ring Indicator 18 COM5 2 0mm Pitch 2X5 Pin Header COM5 Port standard RS232 ports are provided They can be used directly via COM cable connection Signal N...

Page 24: ...OM6 select output Signal 5V or 12v For details please refer to description of JCOM6 Signal Name Pin Pin Signal Name DCD 1 2 RXD TXD 3 4 DTR Ground 5 6 DSR RTS 7 8 CTS RI 9 10 JCOM6 select Setting 21 USB4 USB5 USB6 USB7 Double stack USB type A Rear USB connector it provides up to 4 USB2 0 ports speed up to 480Mb s 22 LAN1 LAN2 RJ45 Connector Rear LAN port Two standard 10 100 1000M RJ 45 Ethernet po...

Page 25: ...ne Out can be connected to a headphone or amplifier Line In is used for the connection of external audio source via a Line in cable MIC is the port for microphone input audio Signal Name Pin Pin Signal Name FRONT_OUTP L 1 2 FRONT_OUTP_ R FRONT_OUTN_ L 3 4 FRONT_OUTN_ R FRONT_JD 5 6 LINE1_JD LINE_IN_L 7 8 LINE1_IN_R MIC2_IN_L 9 10 MIC2_IN_R Ground 11 12 MIC2_JD 25 BZ Onboard buzzer 26 JP_104P 2 0mm...

Page 26: ...EX2 connector in the Bottom MODEL PC104 PCIEX2 ASB M801T Top ASB M801ET Top ASB M801B Bottom ASB M801EB Bottom 29 MPCIE1 Socket 52Pin mini PCIe socket it is located at the top it supports mini PCIe devices with USB2 0 SMBUS and PCIe signal MPCIe card size is 30x30mm or 30x50 95mm 30 JRI 2 0mm Pitch 1X3 Pin Header Wake up setting jumper pin 1 2 are used to select signal for COM4 Wake up pin 2 3 are...

Page 27: ...d Ground 29 30 Ground USB11 5V_USB_101 1 31 32 PWR_LED Power LED USB11_N 33 34 PWR_LED USB11_P 35 36 MIO_PSON Power Button Ground 37 38 Ground Ground 39 40 Ground 32 MIO2 1 25mm Pitch 2x20 Connector Front panel connector Function Signal Name Pin Pin Signal Name Function H_LED HDD_LED 1 2 PWR LED P_LED H_LED Ground 3 4 Ground P_LED RESET Ground 5 6 MIO_PSON PSON RESET RESET 7 8 Ground PSON BUZZER B...

Page 28: ...sed to connect reset button The two pins are dis connected under normal condition You may short them temporarily to realize system reset Pin6 8 POWER on off Button They are used to connect power switch button The two pins are disconnected under normal condition You may short them temporarily to realize system startup shutdown or awaken the system from sleep state Pin9 10 BUZZER They are used to co...

Page 29: ...DE_CF1 or SATA4 signal output control Functio n Jumper setting SATA 4 Default IDE_CF 1 option 34 SATA_P1 SATA_P2 2 5mm Pitch 1x2 box Pin Header Two onboard 5V output connectors are reserved to provide power for SATA devices Pin Signal Name 1 DC5V 2 Ground Note Output current of the connector must not be above 1A 35 SATA1 SATA2 SATA3 SATA4 SATA 7P SATA Connectors Four SATA connectors are provided w...

Page 30: ...ating voltage of CF card can be set as 3 3V or 5V The default setting of the product is 3 3V Please refer to description of JCF JSATA Jumper setting 37 CPU SCREW HOLES CPU FAN SCREW HOLES Four screw holes for fixed CPU Cooler assemble 38 H5 H6 MPCIE1 SCREW HOLES H5 for mini PCIE card 30mmx30mm assemble H6 for mini PCIE card 30mmx50 95mm assemble 39 LED1 LED STATUS Green LED for Motherboard Standby...

Page 31: ...rt them temporarily to realize system startup shutdown or awaken the system from sleep state PWR LED POWER LED status COM3 Type DB9 I O serial port it provides selectable RS422 RS485 serial signal output RS422 Type option RS485 Type option Signal Name Pin Pin Signal Name 422_RX 1 1 NC 422_RX 2 2 NC 422_TX 3 3 485 422_TX 4 4 485 Ground 5 5 Ground NC 6 6 NC NC 7 7 NC NC 8 8 NC NC 9 9 NC ...

Page 32: ...ame 1 DCD Data Carrier Detect 2 RXD Received Data 3 TXD Transmit Data 4 DTR Data Terminal Ready 5 Ground 6 DSR Data Set Ready 7 RTS Request To Send 8 CTS Clear To Send 9 RI Ring Indicator USB10 USB11 Double stack USB type A I O USB connector it provides up to 2 USB2 0 ports speed up to 480Mb s CF CF Card socket it is located at TB 522 and serves as an insert interface for Type I and Type II Compac...

Page 33: ...APC 3918P User Manual 32 41 TB 520P1 TB 520P1 connect to ASB M801T ET PC104 connector PC104 is located at the top It provides one PCI slot ...

Page 34: ...A300 PB0C64G Ultra DMA 5 S M A R T Capable and Status OK Auto detecting USB Mass Storage Devices 00 USB Mass storage devices found and configured CMOS Settings Wrong CMOS Data Time Not Set Press F1 to Run SETUP Press F2 to load default values and continue 6B38 After optimizing and exiting CMOS Setup the POST screen displayed for the first time is as follows and includes basic information on BIOS C...

Page 35: ...t ESC Exit AMIBIOS Version 08 00 15 Build Date 05 13 11 ID M801V001 Processor Genuine Intel R CPU 575 2 00GHz Speed 2000MHz System Memory Size 1981MB System Time 00 01 18 System Date Tue 05 15 2011 v02 61 Copyright 1985 2006 American Megatrends Inc 3 3 System Overview BIOS SETUP UTILITY Main Advanced PCIPnP Boot Security Chipset Exit System Overview User ENTER TAB or SHIFT TAB to Select a field Us...

Page 36: ...at the Day automatically changes when you set the date Month 01 to 12 Date 01 to 31 Year 2009 to 2099 3 4 Advanced Settings BIOS SETUP UTILITY Main Advanced PCIPnP Boot Security Chipset Exit Advanced Settings Configure CPU Select Screen WARNING Setting wrong values In below sections may cause system to malfunction CPU Configuration IDE Configuration Super IO Configuration Hardware Health Configura...

Page 37: ...nce to the Specific application Select Screen Select Item Charge Field F1 General Help F10 Save and Exit ESC Exit Manufacturer Intel Genuine Intel R CPU 575 2 00GHz Frequency 2 00GHz FSB Speed 668MHz Cache L1 32 KB Cache L2 1024 KB Ratio Actual Value L2 Hardware Prefetcher Enabled Adjacent Cache Line Prefetch Enabled Max CPUID Value Limit Disabled Execute Disable Bit Capability Enabled Intel R C S...

Page 38: ...abled Compatible Enhanced Select Screen Select Item Charge Field F1 General Help F10 Save and Exit ESC Exit SATA 1 Configuration Compatible Configure SATA as IDE SATA 1 Configuration Enhanced Primary IDE Master Not Detected Primary IDE Slaver Not Detected Secondary IDE Master Not Detected Secondary IDE Slaver Not Detected Third IDE Master Not Detected Fourth IDE Master Hard Disk Hard Disk Write Pr...

Page 39: ... Mega trends Inc SATA 1 Configuration Compatible Disabled Enhanced Configure SATA as IDE RAID AHCI SATA 2 Configuration Enhanced Disabled Hard Disk Write Protect Disabled Enabled IDE Detect Time Out 35 0 5 10 15 20 25 30 ATA PI 80Pin Cable Detection Host Device Host Device 3 4 3 Super IO Configuration ...

Page 40: ...Port3 IRQ IRQ4 Serial Port3 Mode RS 485 Serial Port4 Address 2E8 Serial Port4 IRQ IRQ3 Serial Port5 Address 238 Serial Port5 IRQ IRQ5 Serial Port6 Address 228 Serial Port6 IRQ IRQ7 V02 61 Copyright 1985 2006 American Mega trends Inc Serial Port3 Mode COM3 Options RS485 RS422 RS422 for RS422 Mode RS485 for RS485 Mode 3 4 4 Hardware Health Configuration BIOS SETUP UTILITY Advanced Hardware Health Co...

Page 41: ...aximum CPU Temperature 60 140 Maximum PWM Duty for CPU Fan 60 V02 61 Copyright 1985 2006 American Mega trends Inc System Temperature Show you the current system temperature CPU Temperature Show you the current CPU temperature CPUFAN Speed Show you the current CPU Fan operating speed Maximum CPU Temperature 60 140 55 131 65 149 70 158 Minimum PWM Duty for CPU Fan 60 50 70 80 3 4 5 ACPI Configuratio...

Page 42: ...isabled Headless mode Disabled Enabled Chipset ACPI Configuration APIC ACPI SCI IRQ Disabled Enabled High Performance Event Timer Disabled Enabled 3 4 6 AHCI Configuration BIOS SETUP UTILITY Advanced AHCI Setting Enables For supporting AHCI BIOS Support Enabled AHCI CD DVD Boot Time out 35 AHCI Port0 Not Detected AHCI Port1 Not Detected ...

Page 43: ...ing setup BIOS auto detects the presence of IDE devices This displays the status of auto detecting of IDE devices 3 4 7 MPS Configuration BIOS SETUP UTILITY Advanced MPS Configuration Select MPS Revision Select Screen Select Item Charge Field F1 General Help F10 Save and Exit ECS Exit MPS Revision 1 1 V02 61 Copyright 1985 2006 American Mega trends Inc MPS Revision 1 1 1 4 3 4 8 PCI Express Config...

Page 44: ...t 1985 2006 American Mega trends Inc Active State Power Management Disabled Enabled 3 4 9 Smbios Configuration BIOS SETUP UTILITY Advanced Smbios Configuration SMBIOS SMI Wrapper Support for PnP Func 50h 54h Select Screen Select Item Charge Field F1 General Help F10 Save and Exit ESC Exit Smbios Smi Support Enabled V02 61 Copyright 1985 2006 American Mega trends Inc Smbios Smi Support Enabled Disa...

Page 45: ...ntroller Mode Fullspeed BIOS EHCI Hand Off Enabled V02 61 Copyright 1985 2006 American Mega trends Inc Legacy USB Support Enabled Disabled USB2 0 Controller Mode FullSpeed HiSpeed BIOS EHCI Hand Off Enabled Disabled 3 5 Advanced PCI PnP Settings This part describes configurations to be made on PCI bus system PCI namely Personal Computer Interconnect is a computer bus that allows I O device to oper...

Page 46: ... wrong values In below sections may cause system to malfunction Clear NVRAM No Plug Play O S No PCI Latency Timer 64 Allocate IRQ to PCI VGA Yes Palette Snooping Disabled PCI IDE BusMaster Disabled OffBoard PCI ISA IDE Card Auto IRQ3 Available IRQ4 Available IRQ5 Available IRQ7 Available IRQ9 Available IRQ10 Available IRQ11 Available V02 61 Copyright 1985 2006 American Mega trends Inc Clear NVRAM ...

Page 47: ...he PCI slot number that is holding the card Auto Works for most PCI IDE Cards Auto PCI Slot1 PCI Slot2 PCI Slot3 PCI Slot4 PCI Slot5 PCI Slot6 IRQ3 4 5 7 9 10 11 14 15 Available Reserved Available Specified IRQ is available to be used by PCI PnP devices Reserved Specified IRQ is reserved for use by legacy ISA devices DMA Channel 0 1 3 5 6 7 Available Reserved Available Specified DMA is available t...

Page 48: ...set Exit Boot Settings Configure Settings During System Boot Select Screen Select Item Enter Go to sub screen F1 General Help F10 Save and Exit ESC Exit Boot Setting Configuration Boot Device Priority Hard Disk Drives V02 61 Copyright 1985 2006 American Mega trends Inc Boot Setting Configuration Configure Settings during System Boot Quick Boot Enabled Disabled Allows BIOS to skip certain tests whi...

Page 49: ...ect Power on state for Numlock On Off Wait For F1 If Error Wait for F1 key to be pressed if error occurs Enabled Disabled Hit DEL Messgae Display Displays press DEL to run Setup in POST Enabled Disabled Interrupt 19 Capture Enabled Allows option ROMs to trap interrupt 19 Disabled Enabled Boot Device Priority Specifies the Boot Device Priority sequence Hard Disk Devices Specifies the Boot Device Pr...

Page 50: ...word Change User Password Boot Sector Virus Protection Disabled V02 61 Copyright 1985 2006 American Mega trends Inc Change Supervisor Password Install or Change the password Change User Password Install or Change the password Password Check Setup Always Setup Check password while invoking setup Always Check password while invoking setup a well as on each boot Boot Sector Virus Protection Disabled ...

Page 51: ... configurations Also the feature is capable of requesting users to enter the password prior to system boot to control unauthorized access to your computer Users may enable the feature in Security Option of Advanced BIOS Features If Security Option is set to System you will be requested to enter the password before system boot and when entering BIOS setup if Security Option is set to Setup you will...

Page 52: ... the total Physical memory DISABLE Do not allow remapping of memory Select Screen Select Item Charge Field F1 General Help F10 Save and Exit ESC Exit Memory Remap Feature Enabled PCI MMIO Allocation 4Gb To 3072MB Memory Hole Disabled Initate Graphic Adapter PCI IGD IGD Graphics Mode Select Enabled 64MB IGD GTI Graphic smemory size No VT mode 2MB PEG Port Configuration Video Function Configuration ...

Page 53: ...VMT Mode Select Screen Select Item Charge option F1 General Help F10 Save and Exit ESC Exit DVMT Mode Select DVMT Mode DVMT FIXED Memory 256MB Boot Display Device VBIOS Default Flat Panel Type 1024x768 18bit 1c Backlight Control Support VBIOS Default Backlight Control Level Level 8 Backlight Control Mode DC Backlight Image Adaptation VBIOS Default V02 61 Copyright 1985 2006 American Mega trends In...

Page 54: ...4x 768 18bit 1ch 640x480 18bit 1ch 800x480 18bit 1ch 800x600 18bit 1ch 1280x800 18bit 1ch 1366x768 18bit 1ch 1024x768 24bit 2ch 1280x1024 24bit 2ch 1440x900 24bit 2ch 1600x900 24bit 2ch 1680x1050 24bit 2ch 1920x1080 24bit 2ch Backlight Control Support VBIOS Default Both BLC BIA Disabled BLC Enabled Backlight Control Control Level8 Level0 Level1 Level2 Level3 Level4 ...

Page 55: ... BIA Enabled at Level2 BIA Enabled at Level3 BIA Enabled at Level4 BIA Enabled at Level5 3 8 2 South Bridge Configuration BIOS SETUP UTILITY Chipset South Bridge Chipset Configuration Options Disabled 2 USB Ports 4 USB Ports 6 USB Ports 8 USB Ports 10 USB Ports 12 USB Ports USB Functions 12 USB Ports USB2 0 Controller Enabled Keep USB Power at S5 Enabled Wireless Controller Enabled HAD Controller ...

Page 56: ...Auto PCIE Port 1 Auto PCIE Port 2 Auto PCIE Port 3 Auto PCIE Port 4 Auto PCIE High Priority Port Disabled V02 61 Copyright 1985 2006 American Mega trends Inc USB Functions 12 USB Ports Disabled 2 USB Ports 4 USB Ports 6 USB Ports 8 USB Ports 10 USB Ports USB 2 0 Controller Enabled Keep USB Power at S5 Enabled Disabled Wireless Controller Enabled Disabled HDA Controller Enabled Disabled SMBUS Contr...

Page 57: ...conds Restore on AC Power Loss Power Off Power On Last Status PCIE Ports Configuration PCIE Port 0 Auto Enabled Disabled PCIE Port 1 Auto Enabled Disabled PCIE Port 2 Auto Enabled Disabled PCIE Port 3 Auto Enabled Disabled PCIE Port 4 Auto Enabled Disabled PCIE High priority Port Disabled Port 0 Port1 Port2 ...

Page 58: ...Y Main Advanced PCIPnP Boot Security Chipset Exit Exit Options Exit system setup after saving the changes F10 key can be used For this operation Select Screen Select Item Enter Go to sub screen F1 General Help F10 Save and Exit ESC Exit Save Changes and Exit Discard Changes and Exit Discard Changes Load Optimal Defaults Load Failsafe Defaults V02 61 Copyright 1985 2006 American Mega trends Inc Sav...

Page 59: ...it setup ESC key can be used for this operation OK Cancel Discard Changes Discard changes F7 key can be used for this operation OK Cancel Load Optimal Defaults Load Optimal Defaults F9 key can be used for this operation OK Cancel Load FailSafe Defaults Load FailSafe Defaults F9 key can be used for this operation OK Cancel ...

Page 60: ...tents include Intel GM45 ICH9M Chipset Driver Intel R VGA Chipset Driver Intel R Network Adapter Realtek ALC662 Audio Codec Driver Microsoft NET Framework 3 5 Service Touch Panel Driver Installation instructions are given below I Important Note After installing your Windows operating system Windows XP you must install first the Intel Chipset Software Installation Utility before proceeding with the...

Page 61: ...60 4 1 Intel Chipset Driver To install the Intel chipset driver please follow the steps below Step 1 Access driver list as shown below Select Intel GM45 ICH9M Chipset Driver from the list Step 2 Click Next to set up program ...

Page 62: ...APC 3918P User Manual 61 Step 3 Click Yes to accept all of the terms of the license agreement Step 4 Click Next to continue ...

Page 63: ...APC 3918P User Manual 62 Step 5 Click Next Step 6 Select Yes I want to restart this computer now to restart the computer Click Finish then remove any installation media from the drives ...

Page 64: ...r Manual 63 4 2 Intel R VGA Chipset Driver To install the VGA driver follow the steps below to proceed with the installation Step 1 Select Intel R VGA Chipset Driver Step 2 Click Next to continue the set up program ...

Page 65: ...APC 3918P User Manual 64 Step 3 Click Yes to continue Step 4 Click Next Step 5 Read the license agreement Click Yes to accept all of the terms of the license agreement ...

Page 66: ...APC 3918P User Manual 65 Step 6 Readme File Information screen appears Click Next to continue Step 7 Click Next ...

Page 67: ... to restart this computer now to restart the computer Click Finish to complete installation 4 3 Intel R Network Adapter To install Intel R Network Adapter device driver please follow the steps below Step 1 Select Intel R Network Adapter from the list ...

Page 68: ...APC 3918P User Manual 67 Step 2 Click Next to continue the installation Step 3 Select I accept the terms in the license agreement ...

Page 69: ...APC 3918P User Manual 68 Step 4 Tick Drivers Intel R PROSet for Windows Device Manager Advanced Network Services Click Next to continue the installation Step 5 Click Install to begin installation ...

Page 70: ... Finish to complete the installation 4 4 Realtek Audio Driver Installation To install the Realtek ALC662 Audio Codec Driver please follow the steps below Step 1 Access the driver list as shown below Select Realtek ALC662 Audio Codec Driver ...

Page 71: ...APC 3918P User Manual 70 Step 2 Click Next Step 3 The installation files are extracted ...

Page 72: ...APC 3918P User Manual 71 Step 4 Select Yes I want to restart my computer now and click Finish The system reboots ...

Page 73: ...lation To install the Microsoft NET Framework 3 5 Service please follow the steps below Step 1 Access the driver list as shown below Select Microsoft NET Framework 3 5 Service Step 2 Select I have read and ACCEPT the terms of the License Agreement Click Install to continue ...

Page 74: ...APC 3918P User Manual 73 Step 3 The installation can be monitored in the progress bar shown in below Step 4 When the driver installation is completed click Exit ...

Page 75: ...creens It is designed with USB interface features with multiple devices supporting function It is designed for Projected Capacitive Touch Panel PCAP application through glass touch sensing is ready for products that require a complete flat surface It also can drive the touch panel to get two fingers touch function that based on the Windows 7 support Figure 5 1 Bird s Eye View of Control Board 5 2 ...

Page 76: ...all the driver Please make sure your USB controller device had plugged in advance When the system first detects the controller board a screen appears that shows Unknown Device Do not use this hardware wizard Press Cancel Insert the product CD install setup exe the screen below would appear Click Touch Panel Driver Step 1 Click Next to install eGalax Touch on your computer ...

Page 77: ...APC 3918P User Manual 76 Step 2 Tick Install RS232 interface driver Step 3 Select None then click Next ...

Page 78: ...APC 3918P User Manual 77 Step 4 There is a pop up Click OK Step 5 Tick Support Multi Monitor System and click Next Step 6 Click Browse to create new folder Click Next to continue settings ...

Page 79: ...APC 3918P User Manual 78 Step 7 Under eGalaxTouch folder select Accessories Click Next to continue Step 8 Tick Create a eGalaxTouch Utility shortcut on desktop Click Next ...

Page 80: ...APC 3918P User Manual 79 Step 9 eGalaxTouch is configuring your new software installation Step 10 Click Yes to do 4 point calibration ...

Page 81: ...APC 3918P User Manual 80 5 2 2 Software Functions General In this window you can see there is USB Controller Click OK to continue Monitor Mapping to adjust the touch panel Add to search for the device ...

Page 82: ...Setting Beep Beep On Touch Beep On Release Beep From System Beep Beep From Sound Card Linearization Style 9 points 25 points Double Click Time Shorter Longer Double Click Area Smaller Bigger Normal mode Simulate the mouse mode ...

Page 83: ...APC 3918P User Manual 82 Option Function Enable Constant Touch Enable Auto Right Click Enable Touch Enable Cursor Stabilization Constant Touch Area Auto Right Click Time ...

Page 84: ...gs 4 Points Calibration Do 4 points alignment to match display Clear and Calibrate Clear linearization parameter and do 4 points alignment Linearization Do 9 points linearization for better touchscreen linearity Draw Test Do draw test to verify the touch accuracy ...

Page 85: ...ser Manual 84 Display In this window it shows the mode of display Enable Multiple Monitors Map to main display if system has only one display monitor Full Screen Lower Screen Left Screen Upper Screen Right Screen ...

Page 86: ...APC 3918P User Manual 85 Other Other mode of display Quarter1 4 and Customized area Active Area Drag active area to enable Active Area Function ...

Page 87: ...APC 3918P User Manual 86 Hardware Saturn Hardware Configuration ...

Page 88: ...APC 3918P User Manual 87 About To display information about eGalaxTouch and its version ...

Reviews: