Aplex ACS-2630 User Manual Download Page 13

ACS-2630 User Manual   

13

Chapter 2_____________________________ 


2  

Installation of HDD


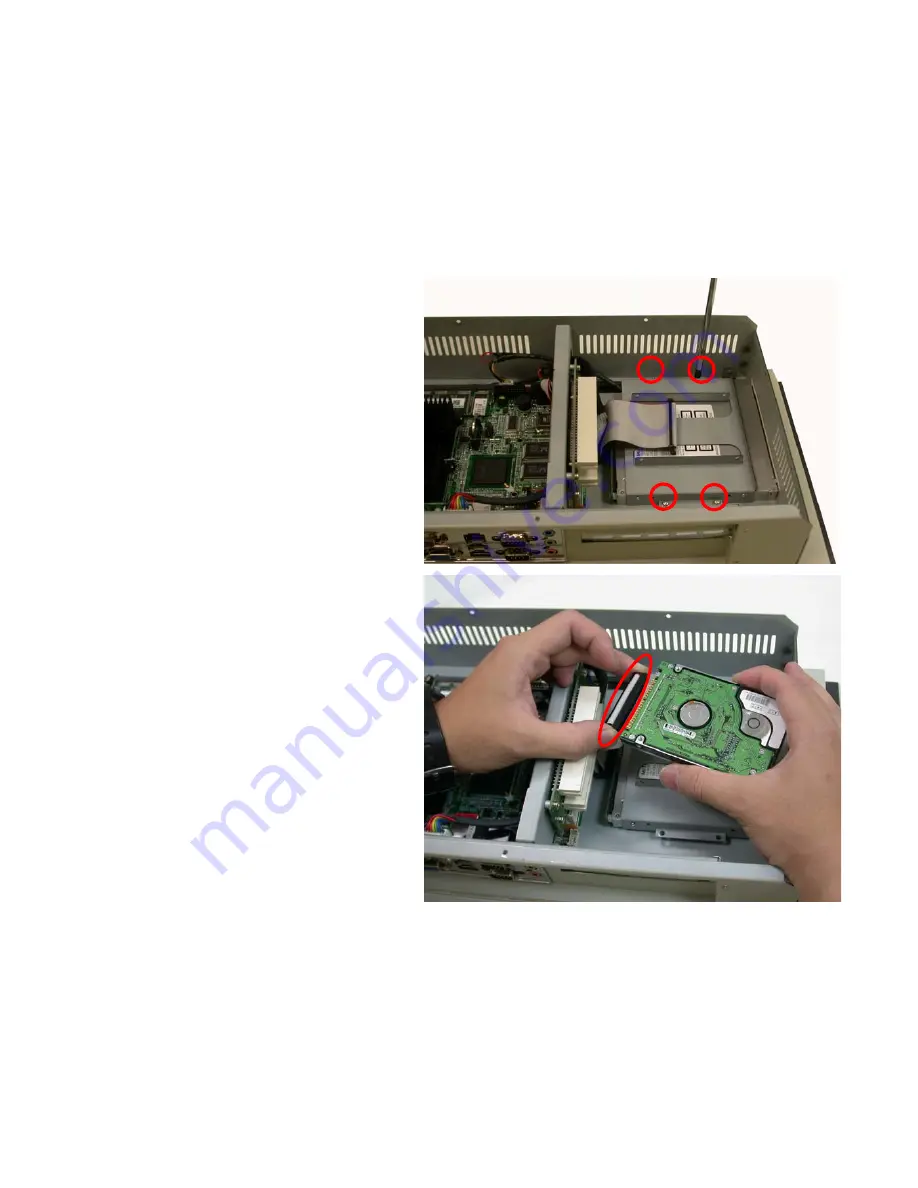
2.1 Removal of HDD Bracket 


To remove the HDD bracket from its position, 

just unscrew the 4 screws as shown in the 

picture.  


2.2 Connecting Cable to HDD   


Connect the cable to the HDD, making sure 

that the red stripe of the cable is on the right 

side (if connected with the top of the HDD 

facing upward). 


Summary of Contents for ACS-2630

Page 1: ... Date Revision June 2006 V0 1 2005 Aplex Technology Inc All Rights Reserved Published in Taiwan Aplex Technology Inc 9F 5 No 2 Jian Pa Road Chung Ho City Taipei County Taiwan Tel 886 2 82262881 Fax 886 2 82262883 E mail aplex aplex com tw URL www aplex com tw ...

Page 2: ...perated in a commercial environment Operation of this equipment in a residential area is likely to cause interference in which case the user at his own expense will be required to take whatever measures may be required to correct the interference Disclaimer This information in this document is subject to change without notice In no event shall Aplex Technology Inc be liable for damages of any kind...

Page 3: ...cations 5 1 3 Dimensions 7 1 4 Mainboard 8 1 5 Safety Precautions 11 1 6 Brief Description of ACS 2630 11 Chapter 2 Hardware Installation 2 Installation of HDD 2 1 Removal of HDD Bracket 13 2 2 Connecting Cable to HDD 13 2 3 Putting HDD into Bracket 14 2 4 Tightening HDD 14 2 5 Installing HDD 14 Chapter 3 Jumper Setting Jumper Setting 15 ...

Page 4: ...ACS 2630 User Manual 4 Figures Figure 1 1 Dimensions 7 Figure 1 2 Front View 11 Figure 1 3 Rear View 12 ...

Page 5: ...lim HDD z DC11 28V wide ranging power input with 60W 1 2 Specifications System CPU Intel Celeron M 600MHz 1 5GHz up to Pentium M 1 7GHz Chipset Intel 852GM ICH4 System Memory DDR SO DIMM with 256MB up to 1GB DRAM Socket One 200 pin SO DIMM Drive Bay 1 x compact flash 1 x 2 5 anti vibration slim HDD BIOS Award Flash Watchdog Timer Generates system reset 256 levels I O Port 2 COM ports one SPP ECP E...

Page 6: ...9 5 W x 73 7 D x 221mm H Power Supply DC11 28V wide ranging power input with 60W Environment Operating temperature 0 60 C Storage temperature 20 C 80 C Relative humidity 10 90 40 C non condensing Vibration 5 17Hz 0 1 double amplitude displacement 17 640Hz 1 5G acceleration peak to peak Shock 10G acceleration peak to peak 11 millimeters ...

Page 7: ...ACS 2630 User Manual 7 1 3 Dimensions Figure 1 1 Dimensions of the ACS 2630 ...

Page 8: ...CPU Intel Celeron M processor CPU Frequency ULV 600MHz non L2 cache Chipset Intel 852GM ICH4 DRAM One 200 pin DDR SO DIMM supporting DDR266 SDRAM up to 1GB BIOS Phoenix Award PnP BIOS with VGA BIOS Watchdog Timer 1 255 secs watchdog timer selectable w Reset NMI ...

Page 9: ... 40 pin IDE UDMA 33 66 100 CF One Compact flash slot IDE FDD Interface One FDD Bus Interface PCI slot mini PCI bus Serial Port Four COM ports COM1 and 4 for RS232 and COM2 and for RS232 422 485 for 16550 compatible type of UART Parallel Port One parallel SPP EPP ECP IrDA 1 SIR Keyboard Mini DIN connector Mouse Mini DIN connector LAN Realtek RTL8100C 10 100Mbps ...

Page 10: ...ake on with ATX power USB 2 USB 2 0 ports Graphics Built in Intel 852GM sharing system memory and supporting CRT LVDS Environment Operating Temperature 0 60 C Storage Temperature 20 80 C Operating Humidity 20 90 Storage Humidity 20 95 ...

Page 11: ... system 1 6 Brief Description of the ACS 2630 The ACS 2630 is a fanless rugged and ultra compact standalone Box PC powered by an Intel Celeron M processor with speed of 600MHz 1 5GHz up to Pentium M 1 7GHz and supporting 2 USB 2 0 ports It is ideal for kiosks POS systems airport terminal controllers digital entertainments etc and running factory operations from small visual interface and maintenan...

Page 12: ...ACS 2630 User Manual 12 Figure 1 3 Rear View of ACS 2630 ...

Page 13: ...Removal of HDD Bracket To remove the HDD bracket from its position just unscrew the 4 screws as shown in the picture 2 2 Connecting Cable to HDD Connect the cable to the HDD making sure that the red stripe of the cable is on the right side if connected with the top of the HDD facing upward ...

Page 14: ...to Bracket Place the HDD into the base of the bracket as shown in the picture 2 4 Tightening HDD Tightly fasten the four screws as circled to secure the HDD 2 5 Installing HDD Get the 4 screws tightened onto the chassis as shown in the picture ...

Page 15: ...ACS 2630 User Manual 15 Chapter 3_____________________________ ...

Page 16: ...ACS 2630 User Manual 16 ...

Page 17: ...ACS 2630 User Manual 17 ...

Page 18: ...ACS 2630 User Manual 18 ...

Page 19: ...ACS 2630 User Manual 19 ...

Page 20: ...ACS 2630 User Manual 20 ...

Page 21: ...ACS 2630 User Manual 21 ...

Page 22: ...ACS 2630 User Manual 22 ...

Page 23: ...ACS 2630 User Manual 23 ...

Page 24: ...ACS 2630 User Manual 24 ...

Page 25: ...ACS 2630 User Manual 25 ...

Page 26: ...ACS 2630 User Manual 26 ...

Page 27: ...ACS 2630 User Manual 27 ...

Page 28: ...ACS 2630 User Manual 28 ...

Page 29: ...ACS 2630 User Manual 29 ...

Page 30: ...ACS 2630 User Manual 30 ...

Page 31: ...ACS 2630 User Manual 31 ...

Page 32: ...ACS 2630 User Manual 32 ...

Page 33: ...ACS 2630 User Manual 33 ...

Page 34: ...ACS 2630 User Manual 34 ...

Page 35: ...ACS 2630 User Manual 35 ...

Reviews: