background image

In the 

Parental

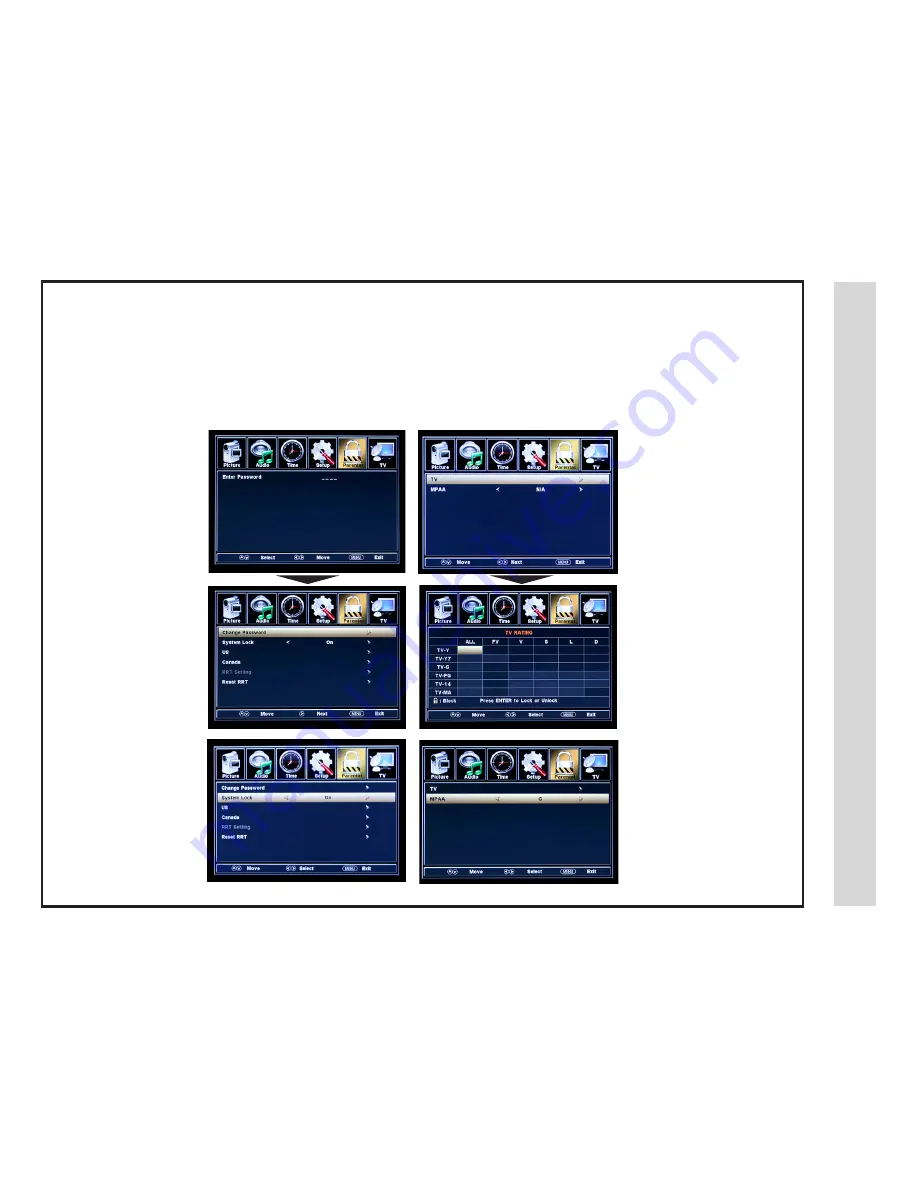
 menu, you may block television and movie programming based on TV ratings and Motion Picture Association guidelines. To 

gain access and select your preferences within the Parental menu make certain your input is set to TV.

How to Navigate: 

Press the 

MENU

 button on the remote control. Navigate using arrow 

t


u

 buttons to select 

PARENTAL

. Gain access to parental rating op-

tions by pressing the down 

q

 arrow button to highlight 

ENTER PASSWORD

. Enter your 4 digit code (factory default code is “0000”) unless 

previously changed.

• To set parental controls for 

television programming or DVD 
movies, press the down/up 

qp


arrow buttons to highlight US. 
Navigate using the 

t


u

 buttons 

to highlight 

TV/MPAA

 menu.

• Highlight TV, then press the 


u

 arrow button to enter the TV 

Ratings menu to select your 
preference.

TV -Y 

     Appropriate for all children

TV -Y7

    Appropriate for all children over 7

TV -G

     General Audience

TV - PG

  Parental Guidance Suggested

TV - 14 

  Parents Strongly Cautioned

TV - MA 

 Mature Audience Only

• Highlight MPAA then press the 

u

 arrow button repeatedly  to 

select your movie rating prefer-
ence. 

G       

General Audience

PG     

Parental Guidance Suggested

PG13 

Parents Strongly Cautioned

R        

Restricted

NC17  

No One Under 17 Permitted

X         

Adults Only

• To change the password, 

press


u

 arrow button to 

display a screen to enter your 

new password, then confirm 

again. (Not illustrated)

• To make changes to 

PARENTAL

 controls, high-

light 

SYSTEM LOCK

 then 

press the


u

 arrow button to 

ON

.

Menu Adjustments

NOTE: RRT Setting and Reset RRT are not user adjustable settings.

Parental Menu

23

24

Summary of Contents for LD4088

Page 1: ...07 2009 LD4088 USER S MANUAL 40 LCD TELEVISION ...

Page 2: ...ital device pursuant to Part 15 of the FCC Rules These limits are designed to provide reasonable protection against harmful interference in a residential installation This television generates uses and can radiate radio frequency energy and if not installed and used in accordance with the instructions may cause harmful interference to radio communications However there is no guarantee that interfe...

Page 3: ...Safety Instructions 2 ...

Page 4: ...Safety Instructions 3 ...

Page 5: ...Table of Contents 4 ...

Page 6: ...ack and one VGA terminal for connection to a computer A coaxial digital audio SPDIF jack is included to connect through your home amplifier receiver to provide a spectacular home theater experience 3D Digital noise reduction digitally reduces image noise while film mode detection adjusts the picture providing a more natural looking and clearer image We recommend that you read the user manual thoro...

Page 7: ...an to use the remote control handset for an extended period of time Do not mix bat teries of different age and or type Always discard used batteries safely Do not expose remote control to liquids direct sunlight or sources of excessive heat The IR receiver will not work properly if TV is in direct sunlight the remote control is pointed off axis or an object is in the IR path Place two 2 AAA batter...

Page 8: ...Volume Adjust volume up or volume down 15 Channel p q Select channel up p or channel down q 16 Input Press to display all input sources on screen 17 Menu Press to display the user menu Press again to exit 18 Favorite Press to display a list of favorite TV channels you ve added 19 Arrow Buttons Enter Use qpt u to navigate and make selections Press Enter to confirm a selection 20 Exit Press to exit ...

Page 9: ... 4 Volume VOL VOL Press the VOL VOL buttons to adjust volume up or down These buttons are also used to adjust settings in the MENU mode 5 Power Press the POWER button to turn the LCD display ON OFF standby When the power is on the blue LED illuminates The screen image will appear within a few seconds NOTE To turn OFF power completely switch the Master Power button located on the rear of the televi...

Page 10: ...side of the television will not function Make sure it is switched ON for regular TV viewing on a daily basis 2 AC Power Plug Insert power plug during initial setup 3 HDMI Inputs 3 Connects to digital AV equipment that feature HDMI connectivity HDMI supports enhanced high definition video and two channel digital audio all from one cable Recommended for best performance 4 PC IN VGA Audio Input 3 5mm...

Page 11: ...t on the TV s rear panel Select Ch 3 or 4 on the TV and select a channel For better performance use AV component or an HDMI installation Refer to your set top box user manual See page 17 for initial TV setup and Channel Auto scan Installation TV REAR PANEL F Connector F Connector F Connector Optional HDMI cable TV REAR PANEL It is strongly recommended that the installation of a high quality roof t...

Page 12: ...les and HD DVD Blu ray players How to Connect HDMI From your external digital A V equipment connect an HDMI cable from the HDMI output to the HDMI input on the TV s rear panel How To Use Press the HDMI button on the remote control repeatedly if necessary or Press the INPUT button on the remote control Use qp arrow buttons to highlight the input to view HDMI 1 2 3 then press ENTER Connecting to an ...

Page 13: ...t ie DVD Player set top box to the YPbPr1 and or YPbPr2 input s on the TV s rear panel Connect white red audio cables for sound from the audio L R output jacks on your external A V equipment ie DVD Player set top box to the YPbPr1 or YPbPr2 L R input s on the TV s rear panel How to Use Press the A V button on the remote control repeatedly if necessary or Press the INPUT button on the TV remote con...

Page 14: ... rear panel How to Connect S Video Connect an optional S Video cable from the S Video output jack on your external A V equipment to the S Video input on the TV s rear panel Connect the white red audio cables for sound from the audio L R output jacks on your external A V equipment to the AV1 L R input on the TV s rear panel How to Use Press the A V button on the remote control repeatedly if necessa...

Page 15: ...he TV s rear panel How to Use Press the VGA button on the remote control or Press the INPUT button on the remote control Use qp arrow buttons to high light the input to view VGA then press ENTER NOTE If your PC uses a standard signal mode the screen will adjust automatically 2 1 AV2 AV1 HDMI 3 HDMI 2 HDMI 1 TV REAR PANEL Connecting a Personal Computer with VGA to your television INPUT SOURCE INPUT...

Page 16: ...rom your system with a Dolby Digital amplifier that incorporates a digital coaxial input Connect an optional digital cable directly to the television s SPDIF audio output to listen through all inputs except VGA The VGA does not support digital audio How To Setup Digital Output Press the MENU button on the remote control Press the right u arrow button to select AUDIO Press the down q arrow button t...

Page 17: ...onnection of audio cables from your AV equipment to a stereo receiver instead of the audio L R jacks on the TV s rear panel NOTE When audio cables are connected to a stereo receiver amplifier no audio sound will be heard from the TV s built in speakers How to Use Video Press the appropriate INPUT button on the remote control Use qp arrow buttons to highlight the input to view then press ENTER How ...

Page 18: ...ect Auto Scan then press the u right arrow button to start Channel Auto Scan Channel Auto Scan may take several minutes to complete Select CABLE if you subscribe to a pay television service includ ing satellite Using the t u arrow button to highlight CABLE Press the q arrow button to select AUTO SCAN Press ENTER and the cursor will move up and CABLE SYSTEM will be displayed next Press the u arrow ...

Page 19: ...ighlight Brightness Navigate using the t u arrow buttons to increase or decrease overall brightness Use down q arrow button to highlight Color Navigate using the t u arrow buttons to increase or decrease color intensity Use down q arrow button to highlight Tint Navigate using the t u arrow buttons to adjust colors toward green or reddish tint Use down q arrow button to highlight Sharpness Navigate...

Page 20: ...t sound towards the left or right speaker Use down q arrow button to highlight Surround Press the u arrow button to turn the dimensional surround effect ON or OFF for built in speakers only Use down q arrow button to highlight AVC Navigate using the u arrow button In the ON position Automatic Volume Control will limit the level of increased volume heard during television commercials and volume dif...

Page 21: ... How to Navigate Press the MENU button on the remote control Navigate using arrow t u buttons to select TIME Use down q arrow button to highlight Time Zone Then press the u arrow button to select between EASTERN CENTRAL MOUN TAIN PACIFIC ALASKA HAWAII Use down q arrow button to highlight Daylight Savings Time Navi gate using the t u arrow buttons to turn this feature on or off 2009 20 Note When ad...

Page 22: ...ng mode displayed Normal Wide Zoom Cinema This feature is also avail able on the remote control See page 27 Highlight Restore Default Press the u arrow button to automatically set all adjust ments back to their original settings Highlight Transparency Navigate using the t u ar row buttons to turn Off u On the translucent effect of the User menu Other languages include Spanish and French Highlight ...

Page 23: ...n to highlight CC Mode Navi gate using the t u arrow buttons select Off On CC on Mute Use down q arrow button to highlight Basic Selection Navigate using the t u ar row buttons select CC 1 4 Text 1 4 Use down q arrow button to highlight Option Press the u arrow button to enter a menu with options to cus tomize text fonts colors and opacities Use down q arrow button to highlight Advanced Selection ...

Page 24: ...igate using arrow t u buttons to select SETUP Gain access to position adjustment options by pressing the down q arrow button to highlight Advanced then press u arrow button to select from the following options Highlight V Pos Navigate using the t u arrow but tons to adjust the position of images displayed up and down Highlight Clock Navigate using the t u arrow buttons to control the width of the ...

Page 25: ...ons to highlight TV MPAA menu Highlight TV then press the u arrow button to enter the TV Ratings menu to select your preference TV Y Appropriate for all children TV Y7 Appropriate for all children over 7 TV G General Audience TV PG Parental Guidance Suggested TV 14 Parents Strongly Cautioned TV MA Mature Audience Only Highlight MPAA then press the u arrow button repeatedly to select your movie rat...

Page 26: ...highlight CANADA ENGLISH then press the u arrow button repeatedly to select your ratings preference E Appropriate for everyone C Appropriate for all children C8 Appropriate for everyone 8 years old and up G General Audience PG Parental Guidance 14 Appropriate for Children over 14 years old 18 Mature Audience Only E Appropriate for everyone G General Audience 8 ans Appropriate for Children 8 years ...

Page 27: ...a channel has been added Highlight CHANNEL LABEL to name or rename a broadcast channel Navigate using the u arrow button to enter the screen menu to re label a channel Use the qp arrow buttons to spell out each letter number or character Use t u arrow buttons to ad vance to the next space NOTE The DTV SIGNAL is a measurement of signal strength for the current channel viewed The TV menu provides fo...

Page 28: ...tent and undistorted 4 3 images With Black Bars Stretches certain 4 3 content and may reduce the black bars Stretches the image both vertically and horizontally to fill the screen when viewing widescreen content The zoom effect will crop images somewhat When viewing 4 3 content Cinema mode will fill the entire screen eliminating the side black bars It may also eliminate or reduce black bars on cer...

Page 29: ... Maximum Colors millions Response Time ms Audio Power Dimension with Pedestal Installed Weight with Pedestal Input Connections LCD TV 40 Diagonal 16 9 480i 480p 720p 1080i 1080p 1 920 x 1 080 450 1 800 1 176 176 16 7M 7ms 2 X 7W 39 H x 28 25 W x 12 75 D 47 4 lbs Composite Video 2 S Video 1 YPbPr Audio L R 2 HDMI 3 RF 1 SPDIF Coaxial Digital Output 1 PC VGA 1 PCAudio IN 1 ...

Page 30: ...Troubleshooting 29 Press the CCD button on the remote control to turn off Press INPUT button to verify the desired input is selected ...

Page 31: ... Display Modes for PC 14 E Exit 7 F Favorite Channels 7 26 G Guide 7 H HDMI Input 11 Home theater 15 16 I IR Receiver 6 8 Input 7 8 11 14 L Languages 19 21 LED light 8 M Master Power 8 9 Menu 7 8 17 26 MTS 7 19 Mute 7 Movie Ratings 24 25 Movie mode 18 N Normal Zoom 27 Noise Reduction 21 Number buttons 7 P Parental Control 24 25 Password 24 25 Pedestal stand removal 9 PC 9 14 23 PCM 15 Phase 23 Pic...

Page 32: ...e until a service claim number is provided Labor service charges for set installation setup adjustment of consumer controls and installation or repair of any type of antenna or cable systems are not covered by this warranty Reception problems caused by inadequate antenna or cable systems are your responsibility Warranties extend only to defects in materials or workmanship as limited above and do n...

Reviews: