background image


2.


Téléchargement de l'application et fonctions


1.Veuillez rechercher aovopro sur APPstore ou Google Play. 

pour télécharger et installer sur un téléphone portable, vous 

 pouvez également scannez le code QR ou le lien suivant pour  

le télécharger l'application aovopro: https: //apps.apple.com 

/app/aovopro/id1484658812  

andriod: https: //play.google.com/store/apps/details?id=com 

.zydtech.aovopro 

2.Une fois l'application installée, veuillez appuyer sur  

l'interrupteur marche / arrêtbouton pendant 3 seco-ndes  

pour  allumer le scooter. 

3.Ouvrez le bluetooth du téléphone portable et ouvrez le  

aovopro l'application, le scooter est automatiquement 

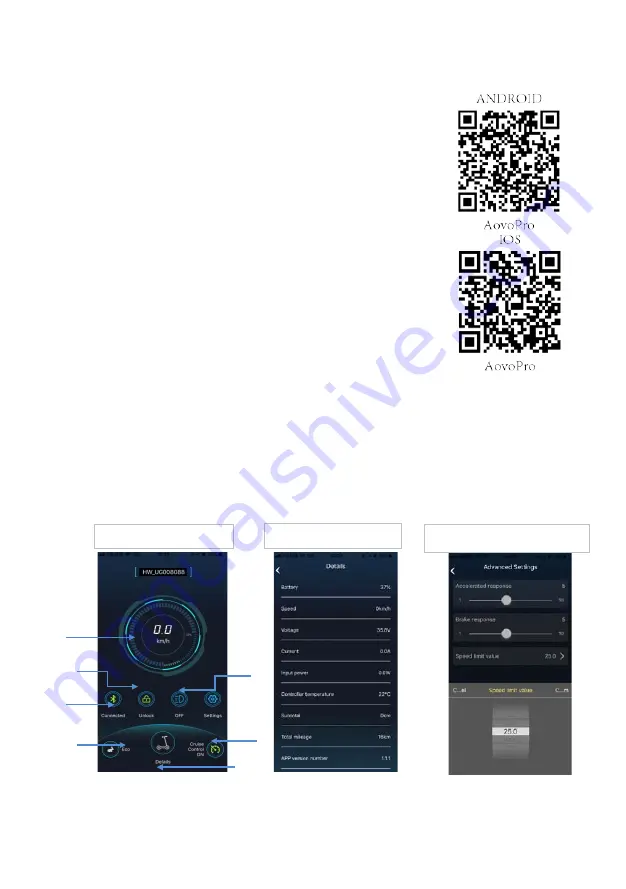
 connecté à l'application,alors vous pouvez utiliser l'app 

 pour allumer / éteindre la lumière et scooter, changer de 

 vitesse, régler le régulateur de vitesse ou le verrouiller scooter. 

4.Si vous ne souhaitez pas utiliser l'application, vous pouvez 

utilisez également le bouton sur l'écran pour faire fonctionner le 

scooter.  Appuyez pendant 1 seconde pour allumer le scooter, appuyez pendant 

3 secondes pour éteindre; 

  Pressez une fois pour allumer / éteindre la lumière; 

  Appuyez rapidement deux fois pour changer le levier de vitesse 

Fonction APP 


scooter connecté 


informations de scooter


vitesse en  
temps réel 

scooter 
connecté 

verrouiller
le scooter


lumière  

on/off 


     croisière  
    on / off 

    scooter  

        info 

 Niveau de 
 vitesse 
 

définir la limite de vitesse


Summary of Contents for AovoPro

Page 1: ...1 AovoPro Electric Scooter Manual Manual d Utilisation Scooter Electrico Manual ...

Page 2: ... funciones 07 4 The Device Accessories 09 5 Assembling the device 11 6 Charge the scooter 12 7 Driving Instructions 12 8 Safety Recommendations 14 9 Folding Transportation 18 10 Daily Maintenance and Storage 20 11 Model Specifications 23 12 Presence of toxic and harmful substances 25 13 Warranty 26 ...

Page 3: ... the cellphone bluetooth and open the aovopro app the scooter is automatically connected the app then you can use the apptoswitch on off the light scooter changespeed set up cruise control or lock scooter 4 If you do not want to use the app you can also use the button on the display to operate the scooter Press for 1 second to switch on scooter press for 3 seconds to turn off Pres one time to turn...

Page 4: ...ter display function realtime speed speed gear blank is low speed red is high speed battery capacity switch on off button accelerator brake cruise control open scooter locked speed gear green is middle speed ...

Page 5: ...vopro l application le scooter est automatiquement connecté à l application alors vous pouvez utiliser l app pour allumer éteindre la lumière et scooter changer de vitesse régler le régulateur de vitesse ou le verrouiller scooter 4 Si vous ne souhaitez pas utiliser l application vous pouvez utilisez également le bouton sur l écran pour faire fonctionner le scooter Appuyez pendant 1 seconde pour al...

Page 6: ...n temps réel vitesse vitesse le rouge est haute vitesse capacité de la batterie bouton allumer éteindre accélérateur frein activer le régulateur de vitesse scooter verrouillé vitesse vitesse vide est basse vitesse le vert est la vitesse moyenne ...

Page 7: ...cación el scooter se conecta automáticamente a la App entonces puedes usarla para encender apagar la luz yscooter cambiar la velocidad configurar el control de crucero o bloquearscooter 4 Si no desea utilizar la aplicación puedetambién usar el botón en la pantalla para operar el scooter Presione durante 1 segundo para encender el scooter presione durante 3 segundos para apagar Presine una vez para...

Page 8: ...mpo real engranaje de velocidad en blanco es de baja velocidad el rojo es de alta velocidad capacidad de la batería botón de encendido apagado acelerador freno encienda el control de crucero scooter bloqueado engranaje de velocidad verde es velocidad media ...

Page 9: ...9 4 The Device Accessory Accessory ...

Page 10: ...10 ...

Page 11: ...ng the device 1 fix the steering rod and 2 Set handle bars vertical open the parking bridge Using hex wrench in the packing box to tighten the screws on handle bar 4 Testing the power switch after finish assembling ...

Page 12: ...12 6 Charge the scooter Open the cover connect the charger close the cover 7 Driving instruction Please wear helmet and knee pads when practice 1 Power on and check the battery led light ...

Page 13: ...ate button only accelerate when the scooter speed is beyond 5km h 4 loose the accelerate button when slow down Energy recovery systems will open itself to slow down Press the left disc brake tightly if want to brake urgently 5 lean your body left slightly to turn left lean your body right slightly to turn right And turn the handlebar slowly ...

Page 14: ...rain It is recommend to slightly bend knees to better adjust to a rough road If you are travelling on a rough road stick to low speed 5 10km h Entering into any room elevator etc Be careful not be injured by a door frame Please not add speed when descending a hill ...

Page 15: ...o not press a speed knob Please do not hang backpacks and other heavy objects on handle bars ground When driving it is recommended to go around various obstacles on a road When driving is forbidden to place one footon the running board ...

Page 16: ...t high roadway for motor vehicles or ride in at a high speed It is forbidden to sharply turn a a residential area with a large flow of passers by It is forbidden to drive through puddles to which exceeds depth of 2cm Never rider a scooter more than or one person hold a child in your arms ...

Page 17: ...17 Do not tread the back of the fender Do not touch the disc brake Do not driving leaving your hands Do not riding electric scooter up down steps or jump over obstacles ...

Page 18: ...cooter loss of balance and even fall Therefore during moving of scooter you need to be vigilant to adhere to an appropriate speed keep a safe distance from pedestrians and or with other vehicles Riding on unfamiliar terrain keep vigilance and appropriate speed 3 While riding scooter respect rights of pedestrians Do not scare them especially children Reduce speed passing by them If you are moving i...

Page 19: ... or other abnormal symptoms please discontinue use of the scooter immediately don t drive it reluctantly 9 Fold and Transportation Fold Make sure scooter be off hold the front pole loosen a lock lever and lower a steering rack Adding a steering rack in a horizontal position and secure it by inserting a hook through a special ring which is located on the rear wheel mudguard To Assemble the scooter ...

Page 20: ...he vehicle it is necessary to insert a plug back to a charging connector otherwise you may get an electric shock or may have serious water damage cause from water falling into this hole may have serious water damage If you do not use the scooter store it in a dry cool place and do not leave the unit for a long time on the street Leaving the device under the sun in extremely high temperature over l...

Page 21: ...ys you need to charge the battery otherwise there is the likelihood of its failure which is not subject to warranty services Avoid a full discharge of the device it will to extend battery life When using the device at normal room temperature the battery will be able to ride much greater distance and its performance will be better but if you use the scooter at temperatures below 0C vehicle performa...

Page 22: ... pulley If you think that brake is very free loosen a tension pulley pull a brake cable to slightly increase a length of its tail Tighten a tension pulley Adjusting a handle bars Staggering of steering rack using a M5 hex wrench tighten two screws near the folding mechanism Using a connecting pipe to pump wheels If a rear wheel of Electric Scooter deflated connect a connecting pipe to a wheel nipp...

Page 23: ... 120 Agee 16 50 Height cm 120 200 Main Parameters Max speed km h 31 Possibility in average 25 35 Condition 2 km Maximum slope 20 Suitable area Solid road surface smooth clay surface to overtime obstacles high less than 1cm a depth of pools no more than 2cm Operating 10 40 temperature range Temperature of 20 45 storage Waterproof level Battery Parameters Rated 36B voltages VDC Max voltage of 42B ch...

Page 24: ... circuit auto sleep wake up overheating protection control of battery Motor Parameters Rated power W 350 Max power w 350 power Adaptor Rated power W 71 Parameters Rated Input 100 240B voltage VAC Rated Output 42V voltage VDC Rated current A 1 7 Certificate CE RoHs Charging time h Est 3 5 Est 5 ...

Page 25: ... X Circuit X O O X X X Board Motor X O O X O O Housing X O O O O O Date provided in accordance with provisions of SJ T 11364 O toxic and harmful substances in all components of the device are contained in an amount below the limit value according to standard GB T 26572 2011 X presence of toxic and hazardous substances at least one of components of the device in an amount that exceeds the threshold...

Page 26: ... The warranty service includes Recommendation use the packaging for safe transport of the device We recommend keeping the original packaging within 15 days after receipt of goods II Warranty terms Name Information on warranty maintainance Term Main Unit hub motor controller steering 1 year Accessories Battery power supply 6 Months ...

Page 27: ... device or its components from the Fault list which arose in connection with the human factor and which interfere with normal operation 6 Failures that have arisen in connection with the human factors including but not limited to excessive wetting device puncture drop scratch and damage an outer casing which have arisen as a result of normal use of goods 7 If this product is used for commercial pu...

Reviews: