


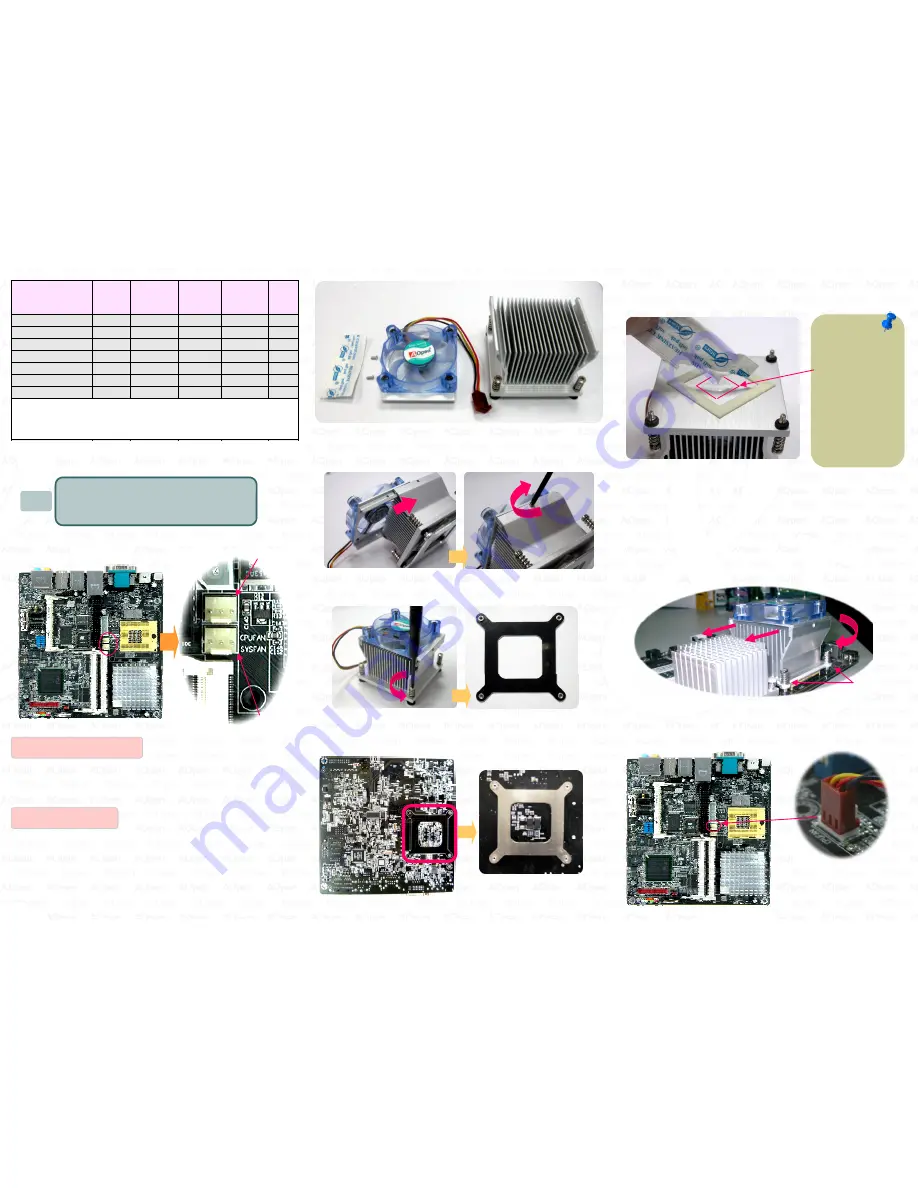
5.
Smear over the thermal compound under the center
of heatsink smoothly and let it be well mixed.
6.
Put the CPU Fan & heatsink on the processor and
lock the four screws of the heatsink with bracket. (on
the MB back side) Please make sure the screws are
well tied between the motherboard and heatsink.
Notice the CPU Fan & heatsink must have direction
as below picture. Keep the heatsink direct the air
flow to North bridge’s heatsink. That can help to get
good thermal in system operation.
(Picture for reference only)
7.
Plug the CPU fan power into “CPUFAN” connector
properly.
2.
Insert CPU FAN into the top of CPU heasink. After
that please lock the screw between the CPU FAN
and CPU heatsink. ( as pictures below )
3.
Remove the four screws of the CPU heatsink and
take the bracket from heatsink.
4.
Place bracket properly on the back side of MoDT
Flex 945 as picture.
(Picture for reference only)
Processor Number
Archite
cture
Clock
Speed
Front
Side Bus
Cache
Ratio
Core Duo T2700
65nm
2.33GHz
667MHz
2MB L2
14
Core Duo T2600
65nm
2.16GHz
667MHz
2MB L2
13
Core Duo T2500
65nm
2GHz
667MHz
2MB L2
12
Core Duo T2400
65nm
1.83GHz
667MHz
2MB L2
11
Core Duo T2300
65nm
1.66GHz
667MHz
2MB L2
10
Core Solo T1400
65nm
1.83GHz
667MHz
2MB L2
11
Core Solo T1300
65nm
1.66GHz
667MHz
2MB L2
10
Note
:
With CPU speed changing rapidly, there might be faster CPU on
the market by the time you received this installation guide. This table
is kindly for your references only.
Above table is Intel® Core™ Duo and Core™ Solo CPU
numbers and simple specification for your reference only.
2
CPU Cooler & System Fan
Installation
Find the CPU fan power connector and system fan power
connector - as below picture.
System Fan
CPU Fan
Connect your system Fan
power with above “SYSFAN”
connector. Be care of the direction of fan power
connector, it has anti-direction stick on it. Please make
your system fan power connect correctly with it.
1.
Please check the all parts are in the CPU cooler’s
box. And take them out. ( If you don’t have any of
them, please contact with local AOpen technical
support team.
Install the SYSTEM FAN
Install the CPU FAN
Note
The thermal
compound should
not paste too much
on the heatsink.
Please paste with
left red area around
(recommend). The
compound thin with
1 ~ 2mm will be
better.
(Picture for reference only)
Screw
Direction


