AOC U34G3XM User Manual Download Page 12

10

Wall Mounting

Preparing to Install An Optional Wall Mounting Arm(Screw diameter is M4 and length is 10mm).

This monitor can be attached to a wall mounting arm you purchase separately. Disconnect power before this procedure. 
Follow these steps:
1. Remove the base.
2. Follow the manufacturer’s instructions to assemble the wall mounting arm. 
3. Place the wall mounting arm onto the back of the monitor. Line up the holes of the arm with the holes in the back of the 
monitor.
4. Insert the 4 screws into the holes and tighten. 
5. Reconnect the cables. Refer to the user’s manual that came with the optional wall mounting arm for instructions on 
attaching it to the wall.

Noted: 

VESA mounting screw holes are not available for all models, please check with the dealer or official department 

of AOC. 

-5°

90°

* Display design may differ from those illustrated.

WARNING: 

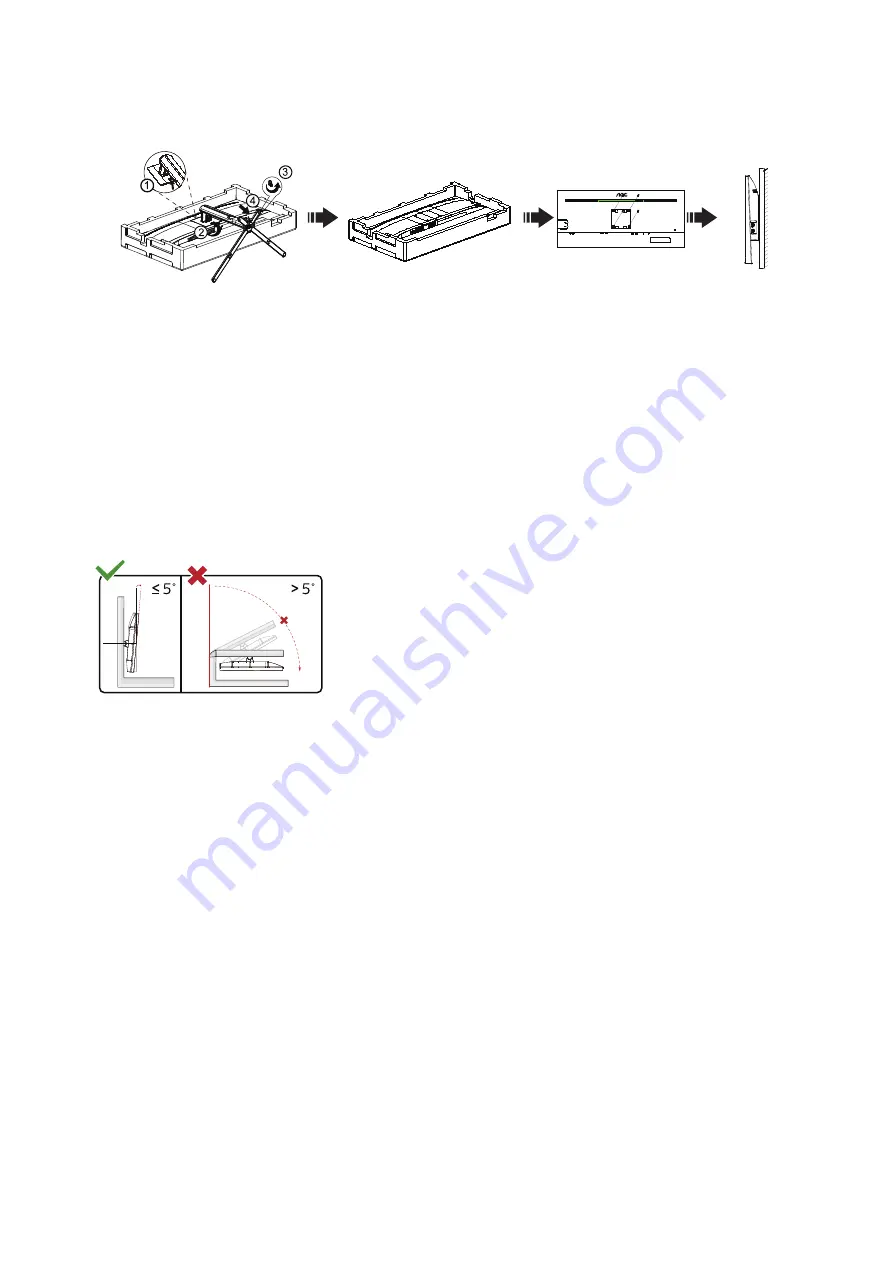
1.  To avoid potential screen damage, such as panel peeling, ensure that the monitor does not tilt downward by more than 

-5 degrees. 

2. Do not press the screen while adjusting the angle of the monitor. Grasp only the bezel.

Summary of Contents for U34G3XM

Page 1: ...1 www aoc com 2022 AOC All Rights Reserved LCD Monitor User Manual U34G3XM...

Page 2: ...Connecting the Monitor 9 Wall Mounting 10 AMD FreeSync Premium function 11 HDR 12 Adjusting 13 Hotkeys 13 OSD Setting 14 Luminance 15 Color Setup 16 Picture Boost 17 OSD Setup 18 PIP Setting 19 Extra...

Page 3: ...used as follows NOTE A NOTE indicates important information that helps you make better use of your computer system CAUTION A CAUTION indicates either potential damage to hardware or loss of data and...

Page 4: ...ctrician install the correct outlet or use an adapter to ground the appliance safely Do not defeat the safety purpose of the grounded plug Unplug the unit during a lightning storm or when it will not...

Page 5: ...the front of the product on the floor If you mount the monitor on a wall or shelf use a mounting kit approved by the manufacturer and follow the kit instructions Leave some space around the monitor as...

Page 6: ...regularly with a water dampened soft cloth When cleaning use a soft cotton or microfiber cloth The cloth should be damp and almost dry do not allow liquid into the case Please disconnect the power cor...

Page 7: ...act conditions during operation Do not knock or drop the monitor during operation or transportation IThe power cords shall be safety approved For Germany it shall be H03VV F 3G 0 75 mm2 or better For...

Page 8: ...nitor Warranty Card Stand Base Power Cable HDMI Cable USB Cable DP Cable Quick Start Not all signal cables will be provided for all countries and regions Please check with the local dealer or AOC bran...

Page 9: ...7 Setup Stand Base Please setup or remove the base following the steps as below Setup 4 1 2 3 Remove...

Page 10: ...r when you change the monitor s angle You are able to adjust the monitor as below NOTE Do not touch the LCD screen when you change the angle It may cause damage or break the LCD screen WARNING 1 To av...

Page 11: ...of the display firmly 2 Turn off your computer and unplug its power cable 3 Connect the display signal cable to the video connector on your computer 4 Plug the power cord of your computer and your dis...

Page 12: ...he holes in the back of the monitor 4 Insert the 4 screws into the holes and tighten 5 Reconnect the cables Refer to the user s manual that came with the optional wall mounting arm for instructions on...

Page 13: ...s Radeon R9 Fury series Radeon R9 R7 200 series R9 270 X R9 280 X except Processors AMD Ryzen 7 2700U AMD Ryzen 5 2500U AMD Ryzen 5 2400G AMD Ryzen 3 2300U AMD Ryzen 3 2200G AMD PRO A12 9800 AMD PRO A...

Page 14: ...of your device and content Please select OFF for the HDR function when you have no need for automatical activation function Note 1 Only the HDMI interface is available and the DisplayPort interface ca...

Page 15: ...press key to open game mode function then press or key to select game mode FPS RTS Racing Gamer 1 Gamer 2 or Gamer 3 basing on the different game types Dial Point When there is no OSD press Dial Point...

Page 16: ...Once the desired function is highlighted press MENU button to activate it 3 Press or to change the settings of the selected function Press AUTO button to exit If you want to adjust any other function...

Page 17: ...Internet Internet Mode Game Game Mode Movie Movie Mode Sports Sports Mode Reading Reading Mode Uniformity Uniformity Mode Gamma Gamma1 Adjust to Gamma 1 Gamma2 Adjust to Gamma 2 Gamma3 Adjust to Gamma...

Page 18: ...en Gain Digital register Blue Gain from Digital register DCB Mode OFF Disable or Enable OFF Mode Full Enhance Disable or Enable Full Enhance Mode Nature Skin Disable or Enable Nature Skin Mode Green F...

Page 19: ...rame Frame Size 14 100 Adjust Frame Size Brightness 0 100 Adjust Frame Brightness Contrast 0 100 Adjust Frame Contrast H position 0 100 Adjust Frame horizontal Position V position 0 100 Adjust Frame v...

Page 20: ...120 Adjust the OSD Timeout DP Capability 1 1 1 2 1 4 Please be noted that only DP1 2 1 4 support Adaptive Sync AMD FreeSync AMD FreeSync Premium AMD FreeSync Premium Pro G SYNC function H Position 0 1...

Page 21: ...ce HDMI1 HDMI2 DP Select sub screen source Size Small Middle Large Select screen size Position Right up Set the screen location Right down Left up Left down Audio On PIP Audio Disable or Enable Audio...

Page 22: ...can adjust from 50 to 100 or 0 to increase contrast for clear picture 1 If picture is too dark to be saw the detail clearly adjusting from 50 to100 for clear picture 2 If picture is too white to be sa...

Page 23: ...ncy 60 Hz Extra PIP Setting PIP Game Setting Input Select Auto HDMI1 HDMI2 DP Select Input Signal Source Off timer 0 24hrs Select DC off time Image Ratio Wide 4 3 1 1 17 4 3 19 4 3 19 5 4 19 W 16 10 2...

Page 24: ...22 Exit Exit Luminance Color Setup Picture Boost OSD Setup Extra PIP Setting PIP Game Setting Exit Exit the main OSD...

Page 25: ...23 LED Indicator Status LED Color Full Power Mode White Active off Mode Orange...

Page 26: ...u are not using an extension cable or switch box We recommend plugging the monitor directly to the video card output connector on the back Picture Bounces Flickers Or Wave Pattern Appears In The Pictu...

Page 27: ...Max Resolution 3440x1440 100Hz HDMI 3440x1440 144Hz DP Plug Play VESA DDC2B CI Power Source 100 240V 50 60Hz 1 5A Power Consumption Typical Default Brightness And Contrast 45W Max Brightness 100 Contr...

Page 28: ...1024 x 768 100Hz 80 448 99 811 SXGA 1280x1024 60Hz 63 981 60 020 1280x1024 75Hz 79 976 75 025 WXGA 1440x900 60Hz 55 935 59 887 1440x900 60Hz 55 469 59 901 WSXGA 1680x1050 60Hz 65 290 59 954 1680x1050...

Page 29: ...t 4 TMDS Data 1 12 TMDS Clock 5 TMDS Data 1Shield 13 CEC 6 TMDS Data 1 14 Reserved N C on device 7 TMDS Data 0 15 SCL 8 TMDS Data 0 Shield 16 SDA 20 Pin Color Display Signal Cable Pin No Signal Name P...

Page 30: ...SA DDC STANDARD It allows the monitor to inform the host system of its identity and depending on the level of DDC used communicate additional information about its display capabilities The DDC2B is a...

Reviews: