AOC LM760 User Manual Download Page 16

14

TECHNICAL SUPPORT (FAQ)
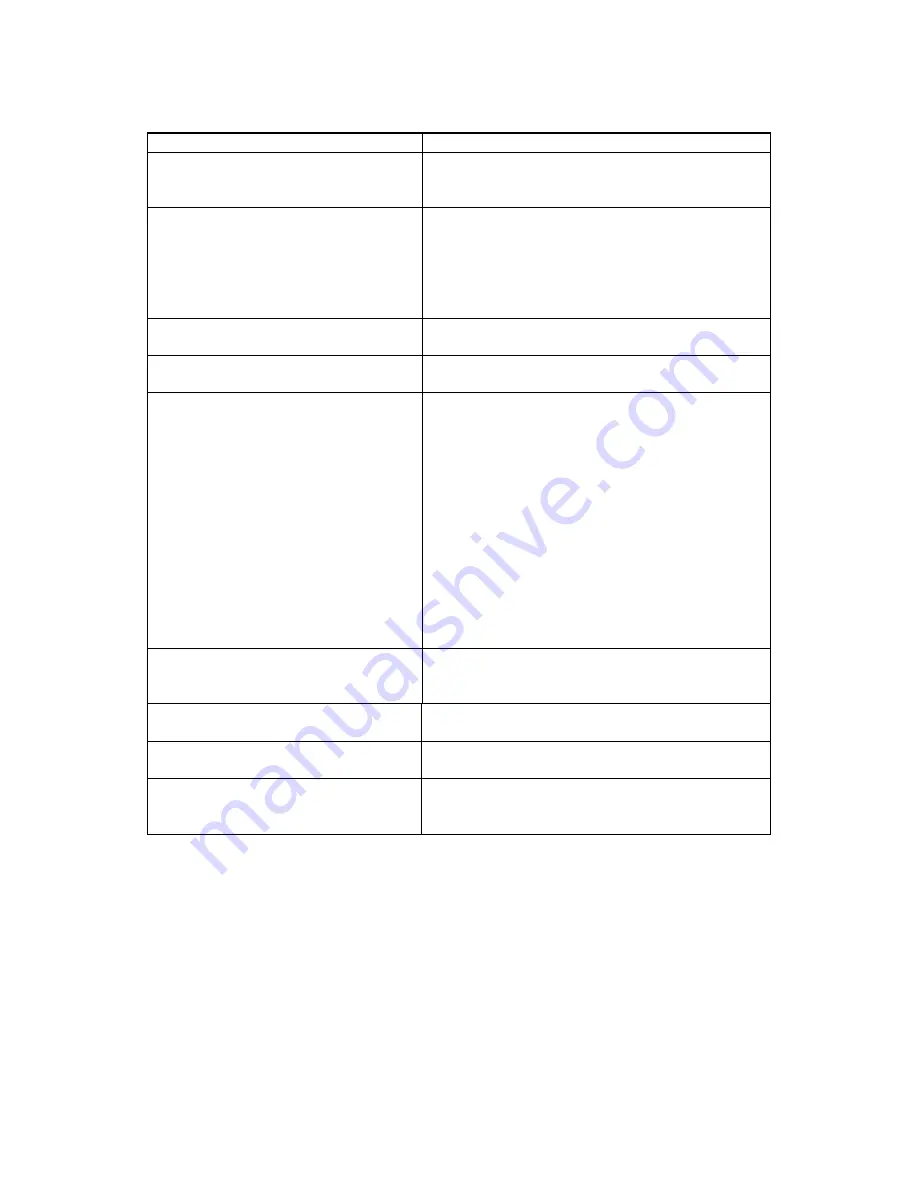
Problem & Question

Possible Solution

Power LED is not on

*Check if the Power Switch is in the ON 

position

*Power Cord should be connected 

No Plug & Play

*Check if the PC system is Plug & Play 

compatible 

*Check if the Video Card is Plug & Play 

compatible

*Check  if  the  D-15  plug  pin  of  Video 

Cable is bent

Picture is fuzzy

*Adjust  the  Contrast  and  Brightness 

Controls.

Picture  bounces  or  a  wave 

pattern is present in the picture

*Move electrical devices that may cause 

electrical interference.

The power LED is ON (orange) 

but  there’s  no  video  or  no 

picture.

*Computer  Power  Switch  should  be  in 

the ON position.

*Computer Video Card should be snugly 

seated in its slot.

*Make  sure  monitor’s  video  cable  is 

properly connected to the computer.

*Inspect monitor’s video cable and make 

sure none of the pins are bent.

*Make  sure  computer  is  operational  by 

hitting  the  CAPS  LOCK  key  on  the 

keyboard  while  observing  the  CAPS 

LOCK  LED.    The  LED  should  either 

turn ON or OFF after hitting the CAPS 

LOCK key.

Missing  one  of  the  primary 

colors  (RED,  GREEN,  or 

BLUE)

*Inspect  the  monitor’s  video  cable  and 

make  sure  that  none  of  the  pins  are  

bent.

Screen image is not centered or 

sized properly.

*Adjust  pixel  frequency  (CLOCK)  and 

FOCUS or press hot-key (AUTO).

Picture has color defects

(white does not look white)

*Adjust  RGB  color  or  select  color 

temperature.

Horizontal 

or 

vertical 

disturbances on the screen

*Use  win  95/98  shut-down  mode  Adjust 

CLOCK and FOCUS or perform hot- key 

(AUTO-key).

CLOCK  (pixel  frequency)  controls  the  number  of  pixels  scanned  by  one 
horizontal sweep. If the frequency is not correct, the  screen shows  vertical 
stripes and the picture has not correct width.

FOCUS  adjusts  the  phase  of  the  pixel  clock  signal.  With  a  wrong  phase 
adjustment the picture has horizontal disturbances in light picture.

For  FOCUS  and  CLOCK  adjustment  use  “dot-pattern”  or  win  95/98  shut-
down mode pattern.

Summary of Contents for LM760

Page 1: ......

Page 2: ...TALLATION INSTRUCTIONS 4 CONTROLS AND CONNECTORS 5 ADJUSTING THE VIEWING ANGLE 6 OPERATING INSTRUCTIONS 7 GENERAL INSTRUCTIONS 7 HOW TO ADJUST A SETTING 9 ADJUSTING THE PICTURE 10 11 PLUG AND PLAY 12...

Page 3: ...g antenna 2 Increase the separation between the equipment and receiver 3 Connect the equipment into an outlet on a circuit different from that to which the receiver is connected 4 Consult the dealer o...

Page 4: ...2 ELECTRONIC INDUSTRIES ALLIANCE AT WWW EIAE ORG...

Page 5: ...home consult your dealer or local power company The monitor is equipped with a three pronged grounded plug a plug with a third grounding pin This plug will fit only into a grounded power outlet as a...

Page 6: ...ude blemishes of 0 01 or less such as a missing pixel or a pixel lit all of the time Due to the nature of the LCD screen an afterimage of the previous screen may remain after switching the image when...

Page 7: ...end into a 3 pin AC power outlet The power cord may be connected to either a wall power outlet or the power outlet socket on your PC depending on the type of power cord supplied with your LCD monitor...

Page 8: ...rd into your LCD monitor s power input socket and then plug the other end into a 3 pin AC power outlet The power cord may be connected to either a wall power outlet or the power outlet socket on your...

Page 9: ...reference Hold the stand so you do not topple the monitor when you change the monitor s angle You are able to adjust the monitor s angle from 5 to 18 Figure 3 NOTES Do not touch the LCD screen when yo...

Page 10: ...ing these settings the picture can be adjusted to your personal preferences The power cord should be connected Connect the video cable from the monitor to the video card Press the power button to turn...

Page 11: ...le the monitor is off and then press power button to turn the monitor on To un lock the OSD press and hold the MENU button while the monitor is off and then press power button to turn the monitor on N...

Page 12: ...button to activate it If the function selected has a sub menu press or again to navigate through the sub menu functions Once the desired function is highlighted press MENU button to activate it 3 Pres...

Page 13: ...ce Horizontal Line noise Image Setup Clock Adjust picture Clock to reduce Vertical Line noise H Position Adjust the horizontal position of the picture Image Position V Position Adjust the verticalposi...

Page 14: ...zontal position of the OSD V Position Adjust the verticalposition of the OSD OSD Setup OSD Timeout Adjust the OSD timeout Language Language N A Set OSD language Information Informatio n N A Show the r...

Page 15: ...put signal this monitor following a time out period will automatically switch to an OFF mode This reduces the monitor s internal power supply consumption After the video input signal is restored full...

Page 16: ...perational by hitting the CAPS LOCK key on the keyboard while observing the CAPS LOCK LED The LED should either turn ON or OFF after hitting the CAPS LOCK key Missing one of the primary colors RED GRE...

Page 17: ...e is properly connected If the connector is loose tighten the connector s screws 2 Check the signal cable s connection pins for damage INPUT NOT SUPPORTED Your computer has been set to unsuitable disp...

Page 18: ...Dot Clock 135MHz Max Resolution 1280 1024 75Hz Plug Play VESA DDC2BTM ON Mode 45W EPA ENERGY STAR OFF Mode 2W Input Connector 15 pin D Sub Input Video Signal Analog 0 7Vp p standard 75 OHM Positive Ma...

Page 19: ...ternal Controls Functions Contrast Brightness Focus Clock H Position V Position Auto Center Language Information OSD Setup Warm Color Cool Color User Color temperature Reset Exit Power Consumption Max...

Page 20: ...Dos mode 720 x 400 31 47kHz 70 0Hz 640 480 31 47kHz 60 0Hz VGA 640 480 37 50kHz 75 0Hz 800 600 37 879kHz 60 0Hz SVGA 800 600 46 875kHz 75 0Hz 1024 768 48 363kHz 60 0Hz 1024 768 56 476kHz 70 0Hz XGA 1...

Page 21: ...lay Signal Cable PIN NO DESCRIPTION PIN NO DESCRIPTION 1 Red 9 5V 2 Green 10 Detect Cable 3 Blue 11 TXD 4 RXD 12 DDC Serial Data 5 Ground 13 H Sync 6 R Ground 14 V Sync 7 G Ground 15 DDC Serial Clock...

Reviews: