background image

22

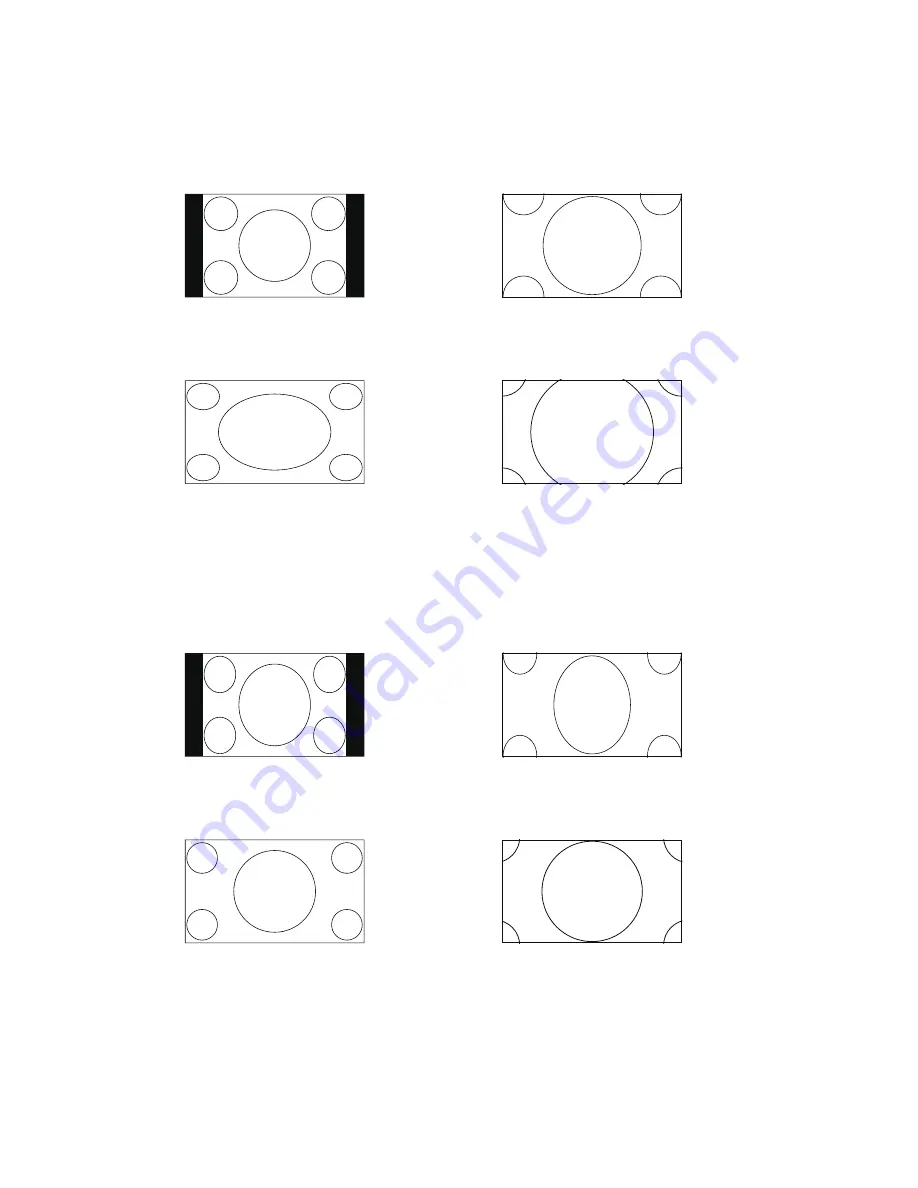
Viewing mode Selection

for TV input with Sd programs

normal mode

Suitable for viewing conventional 4:3 programs in 

their normal format.

Zoom1 mode

Use these aspect modes to zoom in and to reduce 

the black bars.

Wide mode

The original content in this mode has to fill the 

entire screen of the display.

Zoom2 mode

Use these aspect modes to zoom in and to reduce 

the black bars.

for TV input with hd programs

normal mode

Suitable for viewing conventional 4:3 programs in 

their normal format.

Zoom1 mode

Use these aspect modes to zoom in and to reduce 

the black bars.

Wide mode

The original content in this mode has to fill the 

entire screen of the display.

Zoom2 mode

Use these aspect modes to zoom in and to reduce 

the black bars.

Summary of Contents for LC32W063

Page 1: ...1 ...

Page 2: ...recommendations in this manual and in any guides or related documents are believed reliable but the accuracy and completeness thereof are not guaranteed or warranted and they are not intended to be nor should they be understood to be representations or warranties concerning the products described ...

Page 3: ...p 12 Inserting Batteries into the Remote control 12 Attaching the Base 12 Wall Mounting 12 Connecting TV 13 Cable System or VHF UHF Antenna System 13 High Definition Interface 13 HDMI Connection 13 Component Signal Connection 13 Composite S Video Signal Connection 14 PC Connection 14 External sound Connection 14 PC Input Signal Reference Chart 15 Video Input Signal Reference Chart 15 USING AOC TV ...

Page 4: ...ISPOSED OF ACCORDING TO LOCAL STATE OR FEDERAL LAWS FOR MORE INFORMATION CONTACT THE ELECTRONIC INDUSTRIES ALLIANCE AT WWW EIAE ORG Energy Star Please keep the factory default settings as shipped in which the product can meet Energy Star requirements Important Safety Information 1 Read these instructions 2 Keep these instructions 3 Heed all warnings 4 Follow all instructions 5 Do not use this appa...

Page 5: ...anufacturer as they may cause hazards Wall Mount Wall Mount installation requires the use of a Wall Mount Bracket When installing or removing the TV using a Wall Mount Bracket be sure to use qualified contractors If not properly secured during installation or removal from the Wall Mount Bracket the TV may fall and cause serious injury For use only with UL Listed Wall Mount Bracket with suitable we...

Page 6: ...racks do not touch it until you have unplugged the AC power cord Otherwise electric shock may result Handling of broken glass and liquid crystal leakage If the LCD panel gets damaged crystalline liquid leakage may occur or scattered broken glass may result Do not touch broken glass or crystalline liquid which is toxic with bare hands as cuts poisoning or skin irritation may occur Also do not let g...

Page 7: ...g to the National Electrical Code ANSI NFPA 70 Antenna lead in wire Antenna lead in wire Antenna discharge unit Grounding conductors Ground clamps Electric service equipment Ground clamps Power service grounding electrode system Batteries Do not dispose of batteries in a fire Do not short circuit disassemble or overheat the batteries Danger of explosion if battery is incorrectly replaced Replace o...

Page 8: ...V on a bed sofa rug or other similar surface Never place the TV in a confined space such as a bookcase or built in cabinet unless proper ventilation is provided Leave some space around the TV set as shown below Otherwise air circulation may be inadequate and will cause overheating which may cause a fire or damage to the TV set Install on the wall 4 inches 10 cm 4 inches 10 cm 4 inches 10 cm Leave ...

Page 9: ...u see on your AOC TV is only as good as the quality of the signal it receives To experience the stunning detail of your new AOC TV you need access to HD programming Your AOC TV can receive and display HD programming from Over the air broadcasting via HD quality antenna HD cable subscription HD satellite subscription Blu ray Disc player or other external equipment Contact your cable or satellite pr...

Page 10: ...ox please check the TV and all accessories are well presented and undamaged AOC LC32W063 Power Cable User Manual User Manual QSG Warranty Card Base Remote Control Quick Start Guide M4 Screw x 4 To fix stand to base AAA Battery x 2 Warranty Card ...

Page 11: ...ovides better picture quality than composite video The audio input connector was shared with COMPOSITE VIDEO IN HDMI IN 1 2 3 HDMI High Definition Multimedia Interface provides an uncompressed all digital audio video interface between this TV and any HDMI equipped audio video equipment such as a set top box DVD player Blu ray Disc player A V receiver as well as PC HDMI supports enhanced or high de...

Page 12: ...me rating and summaries depending on the information provided by the broadcaster No function No function Wide WIDE Press repeatedly to step through the Wide Mode settings Normal Mode Wide mode Zoom 1 Mode and Zoom 2 Mode Photo Press to display the USB thumbnail browser This is activated only if the USB storage device is plugged into the USB hub Freeze Press to freeze the displayed picture MTS MTS ...

Page 13: ...d with a thick and soft cloth Make sure the Table Top Stand is hanging over the edge 3 Remove the screws as shown in the illustration for your model and pull the Table Top Stand out 4 Do not remove any other screws from the TV 5 Do not remove the Table Top Stand for any reason other than to Wall Mount the TV 6 Be sure to store the removed screws and Table Top Stand in a safe place until you are re...

Page 14: ...HF only 75 ohm coaxial cable supplled Rear of TV VHF UHF input TUNER TUNER TUNER High Definition Interface You can enjoy high definition programming by subscribing to a high definition cable service or a high definition satellite service For the best possible picture make sure you connect this equipment to your TV via the HDMI or component video with audio input on the back of your TV HDMI Connect...

Page 15: ...ite core analog RGB and audio cable If the PC is connected to the TV and no signal has been input from the PC for more than 30 seconds the TV enters the standby mode automatically External sound Connection Turn off the AOC LCD TV and Sound Device and connect the Audio Out jack or SPDIF jack on the rear of AOC LCD TV Connect an audio cable to the audio output connectors associated with the Audio Ou...

Page 16: ...t the output signal from the video input according to the chart below Presetting Video Mode Standard Resolution Horizontal Frequency kHz Vertical Frequency Hz SD 480i 15 734 60 SD 480P 31 5 60 SD 576i 15 625 50 SD 576P 31 25 50 HD 720P 37 5 50 HD 720P 45 60 HD 1080i 28 125 50 HD 1080i 33 75 60 FHD 1080p 56 3 50 FHD 1080p 67 5 60 Standard Definition Interface You can also enjoy traditional program ...

Page 17: ...t language Next Cancel Initial Setting When you first start up this AOC LCD TV set please follow the Initial Wizard to your AOC LCD TV 1 Selecting Language Select your preferred language English Spanish or French 1 Press to select Language and press OK 2 Selecting Time mode Manual Auto Initial Wizard 2 8 Please select Time mode Previous Cancel Navigate Select OK 1 Press to select Auto or Manual fo...

Page 18: ...17 A Selecting Time Zone Inital Wizard 3 8 Please select Time Zone NST MST AST PST EST AKST CST HST Navigate Select OK Previous Cancel 1 Press to select Time Zone which you located then press OK ...

Page 19: ... Year 1 Press to select Year then press OK 2 Press to adjust then press OK Month 1 Press to select Month then press OK 2 Press to adjust then press OK Day 1 Press to select Day then press OK 2 Press to adjust then press OK Time 1 Press to select Time then press OK 2 Press to select Hour Minute or AM PM then press OK 3 Press to adjust then press OK ...

Page 20: ...e contrast and sharpness ENTER Vivid Eco Initial Wizard 4 8 Please select Eco Vivid mode Previous Cancel Navigate Select 1 Press to select Eco or Vivid for display setting 4 Select TV RF tuning band Cable Air Initial Wizard 5 8 Please select TV RF tuning band Previous Cancel Navigate Select OK 1 Press to select Air or Cable for RF Tuning setting Press OK will execute channel searching ...

Page 21: ... to select Previous or Cancel for RF Tuning setting Press OK will execute channel searching Cancel CH 100 66 Searching Analog CH 55 Analog Channels Found Digital Channels Found 100 Navigate Select OK Initial Wizard 7 8 Searching Please wait 1 Press to select Cancel for RF Tuning setting Press OK will execute cancel the channel searching ...

Page 22: ...21 Exit Cancel Initial Wizard 8 8 Congratulations TV Setup is done 1 M U Exit EN Press M U Exit EN to exit initial setting wizard ...

Page 23: ...o fill the entire screen of the display Zoom2 Mode Use these aspect modes to zoom in and to reduce the black bars For TV input with HD programs Normal Mode Suitable for viewing conventional 4 3 programs in their normal format Zoom1 Mode Use these aspect modes to zoom in and to reduce the black bars Wide Mode The original content in this mode has to fill the entire screen of the display Zoom2 Mode ...

Page 24: ...eys to switch input source MTS CC PRECH Display EPG Wide Add Fav COMP Fav M U Exit EN COMP 2 When using Source key to choose signal source OK MENU Exit 0 TV 1 AV1 2 AV2 3 Component 1 4 Component 2 5 VGA 6 HDMI 1 7 HDMI 2 8 HDMI 3 Source List Move Select Exit MTS CC PRECH Display EPG Wide Add Fav COMP Fav M U Exit EN 1 Press Source to call out source menu 2 Press to select input source TV AV1 2 Com...

Page 25: ...om the Air antenna or Cable CATV 2 Channel Strength Show the intensity of the received DTV signal 3 Auto CH Search Automatically scan all NTSC ATSC TV channels and then store in the channel table In channel scan process the OSD can display the number of channels which had been found 4 Add on CH Search Add channels which are new found 5 Channels List Show the Channels List User can edit add delete ...

Page 26: ... change channel on the remote control directly or press CH on the side of the TV to choose the channel 1 Press the number keys directly to change the channel PR 2 Press the CH to change channel 3 Press PRE CH to go to the previous channel PRECH 37 2 ...

Page 27: ...ing Volume Mute and Sound Mode 1 Press VOL to change the volume 2 Press MUTE to mute the TV 3 Press Audio to change surround mode Music Speech and Personal For more details please refer to Adjust Audio Setting ...

Page 28: ...orite setting Preset for all inputs can also be accessed by pressing Picture on the remote control to directly toggle the modes Brightness Brightens or darkens the picture Contrast Increases or decreases picture contrast Color Increases or decreases color saturation Tint Increases or decreases the green tones Sharpness Sharpens or softens the picture Noise reduction Reduces the noise level of conn...

Page 29: ...r pitched sounds Balance Emphasizes left or right speaker balance Audio Source Select the audio source from Mono Stereo or SAP This function works in ATV only Audio Language Change the audio language setting on ATSC TV programs The number of the supported audio languages English Français Español SPDIF Digital audio output format Select from RAW and PCM The difference between SPDIF PCM or RAW SPDIF...

Page 30: ...sition V Position Clock Phase Auto adjust Preset and press OK to enter 4 Press to adjust 5 M U Exit EN Press MENU EXIT again to exit PC Setting Description Auto adjust Auto sync PC timing to fit full screen display For detail supported timing please refer PC Input Signal Reference Chart on page 17 H Position Adjusts the Horizontal positioning V Position Adjusts the Vertical positioning Clock Adjus...

Page 31: ...Menu language Time Password Setting Parental control Closed Captions Analog Caption etc and press OK to enter 4 Press to adjust 5 M U Exit EN Press MENU EXIT again to exit The submenu of FEATURE mode in TV mode shows as below 1 Menu language Adjust the language setting for this TV unit English Français Español 1 Press to select English Français Español and press OK 2 Time Set current time The sub ...

Page 32: ...st Year Month Day and Time and press OK 6 M U Exit EN Press MENU EXIT again to exit 3 Password Setting Change the 4 numeral parental control password Three steps are required for changing the password Step 1 PR Press Number Key to enter the old password Enter Old Password Step 2 PR Press Number Key to enter the New password Enter New Password Step 3 PR Press Number Key to enter the New password Co...

Page 33: ...ons Select an analog caption option CC 1 4 TEXT 1 4 7 Digital Captions Select a digital caption option Service 1 6 8 Digital Captions Setup Provide numerous options for setting the digital closed caption style in the sub menu Items Description Style Set to Automatic or Customer mode If Custom mode is selected user can modify the detail styles described below The setting result will be shown immedi...

Page 34: ...e selected photo orange frame browser 3 Press MENU EXIT to display control menu M U Exit EN Multimedia List 1 JPEG Viewer Exit JPEG Viewer Control Description Image Delay Set display time for each picture in slide show There are three options Fast Slow and Normal Start Slide Show Enter Slide Show mode Rotate Photo Rotate selected picture 0 90 180 270 Back to Upper Folder Return to the upper folder...

Page 35: ...l cable Keep the antenna cable away from other connecting cords To avoid TV interference make sure to use an undamaged antenna cable PC Input No Picture No Signal Confirm the PC is correctly connected to the TV with either the PC IN with an HD15 cable or with the HDMI IN Ensure the output signal from the PC is one of the formats listed on page 18 Turn the PC off Confirm the PC connection and resta...

Page 36: ...ohm AUDIO 500mv rms HDMI Terminals HDMI INPUT Rear HDMI x2 Side HDMI x1 HDCP compliant E EDID compliant VGA Terminals VGA INPUT Rear VGA D SUB 15 Pin Input x1 E EDID compliant Audio Input Mini jack for stereo 3 5Ø Headphone Audio Output Mini jack for stereo 3 5Ø SPDIF Output Optical Digital Audio Out jack Size W x H x D with base and stand mm 778 5 x 553 3 x 250 7 Weight 9 8 Kg with stand 8 2Kg w ...

Page 37: ...l size 33 PC Connection 14 PC Setting 27 Personal 24 Phase 10 27 32 Picture Mode 32 Picture Setting 25 Power 4 5 32 33 Preset 15 25 Presetting PC Mode 15 Presetting Video Mode 15 R Remote control 11 16 21 23 25 26 32 Reset all 28 Resolution 15 33 S SAP 11 26 Setting 32 Setup 14 15 28 32 Set Up 12 Sharpness 25 Signal 10 13 14 15 27 32 Size 25 33 SLEEP 11 Sound 7 8 11 24 26 Sound mode 26 Source 21 3...

Reviews: