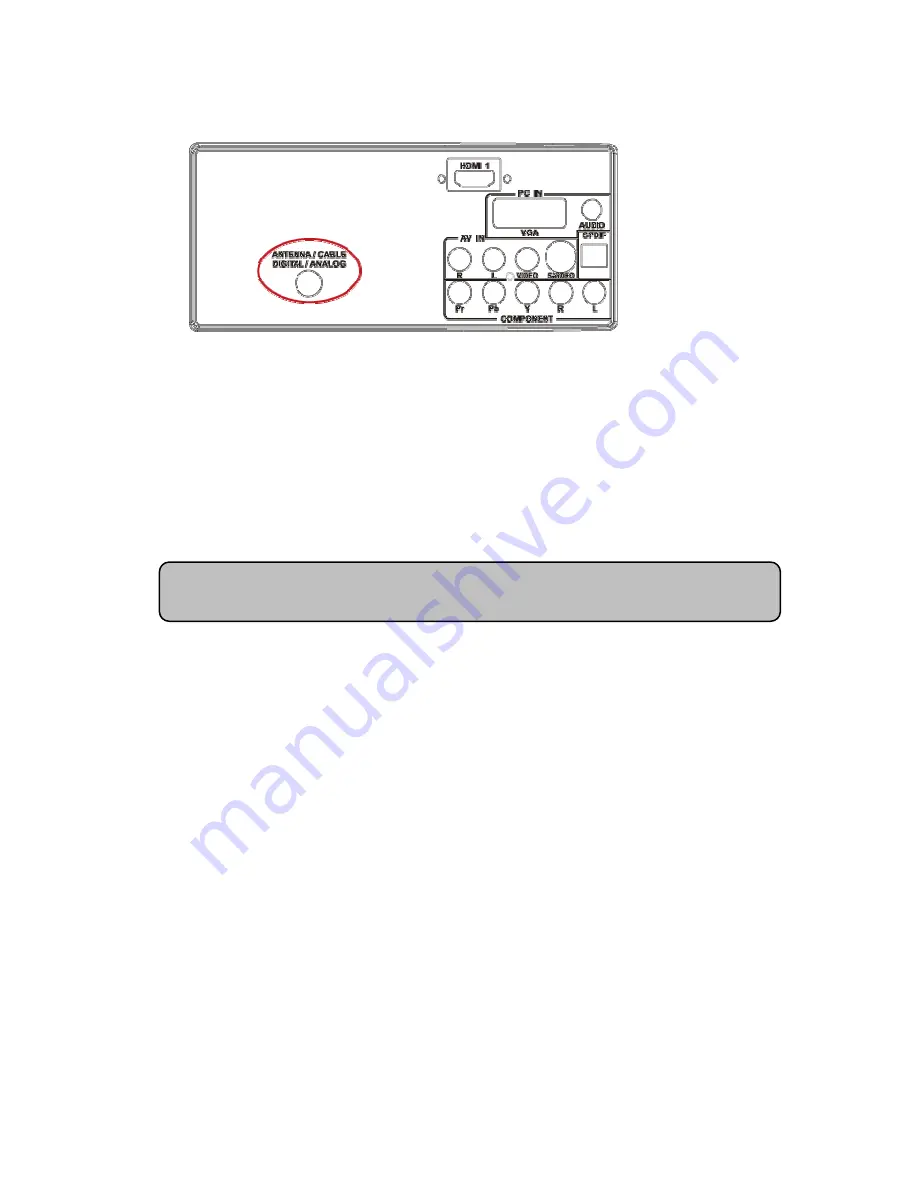
background image


23


Using Coax (RF) 


1.  Turn off the power to the HDTV and Set-Top Box. 

2.  Using a Coax (RF) cable, connect one end to the TV OUT (RF) on your 

Set Top Box and the other end to the DTV/TV input at the rear of the 
HDTV. 

3.  Turn on the power to the HDTV and Set-Top Box. 

4.  Select TV using the INPUT button on the remote, side of the HDTV or 

directly by pressing the TV button (below the WIDE button) on the Remote 
Control. 


Note: Refer to your Set Top Box user manual for more information about 
selecting the video or RF output of the product. 

Summary of Contents for L22W861

Page 1: ......

Page 2: ... Wall Mounting 9 PREPARATION 10 PERIPHERAL CONNECTION GUIDE 12 OPERATING INSTRUCTIONS 14 TO USE THE FRONT PANEL CONTROL 14 TO USE THE REMOTE CONTROL 15 VIEWING MODES ILLUSTRATIONS 16 CONNECTING EQUIPMENT 18 TO USE THE MENUS 30 SETUP MENU 30 VIDEO MENU 31 AUDIO MENU 32 FEATURE MENU 33 TIPS 37 PRODUCT SPECIFICATION 39 BEFORE CALLING SERVICE 40 GLOSSARY 41 English ...

Page 3: ...k of electrical shock to persons SA 1966 INSTRUCTIONS The exclamation point within on equilateral triangle to alert the User to the presence of important operating and maintenance servicing instruction In the literature accompanying the appliance Apparatus shall not be exposed to dripping or splashing and no objects filled with liquids Such as vases Shall be placed on the apparatus Caution Danger ...

Page 4: ...lowing measures 1 Reorient or relocate the receiving antenna 2 Increase the separation between the equipment and receiver 3 Connect the equipment into an outlet on a circuit different from that to which the receiver is connected 4 Consult the dealer or an experienced radio TV technician for help NOTICE 1 The changes or modifications not expressly approved by the party responsible for compliance co...

Page 5: ...A at 1 888 DTV 2009 AVISO RELATIVO A LA TRANSICIÓN A TELEVISIÓN DIGITAL Este equipo incorpora un sintonizador de televisión digital lo que le permitirá recibir una programación digital televisada por aire con una antena adecuada cuando se terminará la transmisión de alta potencia de la televisión analógica en los Estados Unidos el 17 de febrero de 2009 Ciertos receptores de televisión antiguos si ...

Page 6: ...ly if is malfunction like no picture no video audio smoke and bad odor from TV Unplug immediately if other foreign materials are put inside TV box or if the TV fell down Don t throw any object inside the TV box like metals or other flammable materials Prohibit Avoid opening TV cabinet PRECAUTIONS AND REMINDERS ...

Page 7: ...ys Call service personnel to clean the internal part of the TV once a year Do not cover or block any vents and openings Inadequate ventilation may shorten the life of the display unit and cause overheating Do not place the display near water such as bathtub washbasin kitchen sink laundry tub swimming pool or in a damp basement Notice for Remote Controller Avoid Dropping Avoid Liquids Avoid Aerosol...

Page 8: ... moving the cart apparatus combination to avoid injury from tip over 13 The TV should be operated only from the type of power source indicated on the label If you are not sure of the type of power supplied to your home consult your dealer or local power company 14 Unplug this apparatus during lightning storms or when unused for long periods of time 15 Refer all servicing to qualified service perso...

Page 9: ...on against voltage surges and built up static charges Section 810 of the National Electric Code ANSI NFPA No 70 1984 provides information with respect to proper grounding of the mats and supporting structure grounding of the lead in wire to an antenna discharge unit size of grounding connectors location of antenna discharge unit connection to grounding electrodes and requirements for the grounding...

Page 10: ...egrity of the display The manufacturer s warranty does not cover user abuse or improper installations Attaching the Base IMPORTANT The Base of the HDTV must be assembled prior to usage 1 Place TV unit face down on a soft and flat surface blanket foam cloth etc to prevent any damage to the HDTV 2 Carefully align and insert the Base to the stand 3 Gently push the Base towards the HDTV until the lock...

Page 11: ...e Before mounting your TV on the wall you need to remove the base To attach a wall mount bracket to your TV 1 Remove the screws holding your TV to the stand 2 Remove the stand base 3 Secure the wall mount bracket to the back of your TV using four M4 screws as indicated in the illustration Note 100mmx100mm wall mount bracket M4 screws not included ...

Page 12: ...w free flow of air Do not cover the ventilation openings on the back cover To prevent any unsafe situations no naked flame sources such as lighted candles should be placed on or in the vicinity Avoid heat direct sunlight and exposure to rain or water The equipment shall not be exposed to dripping or splashing 2 Connect the antenna cable or CATV cable to the aerial socket ANT IN 75Ω at the back of ...

Page 13: ...aving an AC power supply You can see LED states at the front panel If the LED color is Blue means the TV set is power on If the LED color is Red which means this TV set is in standby state 5 Turn the TV on Push the POWER key on the Remote control or the Front panel control knobs Wait a minute the TV will power on and can see the display on the screen POWER Key ...

Page 14: ...12 HDMI S Video Composite Pr Pb Y PC Line in 15 pin D Sub PERIPHERAL CONNECTION GUIDE AC POWER L ...

Page 15: ...bPr Cr with Audio L R Connect the primary source for component video devices such as a DVD Player or set top box here From left to right use red for Pr blue for Pb green for Y red for right audio R and white for left audio L inputs 5 DTV Connect to an antenna or digital cable out of the wall not from Cable Box for Digital TV 6 SPDIF Optical Digital Audio Out When a digital audio signal is associat...

Page 16: ...next higher Program number 4 CH CH Press to select the next lower Program number 5 MENU Menu key Press to open or exit the OSD menu 6 INPUT Source key Press to select the input source 7 POWER Power key Press to turn on off standby the TV set Please re turn on TV after the Power ON status LED had changed to the Red color and finished flashing OPERATION INSTRUCTIONS ...

Page 17: ...Press to open or exit menu ENTER Press to adjust the various function items on the menu PREV CH Press to display the previous TV MTS SAP Press to activate the NTSC TV sounds such as Stereo SAP or Mono tone And languages of DTV WIDE Press to choose the display aspect as Normal Wide Zoom or Cinema mode SOURCE Press repeatedly to choose the various input sources Video 1 6 EPG This function is not sup...

Page 18: ...een while the proper ratio of 16 9 content is still maintained Little cropping of the content on the sides is necessary Wide2 The original content would fill the width of the screen while the proper ratio of 16 9 content is still maintained Small black bars are added ZOOM Mode on 16 9 Display screen For those wide format images which are originally programmed into 4 3 frames with top and bottom bl...

Page 19: ... wide and high directions to the full display with active data Little cropping on sides is necessary for full display CINEMA Mode on 16 9 or 16 10 Display screen This mode is applied to view 2 35 1 format content on 16 9 displays To crop both right and left sides a little for keeping the undistorted ratio of the image is provide for users 16 9 image in 4 3 frame Same image in ZOOM mode ...

Page 20: ...V using the INPUT button on the remote side of the HDTV or directly by pressing the TV button on the Remote Control Using Your Antenna or Cable for TV 1 Turn off the power to the HDTV 2 Connect the coaxial RF connector from your antenna or cable out of the wall not from the Cable Box to the ANTENNA CABLE DIGITAL ANALOG connector at the rear of the HDTV 3 Turn on the power to the HDTV 4 Select TV u...

Page 21: ...f your VCR to the ANTENNA CABLE DIGITAL ANALOG connector at the rear of the HDTV 3 Turn on the power to the HDTV and VCR 4 Select TV using the INPUT button on the remote side of the HDTV or directly by pressing the TV button on the Remote Control Note If you have an off air antenna or cable TV connect it to the Antenna In connector on the rear of your VCR ...

Page 22: ...at the rear of the HDTV 3 Turn on the power to the HDTV and HDTV Set Top Box 4 Select HDMI using the INPUT button on the remote side of the HDTV or directly by pressing the HDMI button on the Remote Control Note a The HDMI input on the HDTV supports High bandwidth Digital Content Protection HDCP HDCP encrypts the transmission between the video source and the digital display for added security and ...

Page 23: ... blue color connector on your HDTV Set Top Box to the corresponding Pb blue color connector in the Component group 4 Connect the Y green color connector on your HDTV Set Top Box to the corresponding Y green color connector in the Component group 5 Using an audio cable red and white connectors connect the cable to the audio output connectors associated with the Component output on your Note a The H...

Page 24: ...x to the corresponding Video yellow color connector in the AV group at the rear of the HDTV 3 Using the red and white connectors connect the cable to the audio output connectors associated with the Video output on your Set Top Box and connect the other end to the audio connectors associated with the AV input at the rear of the HDTV 4 Turn on the power to the HDTV and Set Top Box 5 Select Composite...

Page 25: ...nd to the DTV TV input at the rear of the HDTV 3 Turn on the power to the HDTV and Set Top Box 4 Select TV using the INPUT button on the remote side of the HDTV or directly by pressing the TV button below the WIDE button on the Remote Control Note Refer to your Set Top Box user manual for more information about selecting the video or RF output of the product ...

Page 26: ...ton on the remote side of the HDTV or directly by pressing the HDMI button on the Remote Control For DVD Players with DVI 1 Turn off the HDTV and DVD player 2 Using a HDMI DVI cable connect the DVI end to your DVD player and the HDMI end to the HDMI Input at the rear of the HDTV 3 Turn on the power to the HDTV and your DVD player 4 Select HDMI using the INPUT button on the remote or side of the HD...

Page 27: ...to the corresponding Y green color connector in the Component group at the rear of the HDTV 5 Using an audio cable red and white connectors connect the cable to the audio output connectors associated with the Component output on your DVD player and connect the other end to the audio connectors associated with the Component input at the rear of the HDTV 6 Turn on the power to the HDTV and DVD playe...

Page 28: ... rear of the HDTV 4 Turn on the power to the HDTV and DVD player 5 Select S Video Video 2 using the INPUT button on the remote side of the HDTV or directly by pressing the AV button on the Remote Control Using Composite AV Video Connecting your DVD Player Good 1 Turn off the power to the HDTV and DVD player 2 Connect the Video yellow color connector on your DVD player to the Video yellow color con...

Page 29: ...27 5 Select Composite Video 1 using the INPUT button on the remote side of the HDTV or directly by pressing the AV button on the Remote Control ...

Page 30: ...nectors associated with the S Video output on your VCR or Video Camera and connect the other end to the audio connectors associated with the AV input on the rear of the HDTV 4 Turn on the power to the HDTV and VCR or Video Camera 5 Select S Video Video 2 using the INPUT button on the remote side of the HDTV or directly by pressing the AV button on the Remote Control Note Refer to your VCR or Video...

Page 31: ...input at the rear of the HDTV 4 Turn on the HDTV and PC Computer 5 Select RGB using the INPUT button on the remote side of the HDTV or directly by pressing the RGB button on the Remote Note For the best picture quality when connecting a PC computer through RGB PC set your PC computer timing mode to native resolution of panel Please refer to the PC or graphic card s user guide for additional inform...

Page 32: ...ticular source modes SETUP MENU The Setup menu in TV mode shows as below In others source modes the Setup menu only shows Menu Language and Aspect Ratio items 1 Tuning Band Select TV source signal from the Air antenna or Cable CATV 2 DTV Signal Show the intensity of the received DTV signal 3 Auto Ch Search Automatically scan all NTSC ATSC TV channels and then store in the channel table In channel ...

Page 33: ...s below It provides several video adjustment items for user fine tuning the video display Only in VGA source modes the Video menu simply provides Contrast Brightness Back light and Settings Preset items 1 Contrast Video contrast adjustment the tuning range is 0 100 2 Brightness Video brightness adjustment the tuning range is 0 100 3 Sharpness Video sharpness adjustment the tuning range is 50 50 4 ...

Page 34: ...ass Bass tone adjustment the tuning range is 0 63 The default state is enabled 3 Treble Treble tone adjustment the tuning range is 0 63 The default state is enabled 4 Balance Audio balance adjustment the tuning range is L31 R31 5 Digital Audio Output Digital audio output format selection user can choose RAW default or PCM format or off 6 TV Speaker Choose to turn on off the TV internal speaker The...

Page 35: ... Manual Time Zone item provides user to set current time zone such as Pacific Alaska Hawaii Eastern Central and Mountain Time item provides user to set the time clock 2 Sleep Timer Enable or disable the TV standby timer User can set the TV standby timer as off 5 min 10 min 15 min 30 min 45 min 60 min 90 min 120 min 180min 240min Timer starts to count down after cursor leaving the sub menu At the m...

Page 36: ...default password is 0 0 0 0 5 Parental Control provide the parental Control V chip function setting Before entering the Parental Control sub menu user has to key in the password first Then enter the Parental Lock item User can modify the restricted table about MPAA or TV Rating respectively While exiting the sub menu the parental control function is working The inhibitive channels or source signal...

Page 37: ...styles described below The setting result will be shown immediately on the bottom side of the sub menu OSD Note This feature is only available in Digital TV ATSC mode Size Digital close caption font size which can be set as Small Normal or Large Font Digital close caption font style which can be chosen as Default or Font 1 7 Text Color Giving Red Green Blue Yellow Magenta Cyan Black White Colors T...

Page 38: ...ovides fine tuning component display such as H Position V Position Clock Phase and Auto Adjust All these items are giving the tuning range from 0 to 100 Setting item providesthe default componentsetting values restoring 9 VGA Set This option only shows and is available in VGA mode which provides several items for the VGA display fine tuning such as H Position V Position Clock and Phase All these i...

Page 39: ...e warning To avoid disturbances in picture and sound malfunctioning of your TV or even damage to the TV keep away your mobile telephone from the TV End of life directives We are paying a lot of attention to produce environmentally friendly in green focal areas Your new receiver contains materials which can be recycled and reused At the end of its life specialized companies can dismantle the discar...

Page 40: ...the interference by one or more of the following measures Reorient or relocate the receiving antenna Increase the separation between the equipment and the TV Connect the equipment into wall power outlet on a circuit different from that to which the receiver is connected Consult the dealer or an experienced radio or television technician for help Modifications The FCC requires the user to be notifi...

Page 41: ...0X480 60Hz 800x600 60Hz 1024X768 60Hz 1680X1050 60Hz Recommended 1680X1050 60Hz Audio INPUT Headphone Mini jack for stereo 3 5Φ Power Source AC power supply 100V 240 V 50 60 Hz Power Consumption 75 W 1 W in standby mode power cord plugged in and power OFF Dimensions Include Stand 512mm W x 400mm H x 145mm L Audio Power 3 W 3 W Internal Speaker Weight 5kg With Stand Video Audio Terminals Rear AV x1...

Page 42: ...ghtness settings Check the Closed Captions control Some TEXT modes could block the screen Good picture but no sound Increase the VOLUME Check that the TV is not muted press the MUTE button on the remote control Good sound but poor color Adjust the contrast color and brightness settings Poor picture Sometimes poor picture quality occurs when having activated an S VHS camera or camcorder connected a...

Page 43: ...tichannel Television sound MTS The broadcasting standard which allows stereo sounds to be transmitted with the TV picture RF Radio Frequency or modulated signal design used as the carrier for television broadcasts Second Audio Program SAP Another or additional audio channel provided for in the Multichannel Television Sound MTS broadcast standard A monaural soundtrack included within the recorded o...

Reviews: