AOC GN2460PF User Manual Download Page 50


50 

Specification 

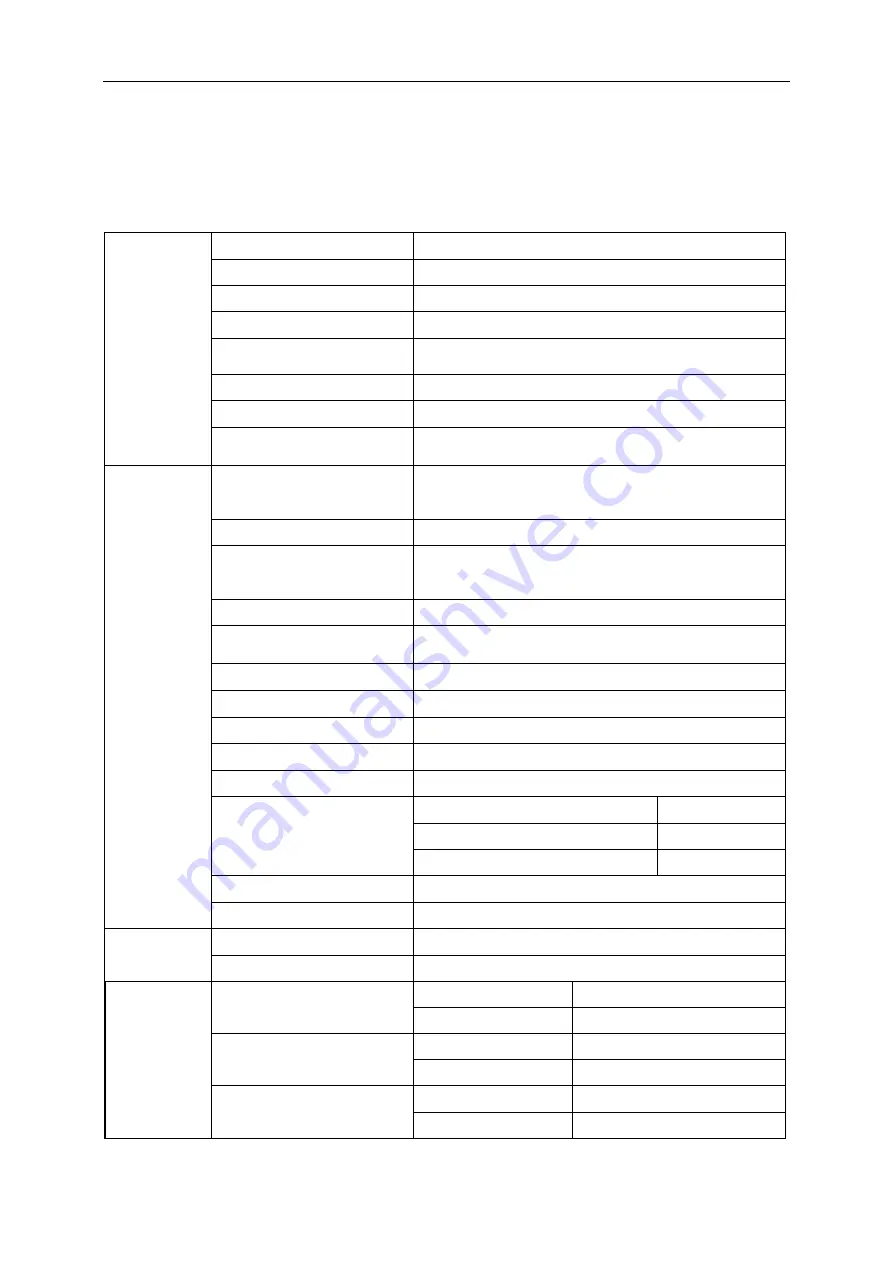
General Specification 

Panel   

Model name 

G2460PF 

Driving system   

TFT Color LCD   

Viewable Image Size 

61.0 cm diagonal 

Pixel pitch   

0. 27675mm(H) x 0.27675mm(V) 

Video   

R, G, B Analog lnterface& Digital Interface & HDMI lnterface& 
DP Interface 

Separate Sync.   

H/V TTL 

Display Color   

16.7M Colors   

Dot Clock   

165MHz (D-SUB, HDMI

MHL)   

330MHz (DVI-D(Dual Channel), DP) 

Others 

Horizontal scan range   

30k - 83kHz (D-SUB, HDMI

MHL)   

30k - 160kHz (DVI-D(Dual Channel))   
160k-160kHz (DP) 

Horizontal scan Size(Maximum)    531.36mm   

Vertical scan range   

50 - 76Hz (D-SUB, HDMI

MHL)   

50 - 146Hz (DVI-D(Dual Channel))   
48 - 146Hz (DP) 

Vertical scan Size(Maximum)   

298.89mm   

Optimal preset resolution   

1920x1080@60Hz (D-SUB, HDMI

MHL)   

1920x1080@144Hz (DVI-D(Dual Channel), DP) 

Plug & Play   

VESA DDC2B/CI 

Input Connector   

VGA / DVI-D

Dual Channel

/ HDMI / DP /Audio input     

Input Video Signal   

Analog: 0.7Vp-p(standard), 75 OHM, TMDS 

Output Connector 

earphone 

Power Source   

100-240V~, 50/60Hz   

Power Consumption 

Typical(Brightness = 90,Contrast = 50)  38W 

(brightness = 100, contrast =100) 

40W 

Power saving 

1W 

Off timer 

0~24 hrs 

Speakers 

2W x 2 

Physical 
Characteristics 

Connector Type 

VGA\DVI\HDMI\DP\ Audio input \Earphone out 

Signal Cable Type   

Detachable 

Environmental


Temperature 

Operating   

0°~ 40°   

Non-Operating   

-25°~  55° 

Humidity 

Operating   

10% ~ 85% (non-condensing)   

Non-Operating   

5% ~ 93% (non-condensing)   

Altitude 

Operating   

0~ 5000 m (0~ 16404ft )   

Non-Operating   

0~ 12192m (0~ 40000ft )   

Summary of Contents for GN2460PF

Page 1: ......

Page 2: ...etting Optimal Resolution 14 Windows 8 14 Windows 7 16 Windows Vista 18 Windows XP 20 Windows ME 2000 21 Hotkeys 22 OSD Setting 23 Luminance 24 Image Setup 26 Color Setup 27 Picture Boost 28 OSD Setup...

Page 3: ...EE Declaration for India 57 EPA Energy Star 58 EPEAT Declaration 58 Service 59 Warranty Statement for Europe 59 Warranty Statement for Middle East and Africa MEA 61 AOC PIXEL POLICY 63 ISO 9241 307 CL...

Page 4: ...used as follows NOTE A NOTE indicates important information that helps you make better use of your computer system CAUTION A CAUTION indicates either potential damage to hardware or loss of data and...

Page 5: ...the appliance safely Do not defeat the safety purpose of the grounded plug Unplug the unit during a lightning storm or when it will not be used for long periods of time This will protect the monitor...

Page 6: ...n should be moved with care Never push any object into the slot on the monitor cabinet It could damage circuit parts causing a fire or electric shock Never spill liquids on the monitor Do not place th...

Page 7: ...ut the stain instead of strong detergent which will cauterize the product cabinet When cleaning make sure no detergent is leaked into the product The cleaning cloth should not be too roughas it will s...

Page 8: ...plug IMMEDIATELY and contact a Service Center Make sure that the ventilating openings are not blocked by a table or curtain Do not engage the LCD monitor in severe vibration or high impact conditions...

Page 9: ...der Power Cable DVI Cable Analog Cable Audio Cable HDMI Cable USB Cable DP Not all signal cables Audio Analog DVI DP USB and HDMI cables will be provided for all countries and regions Please check wit...

Page 10: ...10 Setup Stand Base Please setup or remove the base following the steps as below Setup Remove...

Page 11: ...or then adjust the monitor s angle to your own preference Hold the stand so you will not topple the monitor when you change the monitor s angle You are able to adjust the monitor s angle from 5 to 20...

Page 12: ...her end to the computer s D Sub port 4 Optional Requires a video card with HDMI port Connect one end of the HDMI cable to the back of the monitor and connect the other end to the computer s HDMI port...

Page 13: ...nting arm you purchase separately Disconnect power before this procedure Follow these steps 1 Remove the base 2 Follow the manufacturer s instructions to assemble the wall mounting arm 3 Place the wal...

Page 14: ...14 Adjusting Setting Optimal Resolution Windows 8 For Windows 8 1 Right click and click All apps at the bottom right of the screen 2 Set the View by to Category 3 Click Appearance and Personalization...

Page 15: ...15 4 Click DISPLAY 5 Set the resolution SLIDE BAR to Optimal preset resolution...

Page 16: ...16 Windows 7 For Windows 7 1 Click START 2 Click CONTROL PANEL 3 Click Appearance...

Page 17: ...17 4 Click DISPLAY 5 Set the resolution SLIDE BAR to Optimal preset resolution...

Page 18: ...18 Windows Vista For Windows Vista 1 Click START 2 Click CONTROL PANEL 3 Click Appearance and Personalization 4 Click Personalization...

Page 19: ...19 5 Click Display Settings 6 Set the resolution SLIDE BAR to Optimal preset resolution...

Page 20: ...20 Windows XP For Windows XP 1 Click START 2 Click SETTINGS 3 Click CONTROL PANEL 4 Click Appearance and Themes 5 Double click DISPLAY...

Page 21: ...lution SLIDE BAR to Optimal preset resolution Windows ME 2000 For Windows ME 2000 1 Click START 2 Click SETTINGS 3 Click CONTROL PANEL 4 Double click DISPLAY 5 Click SETTINGS 6 Set the resolution SLID...

Page 22: ...st volume Only for the models with speakers Game Mode When there is no OSD press the minus key to open game mode function then press or key to select game mode FPS RTS Racing Gamer 1 or Gamer 2 basing...

Page 23: ...the settings of the selected function Press to exit If you want to adjust any other function repeat steps 2 3 4 OSD Lock Function To lock the OSD press and hold the button while the monitor is off an...

Page 24: ...tal register Eco mode Standard Standard Mode Text Text Mode Internet Internet Mode Game Game Mode Movie Movie Mode Sports Sports Mode Gamma Gamma1 Adjust to Gamma1 Gamma2 Adjust to Gamma 2 Gamma3 Adju...

Page 25: ...r 2 User s preference settings saved as Gamer 2 off No optimization by Smartimage game Shadow Control 0 100 Shadow Control Default is 50 then end user can adjust from 50 to 100 or 0 to increase contra...

Page 26: ...enter 4 Press or to adjust 5 Press to exit Clock 0 100 Adjust picture Clock to reduce Vertical Line noise Phase 0 100 Adjust Picture Phase to reduce Horizontal Line noise Sharpness 0 100 Adjust pictu...

Page 27: ...Temperature from EEPROM sRGB Recall SRGB Color Temperature from EEPROM User Red Red Gain from Digital register Green Green Gain Digital register Blue Blue Gain from Digital register DCB Mode Full Enh...

Page 28: ...s to exit Frame Size 14 100 Adjust Frame Size Brightness 0 100 Adjust Frame Brightness Contrast 0 100 Adjust Frame Contrast H position 0 100 Adjust Frame horizontal Position V position 0 100 Adjust Fr...

Page 29: ...0 100 Adjust the horizontal position of OSD V Position 0 100 Adjust the vertical position of OSD Timeout 5 120 Adjust the OSD Timeout Transparence 0 100 Adjust the transparence of OSD Language Select...

Page 30: ...HDMI DP Select Input Signal Source Auto Config yes or no Auto adjust the picture to default Off timer 0 24hrs Select DC off time Image Ratio Full Square 1 1 17 4 3 19 4 3 19 16 10 21 5 16 9 22 16 10...

Page 31: ...31 Exit 1 Press Menu to display menu 2 Press or to select Exit and press to enter 3 Press to exit Exit Exit the main OSD LED Indicator Status LED Color Full Power Mode Green Active off Mode Orange...

Page 32: ...2 Driver Monitor Driver Windows 8 1 Start Windows 8 2 Right click and click All apps at the bottom right of the screen 3 Click on the Control panel icon 4 Set the View by to Large icons or Small icons...

Page 33: ...33 5 Click on the Display icon 6 Click on the Change display settings button 7 Click the Advanced Settings button...

Page 34: ...r tab and then click the Properties button 9 Click the Driver tab 10 Open the Update Driver Software Generic PnP Monitor window by clicking on Update Driver and then click the Browse my computer for d...

Page 35: ...drive letter designator for the CD ROM drive 13 Select the xxx inf file and click the Open button Click the OK button 14 Select your monitor model and click the Next button The files will be copied fr...

Page 36: ...36 Windows 7 1 Start Windows 7 2 Click on the Start button and then click on Control Panel 3 Click on the Display icon...

Page 37: ...37 4 Ckick on the Change display settings button Click the AdvancedSettings button Click the Monitor tab and then click the Properties button...

Page 38: ...ab 8 Open the Update Driver Software Generic PnP Monitor window by clicking on Update Driver and then click the Browse my computer for driver software button 9 Select Let me pick from a list of device...

Page 39: ...D ROM drive 11 Select the xxx inf file and click the Open button Click the OK button 12 Select your monitor model and click the Next button The files will be copied from the CD to your hard disk drive...

Page 40: ...40 Windows Vista 1 Click Start and Control Panel Then double click on Appearance and Personalization 2 Click Personalization and then Display Settings 3 Click Advanced Settings...

Page 41: ...w click Continue 5 Click Update Driver in the Driver tab 6 Check the Browse my computer for driver software checkbox and click Let me pick from a list of device drivers on my computer 7 Click on the H...

Page 42: ...42 Windows XP 1 Start Windows XP 2 Click on the Start button and then click on Control Panel 3 Select and click on the category Appearance and Themes 4 Click on the Display Item...

Page 43: ...nitor tab If the Properties button is inactive it means your monitor is properly configured Please stop installation If the Properties button is active click on Properties button Please follow the ste...

Page 44: ...e button and then select the appropriate drive F CD ROM Drive 11 Click on the Open button then click the OK button 12 Select your monitor model and click on the Next button If you can see the has not...

Page 45: ...e Open button then click on the OK button 10 Select your monitor model and click on the Next button 11 Click on the Finish button then the Close button If you can see the Digital Signature Not Found w...

Page 46: ...easy to adjust your monitor display setting by using on screen menus instead of the OSD button on the monitor To complete installation please follow the installation guide The software Supported oper...

Page 47: ...ll wizard to complete software installation Under each of the four PC status you may choose from the pull down menu the desired time in minutes for your monitor to automatically shutdown The example a...

Page 48: ...nels and each panel displays a different window You only need to drag the window to a corresponding panel when you want to access it It supports multiple monitor display to make your task easier Pleas...

Page 49: ...ust the Contrast and Brightness Controls Press to auto adjust Make sure you are not using an extension cable or switch box We recommend plugging the monitor directly to the video card output connector...

Page 50: ...tical scan Size Maximum 298 89mm Optimal preset resolution 1920x1080 60Hz D SUB HDMI MHL 1920x1080 144Hz DVI D Dual Channel DP Plug Play VESA DDC2B CI Input Connector VGA DVI D Dual Channel HDMI DP Au...

Page 51: ...os mode 720 400 70Hz 31 469 70 087 SVGA 800 600 56Hz 35 156 56 250 800 600 60Hz 37 879 60 317 800 600 72Hz 48 077 72 188 800 600 75Hz 46 875 75 000 800 600 100Hz 62 76 99 778 800 600 100Hz 63 68 99 66...

Page 52: ...z 55 935 59 887 WSXGA 1680X1050 60Hz 65 290 59 954 FHD 1920 1080 60Hz 67 500 60 000 FHD DVI D Dual Channel and DP only 1920 1080 100Hz 113 3 100 1920 1080 100Hz 113 2 99 93 1920 1080 100Hz 114 6 99 89...

Page 53: ...ck 8 GND B 24 Pin Color Display Signal Cable Pin No Signal Name Pin No Signal Name Pin No Signal Name 1 TMDS Data 2 9 TMDS Data 1 17 TMDS Data 0 2 TMDS Data 2 10 TMDS Data 1 18 TMDS Data 0 3 TMDS Data...

Page 54: ...lock 5 TMDS Data 1Shield 13 CEC 6 TMDS Data 1 14 Reserved N C on device 7 TMDS Data 0 15 SCL 8 TMDS Data 0 Shield 16 SDA 20 Pin Color Display Signal Cable Pin No Signal Name Pin No Signal Name 1 ML_La...

Page 55: ...SA DDC STANDARD It allows the monitor to inform the host system of its identity and depending on the level of DDC used communicate additional information about its display capabilities The DDC2B is a...

Page 56: ...e determined by turning the equipment off and on the user is encouraged to try to correct the interference by one or more of the following measures Reorient or relocate the receiving antenna Increase...

Page 57: ...sibility to dispose of your waste equipment by handing it over to a designated collection point for the recycling of waste electrical and electronic equipment The separate collection and recycling of...

Page 58: ...rts to reduce the environmental impact of its products AOC believes in protecting the environment With a key concern for the conservation of natural resources as well as land ll protection AOC announc...

Page 59: ...er on the address label Put the RMA number on the shipping carton AOC International Europe B V will pay the return shipping charges within one of the countries specified within this warranty statement...

Page 60: ...AL EUROPE B V OBLIGATIONS AND YOUR REMEDIES HEREUNDER ARE SOLELY AND EXCULSIVELY AS STATED HERE AOC INTERNATIONAL EUROPE B V LIABILITY WHETHER BASED ON CONTRACT TORT WARRANTY STRICT LIABILITY OR OTHER...

Page 61: ...y as per the product ID serial number and for such exceptional cases Original Invoice Proof Of Purchase Receipt is mandatory If the product appears to be defective please contact your AOC authorized d...

Page 62: ...ES FOR THIS PRODUCT INCLUDING THE WARRANTIES OF MERCHANTABILITY AND FITNESS FOR A PARTICULAR PURPOSE ARE LIMITED IN DURATION TO A PERIOD OF ONE 1 to THREE 3 YEARS FOR PARTS AND LABOR FROM THE ORIGINAL...

Page 63: ...s acceptable defect levels for each type In order to qualify for repair or replacement under warranty the number of pixel defects on a TFT monitor panel must exceed these acceptable levels Pixels and...

Page 64: ...mage during shipment Pay all shipping charges EPI is not responsible for damage to inbound product that was not properly packaged EPI will pay the return shipment charges within one of the countries s...

Page 65: ...DAMAGES SO THE ABOVE LIMITATION MAY NOT APPLY TO YOU ALTHOUGH THIS LIMITED WARRANTY GIVES YOU SPECIFIC LEGAL RIGHTS YOU MAY HAVE OTHER RIGHTS WHICH MAY VARY FROM STATE TO STATE In the United States of...

Page 66: ...ue a UPS Call Tag to pick up the defective unit Step 6 Please review the following chart to see your EASE program qualifications WARRANTY PERIOD COVERAGE AT NO CHARGE CUSTOMER CHARGES Within the first...

Reviews: