AOC E2475SWQE User Manual Download Page 11


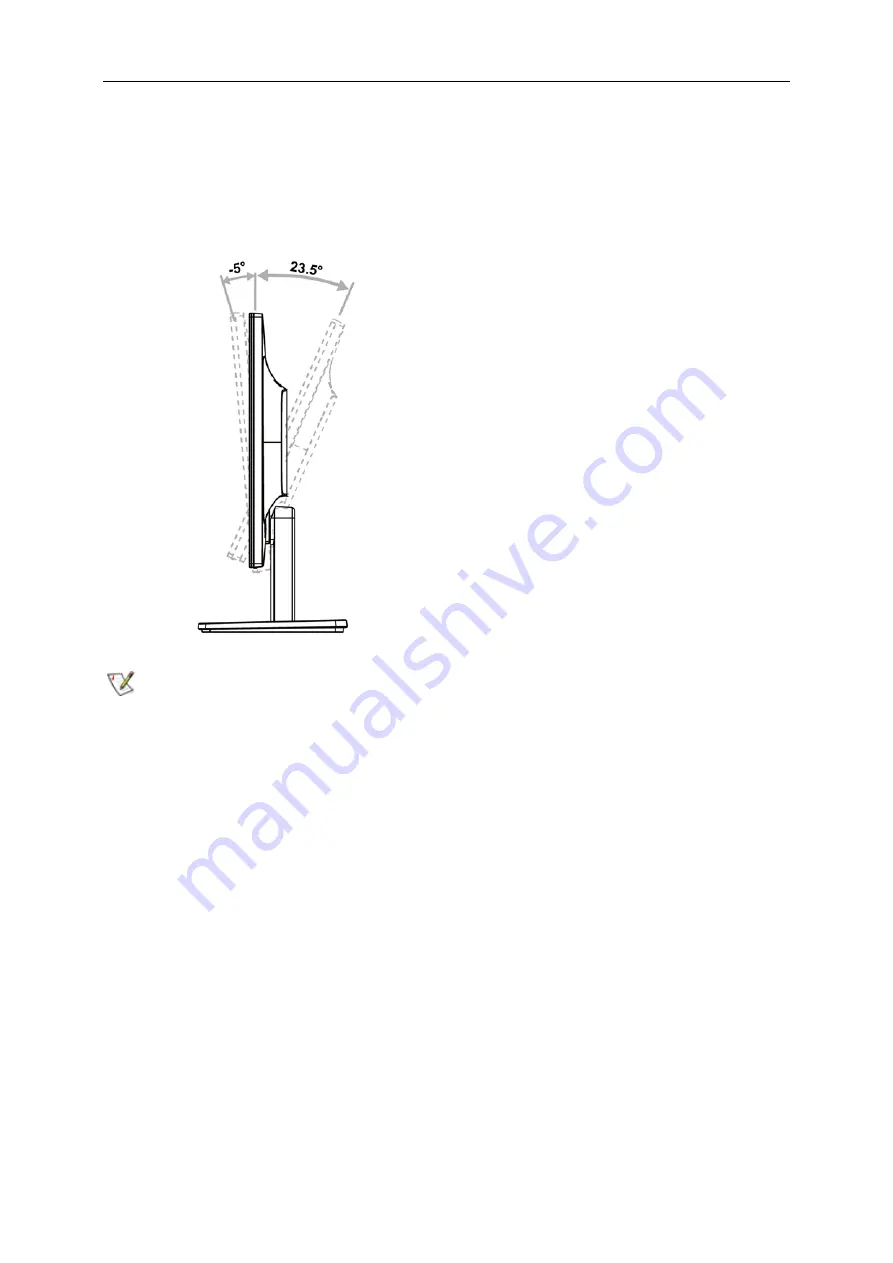
Adjusting Viewing Angle 

For optimal viewing, it is recommended to look at the full face of the monitor, and then adjust the monitor's angle to 

your own preference.   

Hold the stand so you will not topple the monitor when you change the monitor's angle.   

You are able to adjust the monitor's angle from -5° to 23.5 °.   


NOTE: 

Do not adjust the viewing angle over 23.5 degrees in order to avoid damage. 


11 

Summary of Contents for E2475SWQE

Page 1: ...LCD Monitor User Manual E2475SWQE LED backlight www aoc com 2016 AOC All Rights Reserved 1...

Page 2: ...Setting 21 Luminance 22 Image Setup 23 Color Setup 24 Picture Boost 25 OSD Setup 26 Extra 27 Exit 28 LED Indicator 28 Driver 29 Monitor Driver 29 Windows 10 29 Windows 8 33 Windows 7 37 i Menu 41 e S...

Page 3: ...vice 54 Warranty Statement for Europe 54 Warranty Statement for Middle East and Africa MEA 56 AOC International Europe B V 58 Warranty Statement for North South America excluding Brazil 59 EASE PROGRA...

Page 4: ...sed as follows NOTE A NOTE indicates important information that helps you make better use of your computer system CAUTION A CAUTION indicates either potential damage to hardware or loss of data and te...

Page 5: ...y feature If your outlet does not accommodate the three wire plug have an electrician install the correct outlet or use an adapter to ground the appliance safely Do not defeat the safety purpose of th...

Page 6: ...nation should be moved with care Never push any object into the slot on the monitor cabinet It could damage circuit parts causing a fire or electric shock Never spill liquids on the monitor Do not pla...

Page 7: ...the stain instead of strong detergent which will cauterize the product cabinet When cleaning make sure no detergent is leaked into the product The cleaning cloth should not be too rough as it will scr...

Page 8: ...re not blocked by a table or curtain Do not engage the LCD monitor in severe vibration or high impact conditions during operation Do not knock or drop the monitor during operation or transportation Fo...

Page 9: ...nal cables Audio DP Analog HDMI cables CD manual will be provided for all countries and regions Please check with the local dealer or AOC branch office for confirmation CD Manual Stand Base Power Cabl...

Page 10: ...Setup Base Please setup or remove the base following the steps as below Please place the monitor on a soft and flat surface to prevent the scratch Setup Remove 10...

Page 11: ...monitor and then adjust the monitor s angle to your own preference Hold the stand so you will not topple the monitor when you change the monitor s angle You are able to adjust the monitor s angle from...

Page 12: ...k of the monitor and connect the other end to the computer s D Sub port 3 Optional Requires a video card with DP port Connect one end of the DP cable to the back of the monitor and connect the other e...

Page 13: ...Adjusting Setting Optimal Resolution Windows 10 For Windows 10 Right click START Click CONTROL PANEL Click DISPLAY 13...

Page 14: ...Click on the Change display settings button Set the resolution SLIDE BAR to Optimal preset resolution 14...

Page 15: ...Windows 8 For Windows 8 Right click and click All apps at the bottom right of the screen Set the View by to Category Click Appearance and Personalization 15...

Page 16: ...Click DISPLAY Set the resolution SLIDE BAR to Optimal preset resolution 16...

Page 17: ...Windows 7 For Windows 7 Click START Click CONTROL PANEL Click Appearance Click DISPLAY 17...

Page 18: ...Click on the Change display settings button Set the resolution SLIDE BAR to Optimal preset resolution 18...

Page 19: ...ume When there is no OSD press Volume adjust volume Auto Exit Source hot key When there is no OSD press Auto Source button continuously about 2 second to do auto configure When the OSD is closed press...

Page 20: ...5 seconds to activate the Clear Vision Demo and a message of Clear Vision Demo on will be display on the screen for a duration of 5 seconds Press Menu or Exit button the message will disappear Press...

Page 21: ...repeat steps 2 3 4 OSD Lock Function To lock the OSD press and hold the MENU button while the monitor is off and then press power button to turn the monitor on To un lock the OSD press and hold the M...

Page 22: ...from Digital register Brightness 0 100 Backlight Adjustment Eco mode Standard Standard Mode Text Text Mode Internet Internet Mode Game Game Mode Movie Movie Mode Sports Sports Mode Gamma Gamma1 Adjust...

Page 23: ...ress or to adjust 5 Press AUTO to exit Clock 0 100 Adjust picture Clock to reduce Vertical Line noise Phase 0 100 Adjust Picture Phase to reduce Horizontal Line noise Sharpness 0 100 Adjust picture sh...

Page 24: ...Recall SRGB Color Temperature from EEPROM User Recall User Color Temperature from EEPROM DCB Mode Full Enhance ON OFF Disable or Enable Full Enhance Mode Nature Skin ON OFF Disable or Enable Nature S...

Page 25: ...ble Disable Bright Frame Frame Size 14 100 Adjust the Size of the Frame Brightness 0 100 Brightness Adjustment for Enhance Area Contrast 0 100 Contrast Adjustment for Enhance Area H position 0 100 Adj...

Page 26: ...AUTO to exit Language English France Spanish Portugues German Italian Dutch Swedish Finnish Polish Czech Russia Korea TChina SChina Japanese Select the OSD language Timeout 5 120 Adjust the OSD timeo...

Page 27: ...uto Detect input signal D SUB Select D SUB signal source as input DP Select DP signal source as input HDMI Select HDMI signal Source as input Auto Config Yes No Auto adjust the picture to default Off...

Page 28: ...Exit 1 Press MENU Menu to display menu 2 Press or to select Exit and press MENU to enter 3 Press AUTO to exit LED Indicator Status LED Color Full Power Mode Green Power Saving Orange 28...

Page 29: ...Driver Monitor Driver Windows 10 Start Windows 10 Right click START Click Control Panel Click on the Display icon 29...

Page 30: ...Click on the Change display settings button Click the Advanced Settings button 30...

Page 31: ...tab and then click the Properties button Click the Driver tab Open the Update Driver Software Generic PnP Monitor window by clicking on Update Driver and then click the Browse my computer for driver...

Page 32: ...drive letter designator for the CD ROM drive Select the xxx inf file and click the Open button Click the OK button Select your monitor model and click the Next button The files will be copied from the...

Page 33: ...Windows 8 Start Windows 8 Right click and click All apps at the bottom right of the screen Click on the Control Panel icon Set the View by to Large icons or Small icons Click on the Display icon 33...

Page 34: ...Click on the Change display settings button Click the Advanced Settings button 34...

Page 35: ...tab and then click the Properties button Click the Driver tab Open the Update Driver Software Generic PnP Monitor window by clicking on Update Driver and then click the Browse my computer for driver...

Page 36: ...drive letter designator for the CD ROM drive Select the xxx inf file and click the Open button Click the OK button Select your monitor model and click the Next button The files will be copied from the...

Page 37: ...Windows 7 Start Windows 7 Click on the Start button and then click on Control Panel Click on the Display icon Click on the Change display settings button 37...

Page 38: ...Click the Advanced Settings button Click the Monitor tab and then click the Properties button Click the Driver tab 38...

Page 39: ...click the Browse my computer for driver software button Select Let me pick from a list of device drivers on my computer Click the Have Disk button Click on the Browse button and navigate to the follow...

Page 40: ...ct your monitor model and click the Next button The files will be copied from the CD to your hard disk drive Close all open windows and remove the CD Restart the system The system will automatically s...

Page 41: ...o i Menu software by AOC i Menu makes it easy to adjust your monitor display setting by using on screen menus instead of the OSD button on the monitor To complete installation please follow the instal...

Page 42: ...izard to complete software installation Under each of the four PC statuses you may choose the desired time in minutes from the pull down menu for your monitor to automatically shutdown The example bel...

Page 43: ...it splits the desktop into different panels and each panel displays a different window You only need to drag the window to a corresponding panel when you want to access it It supports multiple monito...

Page 44: ...to the Setting the Optimal Resolution If the initial screen the login screen does not appear contact the Service Center or your dealer Can you see Input Not Supported on the screen You can see this me...

Page 45: ...LED should either turn ON or OFF after hitting the CAPS LOCK key Missing one of the primary colors RED GREEN or BLUE Inspect the monitor s video cable and make sure that no pin is damaged Make sure th...

Page 46: ...DDC2B CI Input Connector VGA DP HDMI Input Video Signal Analog 0 7Vp p standard 75 OHM Positive TMDS Power Source 100 240V 50 60Hz Power Consumption Typical Brightness 90 Contrast 50 20W Brightness 1...

Page 47: ...70Hz 56 476 70 069 XGA 1024x768 75Hz 60 023 75 029 SXGA 1280x1024 60Hz 63 981 60 02 SXGA 1280x1024 75Hz 79 976 75 025 WXGA 1440x900 60Hz 55 935 59 887 WXGA 1440x900 60Hz 55 469 59 901 WSXGA 1680x1050...

Page 48: ...V sync 7 GND G 15 DDC Serial clock 8 GND B 19 Pin Color Display Signal Cable Pin No Signal Name Pin No Signal Name 1 TMDS Data 2 11 TMDS Clock Shield 2 TMDS Data 2 Shield 12 TMDS Clock 3 TMDS Data 2...

Page 49: ...No Signal Name 1 ML_Lane 3 n 11 GND 2 GND 12 ML_Lane 0 p 3 ML_Lane 3 p 13 CONFIG1 4 ML_Lane 2 n 14 CONFIG2 5 GND 15 AUX_CH p 6 ML_Lane 2 p 16 GND 7 ML_Lane 1 n 17 AUX_CH n 8 GND 18 Hot Plug Detect 9...

Page 50: ...DDC STANDARD It allows the monitor to inform the host system of its identity and depending on the level of DDC used communicate additional information about its display capabilities The DDC2B is a bi...

Page 51: ...etermined by turning the equipment off and on the user is encouraged to try to correct the interference by one or more of the following measures Reorient or relocate the receiving antenna Increase the...

Page 52: ...e of your waste equipment by handing it over to a designated collection point for the recycling of waste electrical and electronic equipment The separate collection and recycling of your waste equipme...

Page 53: ...n for efforts to reduce the environmental impact of its products AOC believes in protecting the environment With a key concern for the conservation of natural resources as well as land ll protection A...

Page 54: ...on the address label Put the RMA number on the shipping carton AOC International Europe B V will pay the return shipping charges within one of the countries specified within this warranty statement A...

Page 55: ...EUROPE B V OBLIGATIONS AND YOUR REMEDIES HEREUNDER ARE SOLELY AND EXCULSIVELY AS STATED HERE AOC INTERNATIONAL EUROPE B V LIABILITY WHETHER BASED ON CONTRACT TORT WARRANTY STRICT LIABILITY OR OTHER TH...

Page 56: ...y as per the product ID serial number and for such exceptional cases Original Invoice Proof Of Purchase Receipt is mandatory If the product appears to be defective please contact your AOC authorized d...

Page 57: ...INCLUDING THE WARRANTIES OF MERCHANTABILITY AND FITNESS FOR A PARTICULAR PURPOSE ARE LIMITED IN DURATION TO A PERIOD OF ONE 1 to THREE 3 YEARS FOR PARTS AND LABOR FROM THE ORIGINAL DATE OF CONSUMER PU...

Page 58: ...ceptable defect levels for each type In order to qualify for repair or replacement under warranty the number of pixel defects on a TFT monitor panel must exceed these acceptable levels Pixels and Sub...

Page 59: ...e during shipment Pay all shipping charges EPI is not responsible for damage to inbound product that was not properly packaged EPI will pay the return shipment charges within one of the countries spec...

Page 60: ...S YOU MAY HAVE OTHER RIGHTS WHICH MAY VARY FROM STATE TO STATE In the United States of America this limited warranty is only valid for Products purchased in the Continental United States Alaska and Ha...

Page 61: ...UPS Call Tag to pick up the defective unit Step 6 Please review the following chart to see your EASE program qualifications WARRANTY PERIOD COVERAGE AT NO CHARGE CUSTOMER CHARGES Within the first thre...

Page 62: ...TCO DOCUMENT FOR TCO CERTIFIED MODELS 62...

Reviews: