


7
3. Operating Instructions
3.1 General Instructions
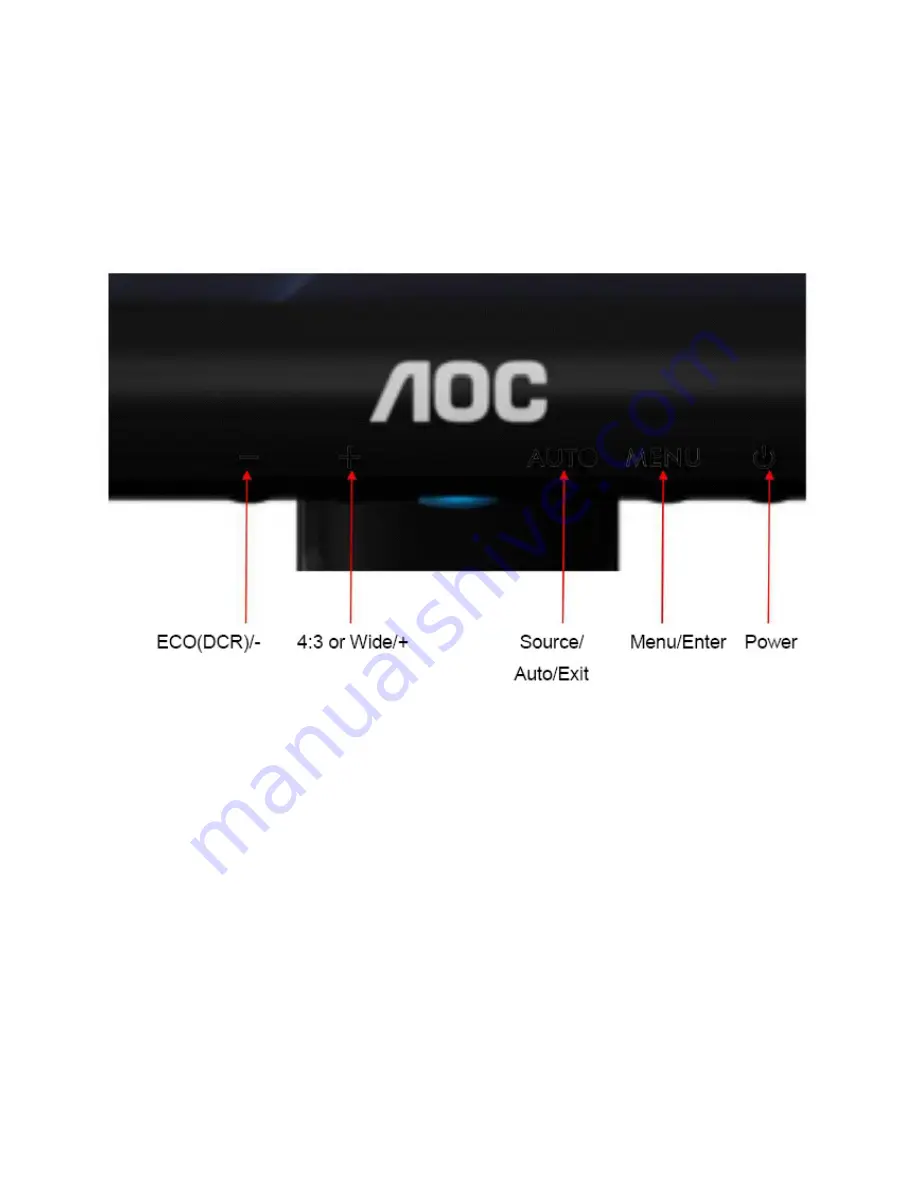
Press the power button to turn the monitor on or off. The other control knobs are located at front panel of the monitor
(See Figure ). By changing these settings, the picture can be adjusted to your personal preferences.
* The power cord should be connected.
* Press the power button to turn on the monitor. The power indicator will light up.
3.2 Control Buttons and Connections
Power
Press the Power button to turn on/off the monitor.
Eco (DCR)/ -
Press the Eco key continuously to select the Eco mode of brightness and DCR on when there is no OSD. ( Eco
mode hot key may not be available in all models).
4:3 or Wide/+
When there is no OSD, press + continuously to change 4:3 or wide image ratio. (If the product screen size is 4:3 or
input signal resolution is wide format, the hot key is disable to adjust. )
Auto / Exit
When the OSD is closed,. Press Auto button continuously to do auto configure (Only for the models with dual or
more inputs).
Source hot key
When the OSD is closed, press Source button will be Source hot key function. Press Source button continuously to
select the input source showed in the message bar , press Menu/Enter button to change to the source selected.
Summary of Contents for e2350Sd
Page 4: ...4 1 Monitor Specifications ...
Page 6: ...6 View and Dimension ...
Page 25: ...25 4 Input Output Specification 4 1 Input Signal Connector Analog connector ...
Page 26: ...26 4 2 Preset Display Modes ...
Page 29: ...29 4 3 4 Optical Characteristics Ta 25 C VLCD 5 0V fV 60Hz fCLK 119MHz IBL 120mA ...
Page 39: ...39 7 PCB Layout 7 1 Main Board 715G4502M01000004C ...
Page 40: ...40 ...
Page 41: ...41 7 2 Power Board Adapter 715G4744P01000001C ...
Page 42: ...42 Converter 715G4013P01002004S ...
Page 43: ...43 7 3 Key Board 715G4747K0E000001C ...
Page 55: ...55 3 2 Double click icon and run it 4 Click TOOL Option FE2P Mode Enable TOOL show ...
Page 62: ...62 ...
Page 63: ...63 350 500 150 300 500 700 ...
Page 67: ...67 5 Click program Note 1 Appear fault as follow please input SN twice and burning again ...
Page 74: ...74 3 Pinch the hook and remove the base 4 Use fixture to leave off the stand ...
Page 75: ...75 5 Use fixture to remove the hinge cover 6 Remove the screws of the stand ...
Page 77: ...77 9 Prize up the front frame use fixture 10 Overturn the monitor and take off the back cover ...
Page 79: ...79 3 Remove the Hexagon screws 4 Remove the LVDS ...
Page 80: ...80 5 Overturn the iron plate and remove the screws PWPC and CBPC ...
Page 81: ...81 13 Monitor Exploded Views ...


