AOC e2051f Manual Download Page 6


6

Installation 

Do not place the monitor on an unstable cart, stand, tripod, bracket, or table. If the monitor falls, it can injure a 

person and cause serious damage to this product. Use only a cart, stand, tripod, bracket, or table recommended by 

the manufacturer or sold with this product. Follow the manufacturer’s instructions when installing the product and 

use mounting accessories recommended by the manufacturer. A product and cart combination should be moved 

with care.     


Never push any object into the slot on the monitor cabinet. It could damage circuit parts causing a fire or 

electric shock. Never spill liquids on the monitor.     


Do not place the front of the product on the floor.   


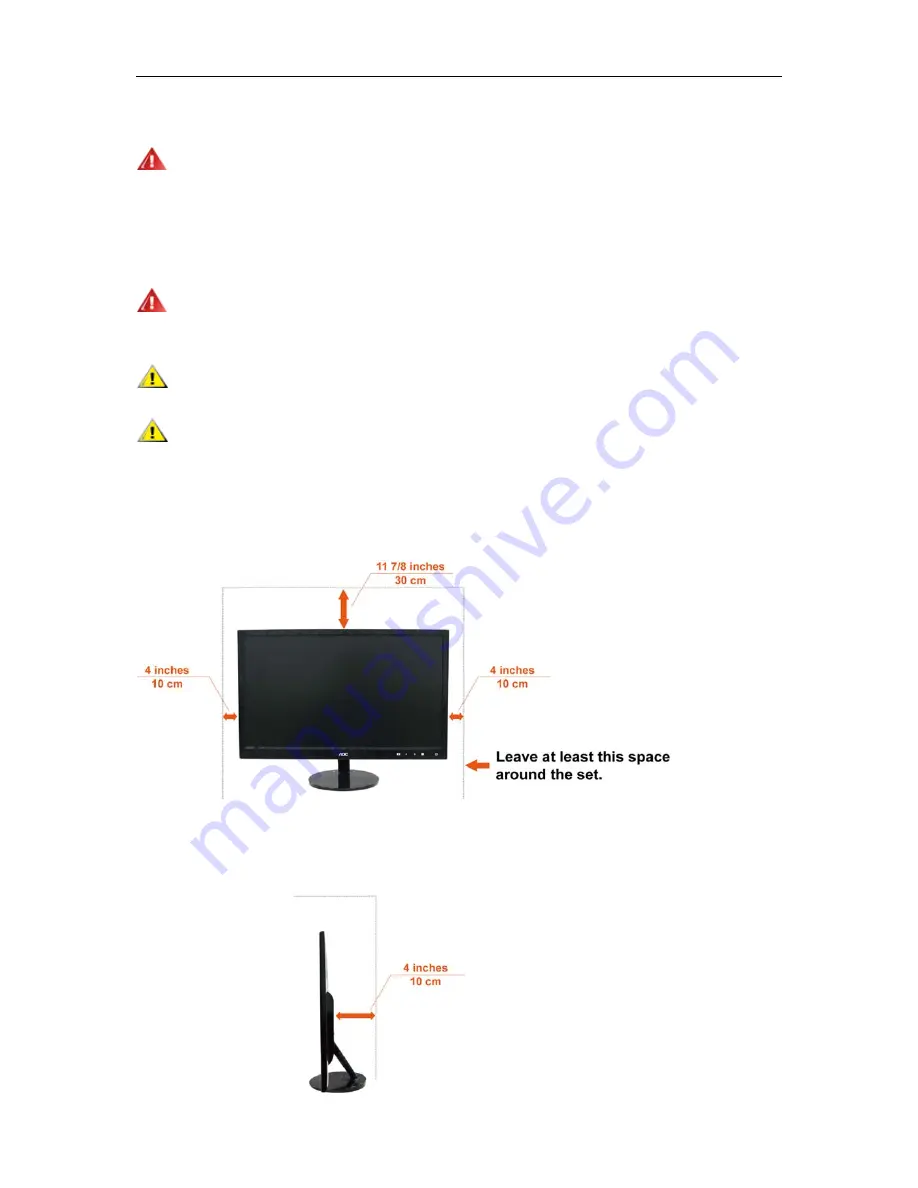
Leave some space around the monitor as shown below. Otherwise, air-circulation may be inadequate hence 

overheating may cause a fire or damage to the monitor.   


See below the recommended ventilation areas around the monitor when the monitor is installed on the wall or on 

the stand:    

Installed with stand 


Summary of Contents for e2051f

Page 1: ...1 LCD Monitor User Manual www aoc com 2010 AOC All Rights Reserved e2051F...

Page 2: ...2000 17 Hotkeys 18 OSD Setting 19 Luminance 20 Image Setup 22 Color Setup 24 Picture Boost 26 OSD Setup 28 Extra 30 Exit 32 LED Indicator 32 Driver 33 Monitor Driver 33 Windows 7 33 Windows Vista 37 W...

Page 3: ...3 Service 55 Warranty Statement for Europe 55 Warranty Statement for North South America excluding Brazil 57...

Page 4: ...used as follows NOTE A NOTE indicates important information that helps you make better use of your computer system CAUTION A CAUTION indicates either potential damage to hardware or loss of data and...

Page 5: ...the grounded plug Unplug the unit during a lightning storm or when it will not be used for long periods of time This will protect the monitor from damage due to power surges Do not overload power str...

Page 6: ...ed by the manufacturer A product and cart combination should be moved with care Never push any object into the slot on the monitor cabinet It could damage circuit parts causing a fire or electric shoc...

Page 7: ...t the stain instead of strong detergent which will cauterize the product cabinet When cleaning make sure no detergent is leaked into the product The cleaning cloth should not be too rough as it will s...

Page 8: ...plug IMMEDIATELY and contact a Service Center Make sure that the ventilating openings are not blocked by a table or curtain Do not engage the LCD monitor in severe vibration or high impact conditions...

Page 9: ...al cables Analog DVI and HDMI cables will be provided for all countries and regions Please check with the local dealer or AOC branch office for confirmation QSG CD Manual Monitor Base Stand Power Cabl...

Page 10: ...10 Setup Stand Base Please setup or remove the base following the steps as below Setup Remove...

Page 11: ...11 Unit standing without base is available Caution must put unit in flat surface Any uneven or sloped surface may result unit damaged or injury to user...

Page 12: ...and then adjust the monitor s angle to your own preference Hold the stand so you will not topple the monitor when you change the monitor s angle You are able to adjust the monitor s angle from 3 to 2...

Page 13: ...2 Connect one end of the 15 pin D Sub cable to the back of the monitor and connect the other end to the computer s D Sub port 3 Optional Requires a video card with DVI port Connect one end of the DVI...

Page 14: ...14 Adjusting Setting Optimal Resolution Windows Vista For Windows Vista 1 Click START 2 Click CONTROL PANEL 3 Click Appearance and Personalization 4 Click Personalization...

Page 15: ...15 5 Click Display Settings 6 Set the resolution SLIDE BAR to 1600 by 900...

Page 16: ...16 Windows XP For Windows XP 1 Click START 2 Click SETTINGS 3 Click CONTROL PANEL 4 Click Appearance and Themes 5 Double click DISPLAY...

Page 17: ...7 Set the resolution SLIDE BAR to 1600 by 900 Windows ME 2000 For Windows ME 2000 1 Click START 2 Click SETTINGS 3 Click CONTROL PANEL 4 Double click DISPLAY 5 Click SETTINGS 6 Set the resolution SLID...

Page 18: ...3 or Wide When there is no OSD press continuously to change 4 3 or wide image ratio If the product screen size is 4 3 or input signal resolution is wide format the hot key is disabled to adjust Sourc...

Page 19: ...If you want to adjust any other function repeat steps 2 3 4 OSD Lock Function To lock the OSD press and hold the MENU button while the monitor is off and then press power button to turn the monitor o...

Page 20: ...20 Luminance 1 Press Menu to display menu 2 Press or to select Luminance and press to enter 3 Press or to select submenu and press to enter...

Page 21: ...ast from Digital register Eco mode Standard Standard Mode Text Text Mode Internet Internet Mode Game Game Mode Movie Movie Mode Sports Sports Mode Gamma Gamma1 Adjust to Gamma1 Gamma2 Adjust to Gamma...

Page 22: ...22 Image Setup 1 Press Menu to display menu 2 Press or to select Image Setup and press to enter 3 Press or to select submenu and press to enter...

Page 23: ...Clock to reduce Vertical Line noise Phase 0 100 Adjust Picture Phase to reduce Horizontal Line noise Sharpness 0 100 Adjust picture sharpness H Position 0 100 Adjust the horizontal position of the pi...

Page 24: ...24 Color Setup 1 Press Menu to display menu 2 Press or to select Color Setup and press to enter 3 Press or to select submenu and press to enter...

Page 25: ...M User Red Red Gain from Digital register Green Green Gain Digital register Blue Blue Gain from Digital register DCB Mode Full Enhance on or off Disable or Enable Full Enhance Mode Nature Skin on or o...

Page 26: ...26 Picture Boost 1 Press Menu to display menu 2 Press or to select Picture Boost and press to enter 3 Press or to select submenu and press to enter...

Page 27: ...100 Adjust Frame Size Brightness 0 100 Adjust Frame Brightness Contrast 0 100 Adjust Frame Contrast H position 0 100 Adjust Frame horizontal Position V position 0 100 Adjust Frame vertical Position B...

Page 28: ...28 OSD Setup 1 Press Menu to display menu 2 Press or to select OSD Setup and press to enter 3 Press or to select submenu and press to enter...

Page 29: ...exit H Position 0 100 Adjust the horizontal position of OSD V Position 0 100 Adjust the vertical position of OSD Timeout 5 120 Adjust the OSD Timeout Transparence 0 100 Adjust the transparence of OSD...

Page 30: ...30 Extra 1 Press Menu to display menu 2 Press or to select Extra and press to enter 3 Press or to select submenu and press to enter...

Page 31: ...fig yes or no Auto adjust the picture to default Off timer 0 24hrs Select DC off time Image Ratio wide or 4 3 Select wide or 4 3 format for display DDC CI yes or no Turn ON OFF DDC CI Support Reset Ye...

Page 32: ...32 Exit 1 Press Menu to display menu 2 Press or to select Exit and press to exit Exit Exit the main OSD LED Indicator Status LED Color Full Power Mode Blue Active off Mode Orange...

Page 33: ...33 Driver Monitor Driver Windows 7 1 Start Windows 7 2 Click on the Start button and then click on Control Panel 3 Click on the Display icon...

Page 34: ...34 4 Click on the Change display settings button 5 Click the Advanced Settings button 6 Click the Monitor tab and then click the Properties button...

Page 35: ...ab 8 Open the Update Driver Software Generic PnP Monitor window by clicking on Update Driver and then click the Browse my computer for driver software button 9 Select Let me pick from a list of device...

Page 36: ...ROM drive 11 Select the xxx inf file and click the Open button Click the OK button 12 Select your monitor model and click the Next button The files will be copied from the CD to your hard disk drive...

Page 37: ...37 Windows Vista 1 Click Start and Control Panel Then double click on Appearance and Personalization 2 Click Personalization and then Display Settings 3 Click Advanced Settings...

Page 38: ...w click Continue 5 Click Update Driver in the Driver tab 6 Check the Browse my computer for driver software checkbox and click Let me pick from a list of device drivers on my computer 7 Click on the H...

Page 39: ...39 Windows XP 1 Start Windows XP 2 Click on the Start button and then click on Control Panel 3 Select and click on the category Appearance and Themes 4 Click on the Display Item...

Page 40: ...nitor tab If the Properties button is inactive it means your monitor is properly configured Please stop installation If the Properties button is active click on Properties button Please follow the ste...

Page 41: ...se button and then select the appropriate drive F CD ROM Drive 11 Click on the Open button then click the OK button 12 Select your monitor model and click on the Next button If you can see the has not...

Page 42: ...e Open button then click on the OK button 10 Select your monitor model and click on the Next button 11 Click on the Finish button then the Close button If you can see the Digital Signature Not Found w...

Page 43: ...e to i Menu software by AOC i Menu makes it easy to adjust your monitor display setting by using on screen menus instead of the OSD button on the monitor To complete installation please follow the ins...

Page 44: ...l wizard to complete software installation Under each of the four PC statuses you may choose the desired time in minutes from the pull down menu for your monitor to automatically shutdown The example...

Page 45: ...g tool it splits the desktop into different panes each pane displays a different window You only need to drag the window to a corresponding pane when you want to access it It supports multiple monitor...

Page 46: ...efer to the Setting the Optimal Resolution If the initial screen the login screen does not appear contact the Service Center or your dealer z Can you see Input Not Supported on the screen You can see...

Page 47: ...he LED should either turn ON or OFF after hitting the CAPS LOCK key Missing one of the primary colors RED GREEN or BLUE Inspect the monitor s video cable and make sure that no pin is damaged Make sure...

Page 48: ...solution 1600 900 60Hz Plug Play VESA DDC2B Input Connector VGA DVI Input Video Signal Analog 0 7Vp p standard 75 OHM Positive Power Source 100 240V 50 60Hz Power Consumption 26 W Standby 0 5 W Off ti...

Page 49: ...800 600 72Hz 48 077 72 188 SVGA 800 600 75Hz 46 875 75 000 XGA 1024 768 60Hz 48 363 60 004 XGA 1024 768 70Hz 56 476 70 069 XGA 1024 768 75Hz 60 023 75 029 702P 1280 720 60Hz 45 000 60 000 WSXGA 1600...

Page 50: ...D B Pin Number 24 Pin Color Display Signal Cable Pin Number 24 Pin Color Display Signal Cable 1 TMDS data 2 13 TMDS data 3 2 TMDS data 2 14 5V Power 3 TMDS data 2 4 Shield 15 Ground for 5V 4 TMDS data...

Page 51: ...SA DDC STANDARD It allows the monitor to inform the host system of its identity and depending on the level of DDC used communicate additional information about its display capabilities The DDC2B is a...

Page 52: ...e determined by turning the equipment off and on the user is encouraged to try to correct the interference by one or more of the following measures Reorient or relocate the receiving antenna Increase...

Page 53: ...to a designated collection point for the recycling of waste electrical and electronic equipment The separate collection and recycling of your waste equipment at the time of disposal will help to cons...

Page 54: ...n for the conservation of natural resources as well as landfill protection AOC announces the launch of AOC monitor s packaging recycling program This program is designed to help you discard of your mo...

Page 55: ...mber on the address label Put the RMA number on the shipping carton Insure it or assume the risk of loss damage during shipment Pay all shipping charges AOC International Europe GmbH is responsible ne...

Page 56: ...GMBH LIABILITY WHETHER BASED ON CONTRACT TORT WARRANTY STRICT LIABILITY OR OTHER THEORY SHALL NOT EXCEED THE PRICE OF THE INDIVIDUAL UNIT WHOSE DEFECT OR DAMAGE IS THE BASIS OF THE CLAIM IN NO EVENT...

Page 57: ...mage during shipment Pay all shipping charges EPI is not responsible for damage to inbound product that was not properly packaged EPI will pay the return shipment charges within one of the countries s...

Page 58: ...GHTS YOU MAY HAVE OTHER RIGHTS WHICH MAY VARY FROM STATE TO STATE In the United States of America this limited warranty is only valid for Products purchased in the Continental United States Alaska and...

Reviews: