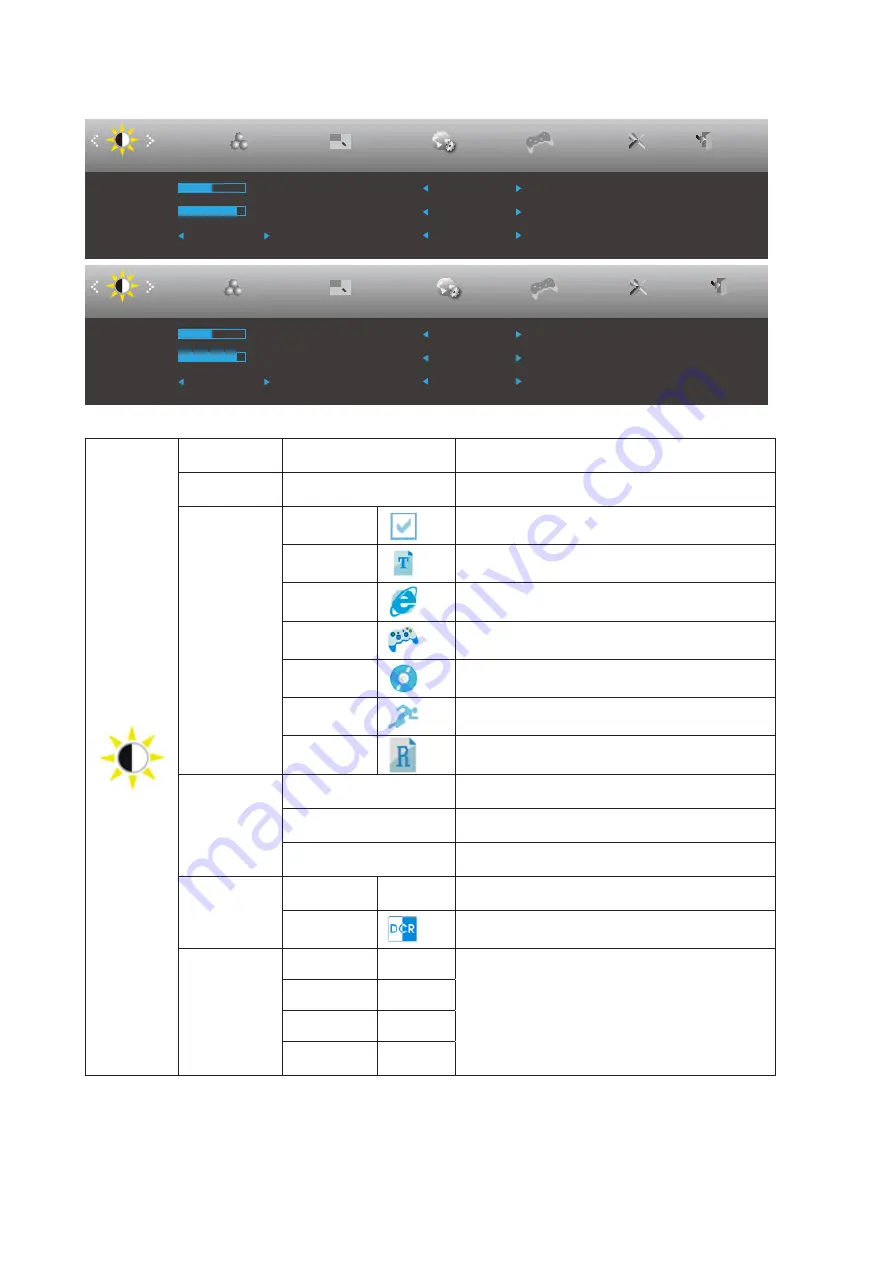
AOC C27G2ZE User Manual Download Page 15

13

Luminance

Luminance

Color Setup

Picture Boost

OSD Setup

Game Setting

Exit

Extra

Contrast

50

Brightness

90

Eco mode

Standard

Gamma

Gamma 1

DCR

Off

HDR Effect

Off

Luminance

Color Setup

Picture Boost

OSD Setup

Game Setting

Exit

Extra

Contrast

50

Brightness

90

Eco mode

Standard

Gamma

Gamma 1

DCR

Off

HDR Mode

Off

Contrast 

0-100 

Contrast from Digital-register.

Brightness 

0-100 

Backlight Adjustment 

Eco mode 

 Standard

Standard Mode 

 Text

Text Mode

 Internet

Internet Mode

 Game

Game Mode 

 Movie

Movie Mode

 Sports

Sports Mode

Reading


Reading Mode

Gamma 

Gamma1

Adjust to Gamma 1

Gamma2

Adjust to Gamma 2

Gamma3

Adjust to Gamma 3 

DCR 

Off

Disable dynamic contrast ratio

On

Enable dynamic contrast ratio

HDR Effect/

Mode

OFF

Adjust HDR Effect/Mode.

HDR Picture

HDR Movie

HDR Game

Summary of Contents for C27G2ZE

Page 1: ...1 www aoc com LCD Monitor User Manual C27G2ZE LED backlight 2020 AOC All Rights Reserved ...

Page 2: ...wing Angle 8 Connecting the Monitor 9 AMD FreeSync Premium function 10 Adjusting 11 Hotkeys 11 OSD Setting 12 Luminance 13 Color Setup 14 Picture Boost 15 OSD Setup 16 Game Setting 17 Extra 18 Exit 19 LED Indicator 19 Troubleshoot 20 Specification 21 General Specification 21 Preset Display Modes 22 Pin Assignments 23 Plug and Play 24 ...

Page 3: ...e used as follows NOTE A NOTE indicates important information that helps you make better use of your computer system CAUTION A CAUTION indicates either potential damage to hardware or loss of data and tells you how to avoid the problem WARNING A WARNING indicates the potential for bodily harm and tells you how to avoid the problem Some warnings may appear in alternate formats and may be unaccompan...

Page 4: ...ectrician install the correct outlet or use an adapter to ground the appliance safely Do not defeat the safety purpose of the grounded plug Unplug the unit during a lightning storm or when it will not be used for long periods of time This will protect the monitor from damage due to power surges Do not overload power strips and extension cords Overloading can result in fire or electric shock To ens...

Page 5: ...e monitor cabinet It could damage circuit parts causing a fire or electric shock Never spill liquids on the monitor Do not place the front of the product on the floor If you mount the monitor on a wall or shelf use a mounting kit approved by the manufacturer and follow the kit instructions Leave some space around the monitor as shown below Otherwise air circulation may be inadequate hence overheat...

Page 6: ...ut the stain instead of strong detergent which will cauterize the product cabinet When cleaning make sure no detergent is leaked into the product The cleaning cloth should not be too rough as it will scratch the screen surface Please disconnect the power cord before cleaning the product ...

Page 7: ...r plug IMMEDIATELY and contact a Service Center Make sure that the ventilating openings are not blocked by a table or curtain Do not engage the LCD monitor in severe vibration or high impact conditions during operation Do not knock or drop the monitor during operation or transportation ...

Page 8: ... CD Manual Power Cable DP Cable HDMI Cable Warranty Card Stand Base Not all signal cables DP HDMI cables will be provided for all countries and regions Please check with the local dealer or AOC branch office for confirmation ...

Page 9: ...7 Setup Stand Base Please setup or remove the base following the steps as below Setup Remove ...

Page 10: ... monitor then adjust the monitor s angle to your own preference Hold the stand so you will not topple the monitor when you change the monitor s angle You are able to adjust the monitor as below NOTE Do not touch the LCD screen when you change the angle It may cause damage or break the LCD screen ...

Page 11: ... and unplug its power cable 3 Connect the display signal cable to the video connector on the back of your computer 4 Plug the power cord of your computer and your display into a nearby outlet 5 Turn on your computer and display If your monitor displays an image installation is complete If it does not display an image please refer Troubleshooting To protect equipment always turn off the PC and LCD ...

Page 12: ...ard Recommend list is as the below also could be checked by visiting www AMD com Radeon RX Vega series Radeon RX 500 series Radeon RX 400 series Radeon R9 R7 300 series R9 370 X R7 370 X R7 265 except Radeon Pro Duo 2016 Radeon R9 Nano series Radeon R9 Fury series Radeon R9 R7 200 series R9 270 X R9 280 X except ...

Page 13: ...Mode When there is no OSD press key to open game mode function then press or key to select game mode FPS RTS Racing Gamer 1 Gamer 2 or Gamer 3 basing on the different game types Dial Point When there is no OSD press Dial Point button to show hide Dial Point Source Exit When the OSD is closed press Source Exit button will be Source hot key function When the OSD is closed press Source Exit button co...

Page 14: ...activate it press or to navigate through the sub menu functions Once the desired function is highlighted press MENU button to activate it 3 Press or to change the settings of the selected function Press AUTO button to exit If you want to adjust any other function repeat steps 2 3 4 OSD Lock Function To lock the OSD press and hold the MENU button while the monitor is off and then press power button...

Page 15: ...a Gamma 1 DCR Off HDR Mode Off Contrast 0 100 Contrast from Digital register Brightness 0 100 Backlight Adjustment Eco mode Standard Standard Mode Text Text Mode Internet Internet Mode Game Game Mode Movie Movie Mode Sports Sports Mode Reading Reading Mode Gamma Gamma1 Adjust to Gamma 1 Gamma2 Adjust to Gamma 2 Gamma3 Adjust to Gamma 3 DCR Off Disable dynamic contrast ratio On Enable dynamic contr...

Page 16: ...l SRGB Color Temperature from EEPROM User Red Red Gain from Digital register Green Green Gain Digital register Blue Blue Gain from Digital register DCB Mode Full Enhance on or off Disable or Enable Full Enhance Mode Nature Skin on or off Disable or Enable Nature Skin Mode Green Field on or off Disable or Enable Green Field Mode Sky blue on or off Disable or Enable Sky blue Mode Auto Detect on or o...

Page 17: ...ing Bright Frame on or off Disable or Enable Bright Frame Frame Size 14 100 Adjust Frame Size Brightness 0 100 Adjust Frame Brightness Contrast 0 100 Adjust Frame Contrast H position 0 100 Adjust Frame horizontal Position V position 0 100 Adjust Frame vertical Position Note Adjust the brightness contrast and position of the Bright Frame for better viewing experience ...

Page 18: ...apability 1 1 1 2 Please be noted that only DP1 2 support AMD FreeSync Premium function H Position 0 100 Adjust the horizontal position of OSD V Position 0 100 Adjust the vertical position of OSD Volume 0 100 Volume Adjustment Transparence 0 100 Adjust the transparence of OSD Break Reminder on or off Break reminder if the user continuously work for more than 1hrs Note If the DP video content suppo...

Page 19: ...user can adjust from 50 to 100 or 0 to increase contrast for clear picture 1 If picture is too dark to be saw the detail clearly adjusting from 50 to100 for clear picture 2 If picture is too white to be saw the detail clearly adjusting from 50 to0 for clear picture Low Input Lag On Off Turn off frame buffer to decrease input lag Game Color 0 20 Game Color will provide 0 20 level for adjusting satu...

Page 20: ...080 V H Frequency 67KHz V Frequency 60Hz Extra Game Setting Input Select Select Input Signal Source Off timer 0 24hrs Select DC off time Image Ratio Wide Select image ratio for display 4 3 1 1 17 4 3 19 4 3 19 5 4 19 W 16 10 21 5 W 16 9 22 W 16 10 23 W 16 9 23 6 W 16 9 24 W 16 9 DDC CI yes or no Turn ON OFF DDC CI Support Reset Yes or no Reset the menu to default ...

Page 21: ...19 Exit Picture Boost OSD Setup Luminance Color Setup Exit Extra Game Setting Exit Exit the main OSD LED Indicator Status LED Color Full Power Mode White Active off Mode Orange ...

Page 22: ... Has Ghosting Shadowing Problem Adjust the Contrast and Brightness Controls Press to auto adjust Make sure you are not using an extension cable or switch box We recommend plugging the monitor directly to the video card output connector on the back Picture Bounces Flickers Or Wave Pattern Appears In The Picture Move electrical devices that may cause electrical interference as far away from the moni...

Page 23: ...m Optimal preset resolution 1920x1080 60Hz Max resolution 1920x1080 240Hz Plug Play VESA DDC2B CI Power Source 100 240V 50 60Hz 1 5A Power Consumption Typical Brightness 90 Contrast 50 31W Max brightness 100 contrast 100 41W Power saving 0 3W Physical Characteristics Connector Type HDMI DP Earphone out Signal Cable Type Detachable Environmental Temperature Operating 0 40 Non Operating 25 55 Humidi...

Page 24: ... 72Hz 48 077 72 188 SVGA 800x600 75Hz 46 875 75 SVGA 800x600 100Hz 63 684 99 662 SVGA 800x600 120Hz 76 302 119 97 SVGA 832x624 75Hz 49 725 74 551 XGA 1024x768 60Hz 48 363 60 004 XGA 1024x768 70Hz 56 476 70 069 XGA 1024x768 75Hz 60 023 75 029 XGA 1024x768 100Hz 81 577 99 972 XGA 1024x768 120Hz 97 551 119 989 WXGA 1440x900 60Hz 55 935 59 887 SXGA 1280x1024 60Hz 63 981 60 02 SXGA 1280x1024 75Hz 79 97...

Page 25: ...ct 4 TMDS Data 1 12 TMDS Clock 5 TMDS Data 1Shield 13 CEC 6 TMDS Data 1 14 Reserved N C on device 7 TMDS Data 0 15 SCL 8 TMDS Data 0 Shield 16 SDA 20 Pin Color Display Signal Cable Pin No Signal Name Pin No Signal Name 1 ML_Lane 3 n 11 GND 2 GND 12 ML_Lane 0 p 3 ML_Lane 3 p 13 CONFIG1 4 ML_Lane 2 n 14 CONFIG2 5 GND 15 AUX_CH p 6 ML_Lane 2 p 16 GND 7 ML_Lane 1 n 17 AUX_CH n 8 GND 18 Hot Plug Detect...

Page 26: ...ESA DDC STANDARD It allows the monitor to inform the host system of its identity and depending on the level of DDC used communicate additional information about its display capabilities The DDC2B is a bi directional data channel based on the I2C protocol The host can request EDID information over the DDC2B channel ...

Reviews: