background image


TO USE THE MENUS 


1. Press 

the 

MENU

 button to display each menu 

1. Press 

the 

MENU

 button to display each menu 

2.  Use the cursor up/down to select a menu item. 

2.  Use the cursor up/down to select a menu item. 
3.  Use the cursor left/right to enter a submenu or enable/disable the  

3.  Use the cursor left/right to enter a submenu or enable/disable the  
       function. 

       function. 
4.    Press the 

MENU

 button to exit the menu. 

4.    Press the 

MENU

 button to exit the menu. 


MAIN MENU


MAIN MENU


Press the 

MENU 

button into the main OSD (On Screen Display). Adjust item 

include 

SOUND  SETUP

OSD SETUP

TV SETUP and


PICTURE SETUP. 

Press the 

MENU 

button into the main OSD (On Screen Display). Adjust item 

include 

SOUND  SETUP

OSD SETUP

TV SETUP and


PICTURE SETUP. 


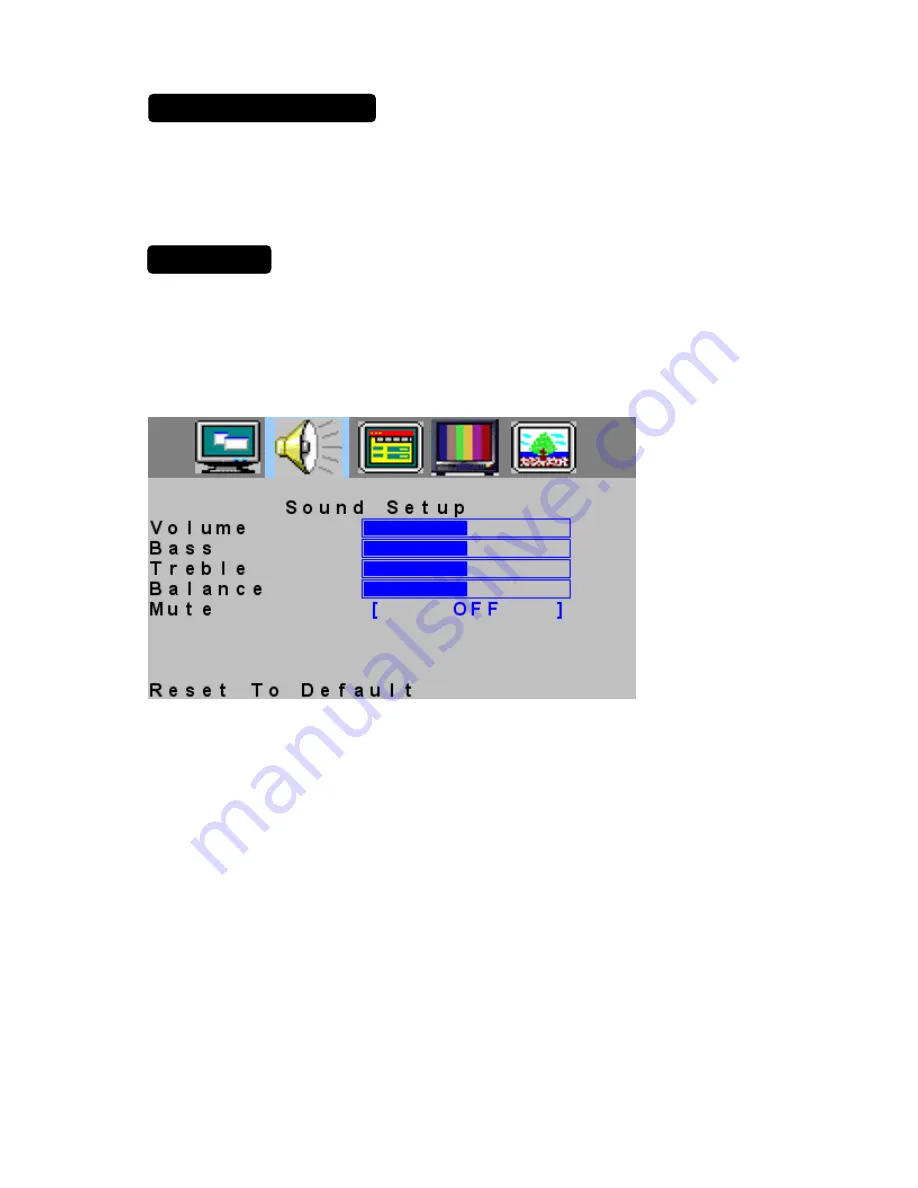
SOUND Setup


SOUND Setup


1. 

Volume

 is adjusted from 0 to 100. 

2. 

Bass

 and 

Treble

 are adjusted from 0 to 100. 

You can adjust picture Volume,  Bass and Treble to the levels you prefer. 

3.   The adjustment range of balance is from 0 to 100. 

0 to 50 is used to adjust the volume of right speaker from low to loud. 
50 to 100 is used to adjust the volume of left speaker from loud to low. 

4.  

The Mute is “ON” or “OFF”, and if the Mute is ON, there are no sound 
output 

  9

Summary of Contents for A20S431

Page 1: ...2 ...

Page 2: ...rol Knobs 14 Preparation 15 Video recorder 16 DVD player 17 Camera camcorder Video Game set 17 Headphone 17 Tips 18 PRODUCT SPECIFICATION 19 BEFORE CALLING SERVICE 21 Glossary 22 Thank you very much for choosing the LCD TV We recommend that you take a few minutes to read carefully through this manual before installing and switching on the TV Please keep this manual in a safe place for your future ...

Page 3: ...10 Protect the power cord from being walked on or pinched particularly at plugs convenience receptacles and the point where they exit from the apparatus 11 Only use attachments accessories specified by the manufacturer 12 Use only with a cart stand tripod bracket or table specified by the manufacturer or sold with the apparatus When a cart is used use caution when moving the cart apparatus combina...

Page 4: ... excessive pull force to the front or top of the cabinet which could ultimately overturn the product y Also do not endanger yourself or children by placing electronic equipment toys on the top of the cabinet Such items could unsuspectingly fall from the top of the set and cause product damage and or personal injury 19 Wall or Ceiling Mounting The appliance should be mounted to a wall or ceiling on...

Page 5: ...lated dangerous voltage within the product s enclosure that may be of sufficient magnitude to constitute a risk of electrical shock to persons SA 1965 INSTRUCTIONS The exclamation point within an equilateral triangle is to alert the User to the presence of important operating and maintenance servicing instruction in the literature accompanying the appliance SA 1966 Apparatus shall not be exposed t...

Page 6: ... Power Insert the power cord in the wall socket having an AC power supply 5 Turn the TV on Turn the main power switch on the right side of TV to ON Press the secondary power button in front of the TV to turn it on If the main power switch is OFF the front LED light will also be OFF If the main power is ON the LED will be blue if the power is ON orange if the power is in standby mode 7 ...

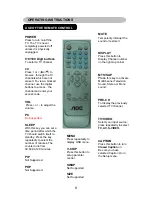
Page 7: ...e not erased To view a blocked channel use the digital buttons to access the channel and enter your MTS SAP Press this key to activate Multichannel Television Sound Stereo or Mono sound access code PRE CH VOL To display the previously Press or to adjust the volume selected TV channel PC No Supported TV VIDEO Select your input source SLEEP press repeatedly to select TV AV S VIDEO With this key you ...

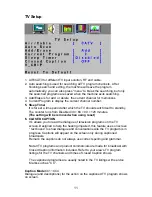
Page 8: ...ton into the main OSD On Screen Display Adjust item include SOUND SETUP OSD SETUP TV SETUP and PICTURE SETUP Press the MENU button into the main OSD On Screen Display Adjust item include SOUND SETUP OSD SETUP TV SETUP and PICTURE SETUP SOUND Setup SOUND Setup 1 Volume is adjusted from 0 to 100 2 Bass and Treble are adjusted from 0 to 100 You can adjust picture Volume Bass and Treble to the levels ...

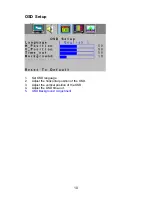
Page 9: ...OSD Setup 1 Set OSD language 2 Adjust the horizontal position of the OSD 3 Adjust the vertical position of the OSD 4 Adjust the OSD time out 5 OSD Background Adjustment 10 ...

Page 10: ...g will be removed when using reset 6 CLOSED CAPTION It s allows you to read the dialogue of television programs on the TV screen Designed to help the hearing impaired this feature uses on screen text boxes to show dialogue and conversations wile the TV program is in progress Captions will appear on the screen only during captioned broadcasts Remark the captions do not always use correct spelling a...

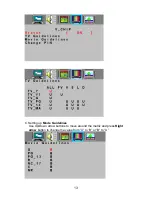
Page 11: ...or message will be displayed It is the parental control function V chip It is used to block program viewing based on the ratings by the broadcaster The default setting is to allow all programs to be viewed Viewing can be blocked by the type of program and by the categories chosen be blocked It is also possible to block all program viewing for a time period A There are two item could be defined One...

Page 12: ...C Setting up Movie Guidelines Use Up Down arrow buttons to move around the matrix and press Right arrow button to change the value from U to B or B to U 13 ...

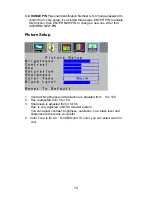
Page 13: ... After that COMFIRM NEW PIN Picture Setup 1 Contrast Brightness and Saturation are adjusted from 0 to 100 2 Hue is adjusted from 0 to 100 3 Sharpness is adjusted from 0 to100 Hue is only adjusted in NTSC telecast system You can adjust contrast brightness saturation hue black level and sharpness to the levels you prefer 4 Color Tone is for AV S VIDEO and TV color you can select warm or cool 14 ...

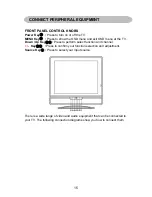
Page 14: ... exit OSD menu at the TV Down Up Key Press to perform select function and channel Key Press to confirm your function selection and adjustment Source Key Press to select your input source There is a wide range of video and audio equipment that can be connected to your TV The following connection diagrams show you how to connect them 15 ...

Page 15: ...Lay the LCD TV with the screen down on a table as it will be easier to connect your peripheral equipment Please take precaution not to damage the screen 1 RF TV port 2 Earphone output port 3 Right audio input port 4 Left audio input port 5 AV video port 6 S VIDEO video port 7 power input port 16 ...

Page 16: ...reo equipment cables to the VIDEO AUDIO L and R inputs AV If your VCR has an S VHS video jack For improved picture quality connect a S Video cable with the S VIDEO input on the TV instead of connecting the VCR to the VIDEO port S Video does not provide audio audio cables must still be connected to provide sound Watching VCR 1 If you use connection select the TV channel search 2 If you use connecti...

Page 17: ...V input If you use connection please select S VIDEO input CAMERA CAMCORDER VIDEO GAME SET DIGITAL CAMERA How to connect 1 Connect your digital camera camcorder videogame set to VIDEO port AUDIO R AUDIO L for mono equipment 3 S VHS quality with an S VHS camcorder is obtained by connecting the S VHS cable with the S VIDEO input and AUDIO input How to use 1 Select AV or S VIDEO 2 Turn on the external...

Page 18: ...ning To avoid disturbances in picture and sound malfunctioning of your TV or even damage to the TV keep away your mobile telephone from the TV End of life directives We are paying a lot of attention to produce environmentally friendly in green focal areas Your new receiver contains materials which can be recycled and reused At the end of its life specialized companies can dismantle the discarded r...

Page 19: ...6375mm Display colors 16 7 million LCD Panel Lamp Type Life 60000 hr Color Temperature Cool Warm TV Standard NTSC M Sound systems MTS SAP TV Function Colour systems NTSC DPF function Supported by memory card Not supported Optional Wireless earphone FM transmission frequency Not supported Optional RCA x 1 Video Inputs Audio L R x 1 Share AV S VIDEO S Video x 1 20 ...

Page 20: ...all Mount VESA 100 x 100 mm Power Supply AC100V 240V 50 60Hz Power Power Consumption 75W Forwards Backwards Panel Tilt 4 18 35 Rotation operating 0 C 40 C storage 25 C 60 C Environment operating 10 85 Dimension W x H x D with stand 498 x 489 x 256 mm Weight net Kg w o Accessories 9 Kg Remote Controller Batteries AAAx2 AC Power Cord Accessories User s Manual Audio Cable 21 ...

Page 21: ...ess settings Check the V Chip control Some V Chip modes could block the screen Good picture but no sound Increase the VOLUME Check that the TV is not muted press the button on the remote control Good sound but poor color Adjust the contrast color and brightness settings Adjust TV Mode AIR or CATV HRC IRC check that is ok or not Poor picture Sometimes poor picture quality occurs when having activat...

Page 22: ...al speaker and enhance the sound quality Menu An on screen listing of feature controls shown on the TV screen that are made available for user adjustments Multichannel Television sound MTS The broadcasting standard that allows for stereo sound to be transmitted with the TV picture RF Radio Frequency or modulated signal design used as the carrier for television broadcasts Second Audio Program SAP A...

Reviews: