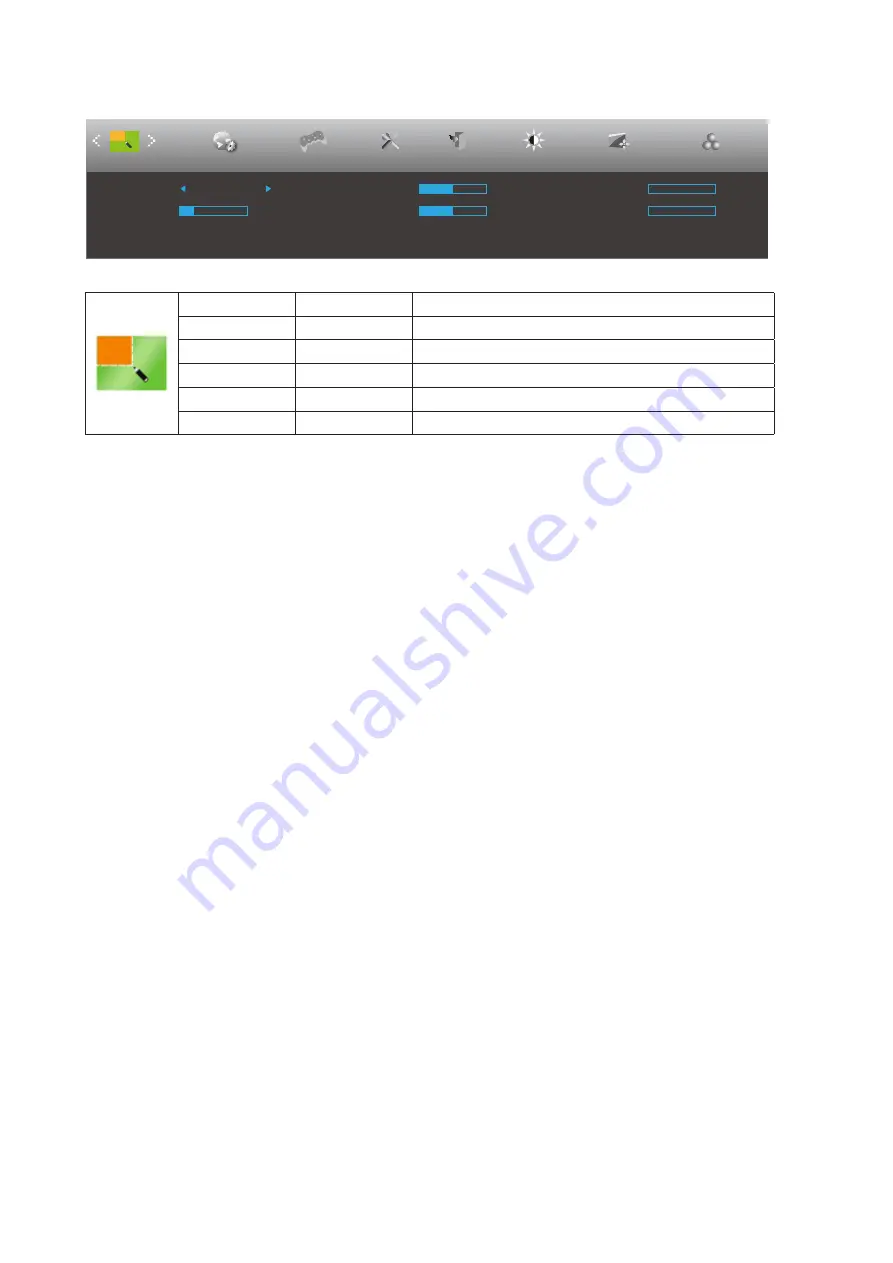
AOC 27B2QAM User Manual Download Page 20

18

Picture Boost

OSD Setup

Exit

Extra

Luminance

Image Setup

Brightness

50

Contrast

50

H. Position

0

V. Position

0

Bright Frame

off

Frame Size

14

Picture Boost

Color Setup

Game Setting

Bright Frame 

on or off 

Disable or Enable Bright Frame 

Frame Size 

14-100 

Adjust Frame Size 

Brightness 

0-100 

Adjust Frame Brightness 

Contrast 

0-100 

Adjust Frame Contrast 

H. position 

0-100 

Adjust Frame horizontal Position

V. position

0-100 

Adjust Frame vertical Position

Note:

Adjust the brightness, contrast, and position of the Bright Frame for better viewing experience.

When “HDR Mode”

 under “Luminance” is set to “non-off”, all items under “Picture Boost” cannot be adjusted.

Summary of Contents for 27B2QAM

Page 1: ...1 www aoc com 2021 AOC All Rights Reserved LCD Monitor User Manual 27B2QAM...

Page 2: ...Connecting the Monitor 9 Wall Mounting 10 Adaptive Sync function 11 Adjusting 12 Hotkeys 12 OSD Setting 14 Luminance 15 Image Setup 16 Color Setup 17 Picture Boost 18 OSD Setup 19 Game Setting 20 Extr...

Page 3: ...used as follows NOTE A NOTE indicates important information that helps you make better use of your computer system CAUTION A CAUTION indicates either potential damage to hardware or loss of data and...

Page 4: ...otect the monitor from damage due to power surges Do not overload power strips and extension cords Overloading can result in fire or electric shock To ensure satisfactory operation use the monitor onl...

Page 5: ...a fire or electric shock Never spill liquids on the monitor Do not place the front of the product on the floor If you mount the monitor on a wall or shelf use a mounting kit approved by the manufactur...

Page 6: ...t the stain instead of strong detergent which will cauterize the product cabinet When cleaning make sure no detergent is leaked into the product The cleaning cloth should not be too rough as it will s...

Page 7: ...pact conditions during operation Do not knock or drop the monitor during operation or transportation The power cords shall be safety approved For Germany it shall be H03VV F 3G 0 75 mm2 or better For...

Page 8: ...l Warranty card Monitor Base Power Cable Adapter HDMI Cable VGA Cable Audio Cable DP Cable Not all signal cables will be provided for all countries and regions Please check with the local dealer or AO...

Page 9: ...7 Setup Stand Base Please setup or remove the base following the steps as below Setup Remove...

Page 10: ...when you change the monitor s angle You are able to adjust the monitor as below 4 NOTE Do not touch the LCD screen when you change the angle It may cause damage or break the LCD screen WARNING 1 To a...

Page 11: ...ff your computer and unplug its power cable 3 Connect the display signal cable to the video connector on the back of your computer 4 Plug the power cord of your computer and your display into a nearby...

Page 12: ...of the monitor 4 Insert the 4 screws into the holes and tighten 5 Reconnect the cables Refer to the user s manual that came with the optional wall mounting arm for instructions on attaching it to the...

Page 13: ...mmend list is as the below also could be checked by visiting www AMD com Radeon RX Vega series Radeon RX 500 series Radeon RX 400 series Radeon R9 R7 300 series R9 370 X R7 370 X R7 265 except Radeon...

Page 14: ...to active volume adjustment bar Press or to adjust volume When there is no OSD Press hotkey to active image ratio Press or to adjust 4 3 or wide If the product screen size is 4 3 or input signal reso...

Page 15: ...for 5 seconds to activate the Clear Vision Demo and a message of Clear Vision Demo on will be display on the screen for a duration of 5 seconds Press Menu or Exit button the message will disappear Pre...

Page 16: ...desired function is highlighted press MENU button to activate it 3 Press Left or to change the settings of the selected function Press to exit If you want to adjust any other function repeat steps 2...

Page 17: ...justment Eco mode Standard Standard Mode Text Text Mode Internet Internet Mode Game Game Mode Movie Movie Mode Sports Sports Mode Reading Reading Mode Gamma Gamma1 Adjust to Gamma 1 Gamma2 Adjust to G...

Page 18: ...pness 50 Luminance Game Setting Clock 0 100 Adjust picture Clock to reduce Vertical Line noise Phase 0 100 Adjust Picture Phase to reduce Horizontal Line noise Sharpness 0 100 Adjust picture sharpness...

Page 19: ...tore Color Temperature from EEPROM DCB Mode Full Enhance Disable or Enable Full Enhance Mode Nature Skin Disable or Enable Nature Skin Mode Green Field Disable or Enable Green Field Mode Sky blue Disa...

Page 20: ...Bright Frame Frame Size 14 100 Adjust Frame Size Brightness 0 100 Adjust Frame Brightness Contrast 0 100 Adjust Frame Contrast H position 0 100 Adjust Frame horizontal Position V position 0 100 Adjus...

Page 21: ...Setup Picture Boost Game Setting Language Select the OSD language Timeout 5 120 Adjust the OSD Timeout H Position 0 100 Adjust the horizontal position of OSD V Position 0 100 Adjust the vertical posi...

Page 22: ...rk to be saw the detail clearly adjusting from 50 to100 for clear picture 2 If picture is too white to be saw the detail clearly adjusting from 50 to0 for clear picture Overdrive Off Adjust the respon...

Page 23: ...uency 60Hz Extra Game Setting Input Select Select Input Signal Source Auto Config Yes or No Auto adjust the picture to default For D SUB models Off timer 0 24hrs Select DC off time Image Ratio Wide Se...

Page 24: ...22 Exit Picture Boost OSD Setup Luminance Image Setup Color Setup Exit Extra Game Setting Exit Exit the main OSD...

Page 25: ...23 LED Indicator Status LED Color Full Power Mode White Active off Mode Orange...

Page 26: ...you are not using an extension cable or switch box We recommend plugging the monitor directly to the video card output connector on the back Picture Bounces Flickers Or Wave Pattern Appears In The Pic...

Page 27: ...preset resolution 1920x1080 60Hz Max resolution 1920x1080 60Hz VGA 1920x1080 75Hz HDMI DP Plug Play VESA DDC2B CI Power Source 19Vdc 2 0A Power Consumption Typical default brightness and contrast 25W...

Page 28: ...0 56Hz 35 156 56 25 800x600 60Hz 37 879 60 317 800x600 72Hz 48 077 72 188 800x600 75Hz 46 875 75 MAC MODES SVGA 835x624 75Hz 49 725 74 5 XGA 1024x768 60Hz 48 363 60 004 1024x768 70Hz 56 476 70 069 102...

Page 29: ...7 GND G 15 DDC Serial clock 8 GND B 19 Pin Color Display Signal Cable Pin No Signal Name Pin No Signal Name Pin No Signal Name 1 TMDS Data 2 9 TMDS Data 0 17 DDC CEC Ground 2 TMDS Data 2 Shield 10 TM...

Page 30: ...Pin No Signal Name 1 ML_Lane 3 n 11 GND 2 GND 12 ML_Lane 0 p 3 ML_Lane 3 p 13 CONFIG1 4 ML_Lane 2 n 14 CONFIG2 5 GND 15 AUX_CH p 6 ML_Lane 2 p 16 GND 7 ML_Lane 1 n 17 AUX_CH n 8 GND 18 Hot Plug Detect...

Page 31: ...SA DDC STANDARD It allows the monitor to inform the host system of its identity and depending on the level of DDC used communicate additional information about its display capabilities The DDC2B is a...

Reviews: