AOC 193FWK User Manual Download Page 20

19

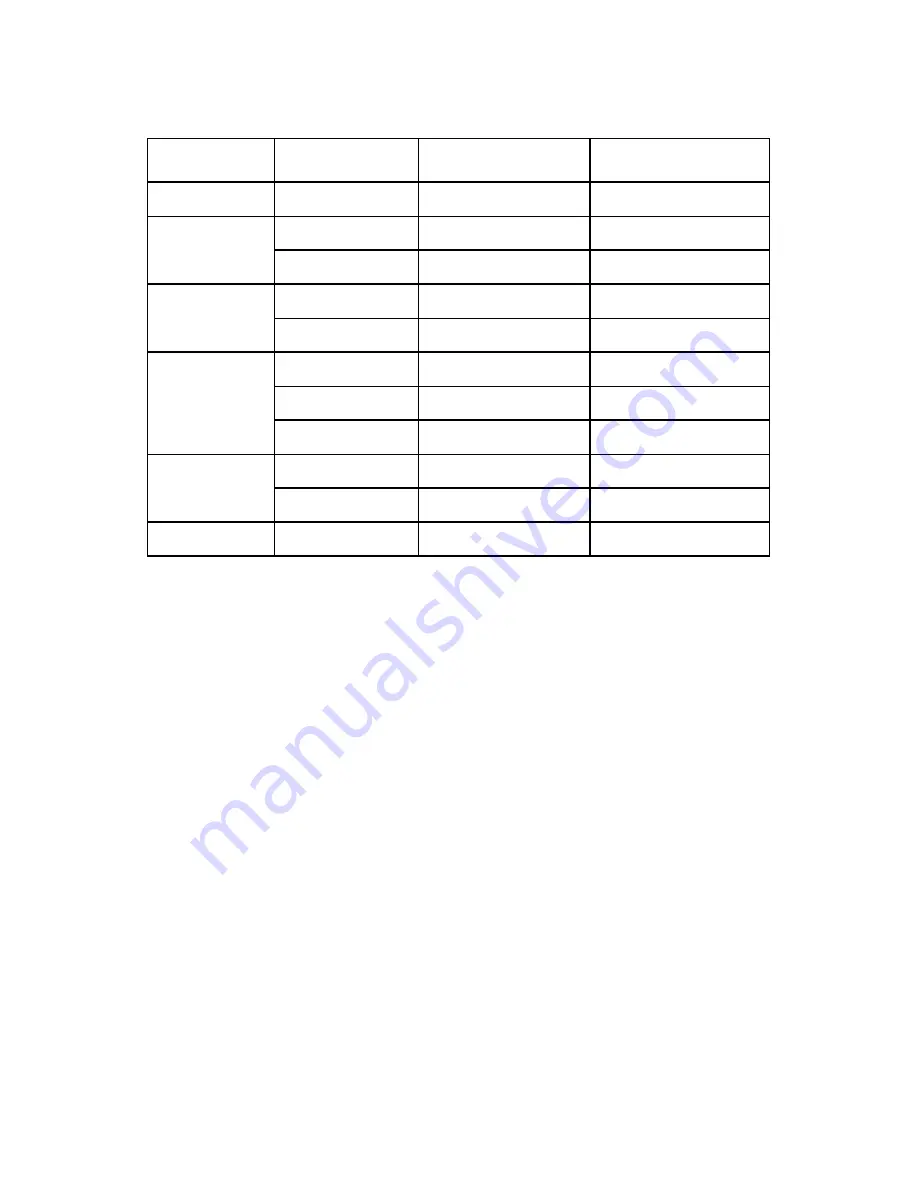
Preset Display Modes

STANDARD

RESOLUTION

HORIZONTAL

FREQUENCY

VERTICAL

FREQUENCY

Dos-mode 

720 × 400 

31.47kHz

70.0Hz

640 × 480

31.47kHz

60.0Hz

VGA

640 × 480

37.50kHz

75.0Hz

800 × 600

37.879kHz

60.0Hz

SVGA

800 × 600

46.875kHz

75.0Hz

1024 × 768

48.363kHz

60.0Hz

1024 × 768

56.476kHz

70.0Hz

XGA

1024 × 768

60.021kHz

75.0Hz

1280 × 1024

64.000kHz

60.0Hz

SXGA

1280 × 1024

80.000kHz

75.0Hz

WXGA+

1440 × 900

55.935kHz

59.8Hz

Summary of Contents for 193FWK

Page 1: ......

Page 2: ...STALLATION INSTRUCTIONS 4 CONTROLS AND CONNECTORS 5 ADJUSTING THE VIEWING ANGLE 6 OPERATING INSTRUCTIONS 7 GENERAL INSTRUCTIONS 7 HOW TO ADJUST A SETTING 9 ADJUSTING THE PICTURE 10 11 PLUG AND PLAY 12...

Page 3: ...g antenna 2 Increase the separation between the equipment and receiver 3 Connect the equipment into an outlet on a circuit different from that to which the receiver is connected 4 Consult the dealer o...

Page 4: ...3 ELECTRONIC INDUSTRIES ALLIANCE AT WWW EIAE ORG...

Page 5: ...any The monitor is equipped with a three pronged grounded plug a plug with a third grounding pin This plug will fit only into a grounded power outlet as a safety feature If your outlet does not accomm...

Page 6: ...uch as a missing pixel or a pixel lit all of the time Due to the nature of the LCD screen an afterimage of the previous screen may remain after switching the image when the same image has been display...

Page 7: ...External adapter to LCD monitor s DC power input The AC power cord may be connected to either a wall power outlet or the power outlet socket on your PC depending on the type of power cord supplied wit...

Page 8: ...er end of the power cord into the power adapter 4 Optional Requires a video card with DVI port Connect one end of the 24 pin DVI cable to the back of the monitor and connect the other end to the compu...

Page 9: ...reference Hold the stand so you do not topple the monitor when you change the monitor s angle You are able to adjust the monitor s angle from 5 to 20 Figure 3 NOTES Do not touch the LCD screen when yo...

Page 10: ...these settings the picture can be adjusted to your personal preferences The power cord should be connected Connect the video cable from the monitor to the video card Press the power button to turn on...

Page 11: ...lock the OSD press and hold the MENU button while the monitor is off and then press power button to turn the monitor on To un lock the OSD press and hold the MENU button while the monitor is off and t...

Page 12: ...button to activate it If the function selected has a sub menu press or again to navigate through the sub menu functions Once the desired function is highlighted press MENU button to activate it 3 Pres...

Page 13: ...ne noise H Position Adjust the horizontal position of the picture Image Position V Position Adjust the verticalposition of the picture Warm N A Recall Warm Color Temperature from EEPROM Cool N A Recal...

Page 14: ...rticalposition of the OSD OSD Setup OSD Timeout Adjust the OSD timeout Language Language N A Select the language you like Information Information N A Show the resolution H V frequency and input port o...

Page 15: ...input signal this monitor following a time out period will automatically switch to an OFF mode This reduces the monitor s internal power supply consumption After the video input signal is restored ful...

Page 16: ...perational by hitting the CAPS LOCK key on the keyboard while observing the CAPS LOCK LED The LED should either turn ON or OFF after hitting the CAPS LOCK key Missing one of the primary colors RED GRE...

Page 17: ...le is properly connected If the connector is loose tighten the connector s screws 2 Check the signal cable s connection pins for damage INPUT NOT SUPPORT Your computer has been set to unsuitable displ...

Page 18: ...lock 135MHz Max Resolution 1440 900 60Hz Plug Play VESA DDC 2BTM EPA ENERGY STAR ON Mode 36W OFF Mode 1W 15 pin D Sub Input Connector DVI 24pin Analog 0 7Vp p standard 75 OHM Positive Input Video Sign...

Page 19: ...MENU External Controls Functions Contrast Brightness Focus Clock H Position V Position Warm Color Cool Color sRGB RGB Color temperature Input select OSD Setup Language Information Reset Exit Power Con...

Page 20: ...00 31 47kHz 70 0Hz 640 480 31 47kHz 60 0Hz VGA 640 480 37 50kHz 75 0Hz 800 600 37 879kHz 60 0Hz SVGA 800 600 46 875kHz 75 0Hz 1024 768 48 363kHz 60 0Hz 1024 768 56 476kHz 70 0Hz XGA 1024 768 60 021kHz...

Page 21: ...Clock 8 B Ground 24 Pin Color Display Signal Cable PIN NO DESCRIPTION PIN NO DESCRIPTION 1 TMDS Data 2 13 TMDS Data 3 2 TMDS Data 2 14 5V Power 3 TMDS Data 2 4 Shield 15 Ground for 5V 4 TMDS Data 4 16...

Page 22: ...21...

Reviews: