background image

Figure 4

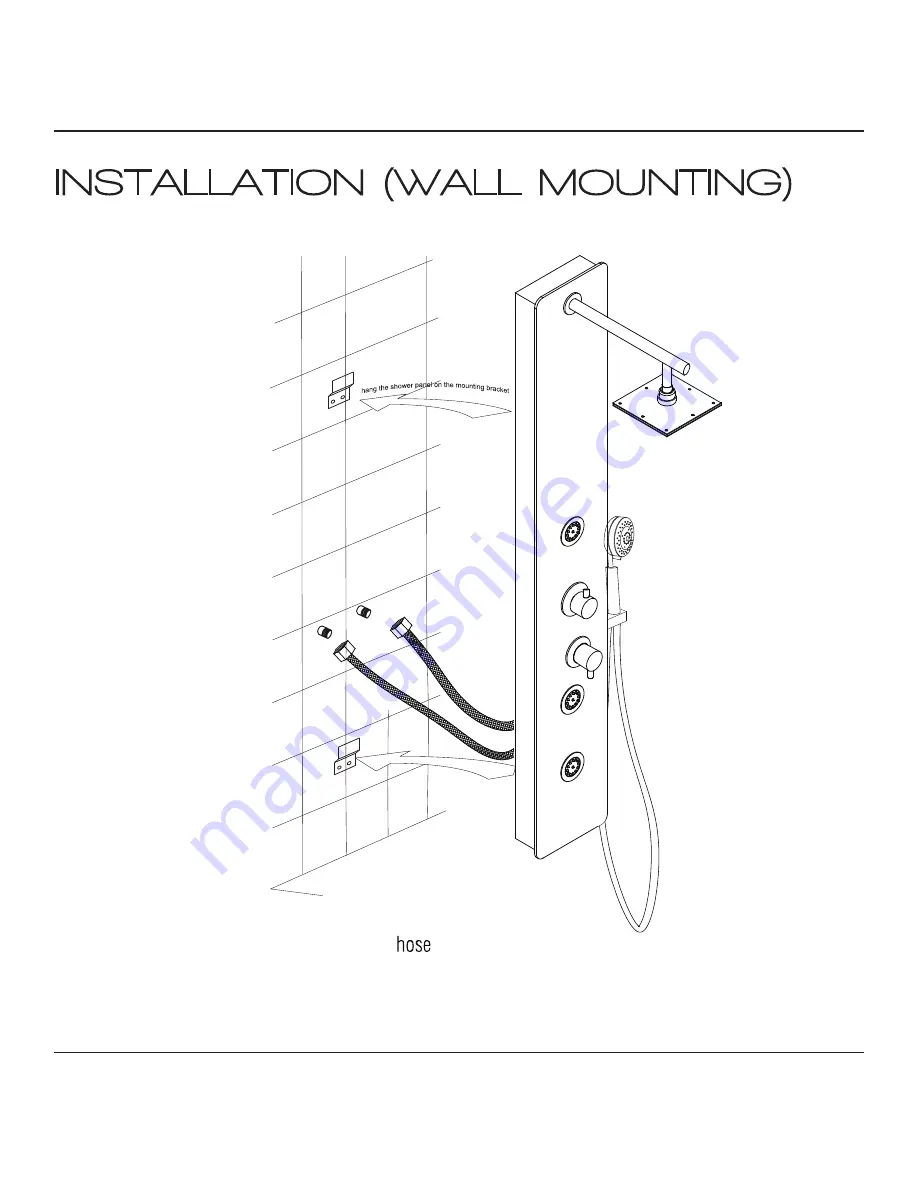
INSTALLATION (WALL MOUNTING)

PERFECTION IS OUR TRADITION™

pg. 9

Screw the cold and hot water 

 from the shower panel to the supply lines in the wall. 

Carefully hang the shower panel on the secured mounting brackets as shown in Figure 4.

Step 4A

Step 4B

Hot

Cold

Summary of Contents for PURE SP-AZ021

Page 1: ...INSTALL GUIDE Model SP AZ021 PURE PERFECTION IS OUR TRADITION v2 0516...

Page 2: ...nd hopes you enjoy your very own ANZZI product for years to come In the meantime let us know about your experience We would love to hear your thoughts from the packaging to the quality and function of...

Page 3: ...y jets brass 11 knob zinc 12 knob plate cover brass 13 cartridge ABS 14 handle zinc 15 handle plate cover brass 16 ABS 17 thermostatic cartridge 18 nut diverter 2 brass brass 19 20 water restrictor wa...

Page 4: ...cated technical support team at 1 844 44 ANZZI BEFORE YOU START Screwdriver Channel Locks Adjustable Wrench Allen key Goggles Teflon tape Recommended Items ATTENTION Please read all instructions thoro...

Page 5: ...ed Glass Finish Dark wood style Handles 2 Jets 3 Shower 6 89 x 6 89 Sprayer 60 reach Weight 26 45 lbs Height 59 05 Supply 1 2 connections Flow 1 8 gpm Features Heavy Rain Swiveling Showerhead Acu Stre...

Page 6: ...l brackets ensure there are no hidden cables or pipelines aligned with the desired drilling position Drill the two holes for the top bracket 1 apart at the desired height Drill the two holes for the b...

Page 7: ...TRADITION pg 5 Insert the wall anchors into the pre drilled holes as shown in Figure B Place the shower panel brackets aligned with the drilled holes and using a Philips screw driver ighten the screws...

Page 8: ...led hole on the shower panel Install the water supply hose for the shower wand onto the holder as shown Make sure all O rings are inserted to prevent leakage Once the shower panel is fully installed a...

Page 9: ...Figure 2 INSTALLATION HANDSHOWER PERFECTION IS OUR TRADITION pg 7 Finally install the shower wand to the hose as shown Step 2A Standard Hand Shower 3 Setting Hand Shower or...

Page 10: ...N pg 8 Install the shower arm to the shower panel using the rubber washer and nut on the opposite side to tighten Makes sure the shower arm is sitting correctly before installed the shower head Screw...

Page 11: ...TING PERFECTION IS OUR TRADITION pg 9 Screw the cold and hot water from the shower panel to the supply lines in the wall Carefully hang the shower panel on the secured mounting brackets as shown in Fi...

Page 12: ...e use of stronger cleaning solutions or chemicals is necessary always test the cleaning solution or chemical on an inconspicuous area before applying to the entire surface Wipe all surfaces clean and...

Page 13: ...es all industrial commercial business usage whose purchasers are hereby extended a five year limited warranty from the date of purchase with all other terms of this warranty applying except the durati...

Page 14: ......

Page 15: ...w SpaWorldParts com ANZZI Product Registration Card I have read the ANZZI Owner s Manual carefully and understand and agree that any installation operation or maintenance of the product must be done s...

Page 16: ...Perfection is our Tradition...

Reviews: