AnyTone AT-D578UV How To Update Firmware Download Page 8

COPYRIGHT BY CONNECT SYSTEMS INC. PERMISSION IS GRANTED TO DISTRIBUTE OR POST 


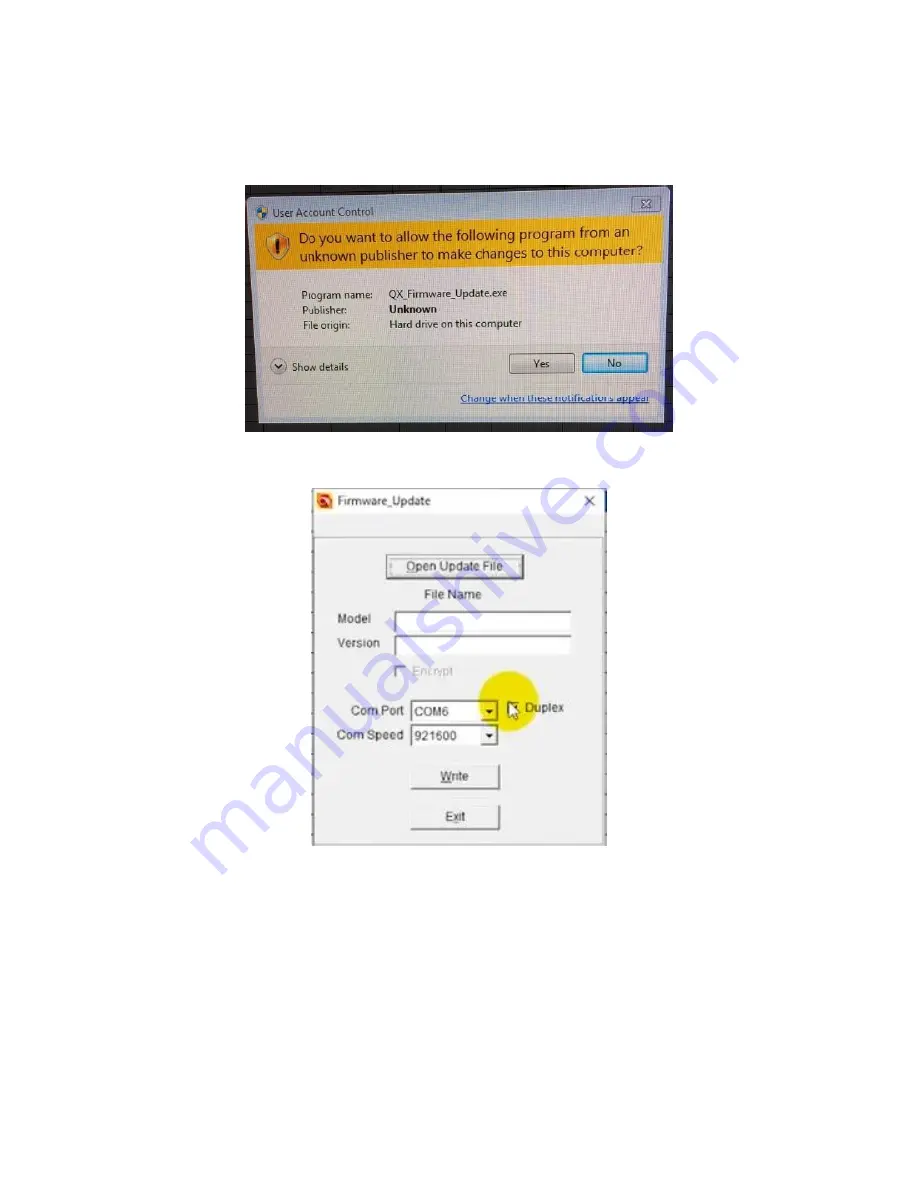
Click on the Firmware Upgrade entry and you might get: 


Press the yes button and you should get the following: 


The Com Speed should be 921600 and the Duplex box should be 
checked. Depending on your computer and where you plugged in the 
USB cable, the Com Port might be different. 


Summary of Contents for AT-D578UV

Page 1: ...your code plug Going through the update procedure will erase any code plug stored in the radio The first thing you need to do when updating the firmware is finding the firmware that is used for updating Connect Systems has the official releases on their website at http www connectsystems com products top radios DS578UV_SOFTWARE htm When you go to their website you will see the following ...

Page 2: ...IS GRANTED TO DISTRIBUTE OR POST 2 Click on the latest firmware version and then store it in a directory on your desktop In this case I made a directory called AnyTone Firmware Updates Inside the directory is the program that was just downloaded ...

Page 3: ...BY CONNECT SYSTEMS INC PERMISSION IS GRANTED TO DISTRIBUTE OR POST 3 If you notice the file that was downloaded was a zip file The first thing we do with that file is unzip it You now have the following directory ...

Page 4: ...COPYRIGHT BY CONNECT SYSTEMS INC PERMISSION IS GRANTED TO DISTRIBUTE OR POST 4 Now install CPS version D578UV V1 09N CPS When it s completed you should have on your desktop the following ICON ...

Page 5: ... the previous page called D578UV V1 09N FW you will see the following You will need to find the program called D578UV_V1 09n_20200612 spi later Now we are ready to update the firmware for the AT D578UV tri band mobile Connect the power to the radio and connect the programming cable between the radio and the computer ...

Page 6: ...thing like the following Now press the MENU key and the EXIT key and then press the power button Wait for the screen to go blank wait five seconds and then release all keys The LED should now be flashing In most other radios you press the appropriate keys as you turn on the power Your radio should look like the following ...

Page 7: ...ONNECT SYSTEMS INC PERMISSION IS GRANTED TO DISTRIBUTE OR POST 7 Now start the CPS you just installed and start it You should see something like the following screen Click on the Tool pulldown menu and you should get ...

Page 8: ...T 8 Click on the Firmware Upgrade entry and you might get Press the yes button and you should get the following The Com Speed should be 921600 and the Duplex box should be checked Depending on your computer and where you plugged in the USB cable the Com Port might be different ...

Page 9: ...NNECT SYSTEMS INC PERMISSION IS GRANTED TO DISTRIBUTE OR POST 9 Now press the Open Update File button and you should get something like as shown below The specific information here is going to depend on your computer ...

Page 10: ...S INC PERMISSION IS GRANTED TO DISTRIBUTE OR POST 10 Now locate the program D578UV_V1 09n_20200612 spi we generated before when we unzipped the file we downloaded from the Connect Systems web site This is what it should look like ...

Page 11: ... CONNECT SYSTEMS INC PERMISSION IS GRANTED TO DISTRIBUTE OR POST 11 Double click on the file and you should get Press the OK button and you should get Notice the Model number shows D578UV and the Version shows V100 ...

Page 12: ...COPYRIGHT BY CONNECT SYSTEMS INC PERMISSION IS GRANTED TO DISTRIBUTE OR POST 12 ...

Page 13: ...COPYRIGHT BY CONNECT SYSTEMS INC PERMISSION IS GRANTED TO DISTRIBUTE OR POST 13 Press the Write button and you should see the following Press the OK Button and you should see the following progress bar ...

Page 14: ... completely written in the radio you should get an acknowledgement that it is completed as shown below We have now completed updating the radio There is one more step to complete before we are finished We now have to complete a MCU reboot This sets the parameters back to a factory reset condition ...

Page 15: ...Plug Memory to A Factory Reset Condition Start by turning off the radio Press the channel selector button and P2 at the same time as you turn on the power The Channel selector button is the knob to the right of P4 If you have done it properly you should get the screen to say Followed immediately by ...

Page 16: ...utton to confirm you want to initialize the radio The radio then will show you are initializing the radio as shown below After a little while the screen will then show You can now update the time and date as desired or just continue by pressing the Menu button to confirmed that the date is correct ...

Page 17: ... IS GRANTED TO DISTRIBUTE OR POST 17 After pressing the Menu button you get the following and now the radio is booting up in its normal mode When it gets to the screen as shown below you are now ready to program your code plug you saved earlier ...

Reviews: