background image


V.


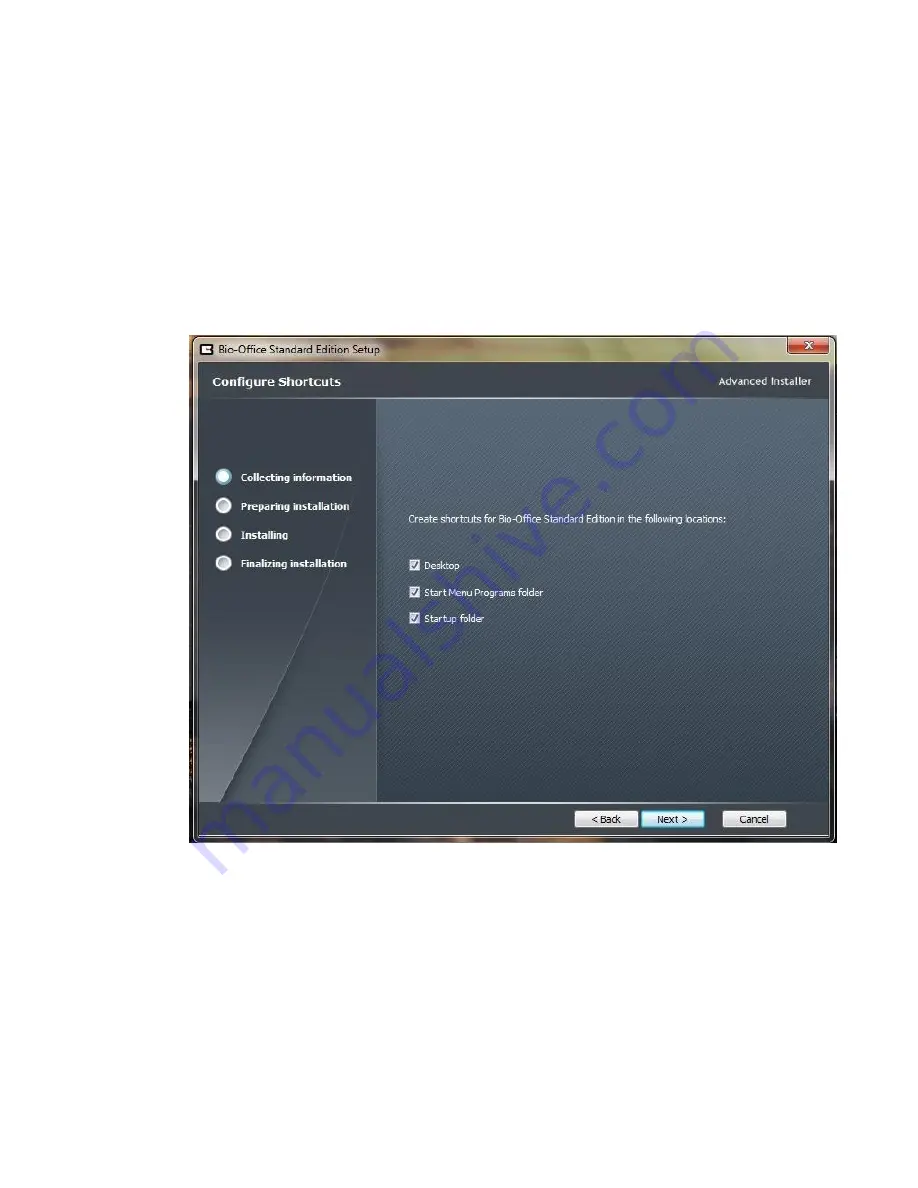
The installer will give you 3 different locations were you can create a shortcut of 
the bio-office software. The installer will then configure what shortcut you would 
like to create. Choose the ones that you would like to create. Recommended 
would be to create one in your Desktop, Start Menu Programs folder & Startup 
folder. Then click. You will then click on 

next

 after selecting your shortcuts that 

you would like to create. (See picture below). 


VI.


The installer will then be finalizing the finishing steps in the your installation of 
the 

Bio-Office Standard 

software. We recommend checking off  to check on the 

View read me file

 and 

Launch 

Bio-Office Standard 

edition boxes. Then click. You 

will then click on 

Finish

 to proceed to opening the software(See picture below). 


Summary of Contents for A Series

Page 1: ...1 ...

Page 2: ...ONNECTION 2 6 CHAPTER 2 ADDING EMPLOYEE INFORMATION TO TIME CLOCK 2 1 ADDING EMPLOYEE INFORMATION VIA THE CLOCK 7 13 2 2 ADDING EMPLOYEE INFORMATION VIA SOFTWARE 11 14 2 3 ASSIGNING AN ADMINISTRATOR VIA SOFTWARE 7 13 2 4 ASSIGNING AN ADMINISTRATOR VIA TIME CLOCK 13 CHAPTER 3 DOWNLOAD ATTENDANCE RECORDS 3 1 MANUAL DOWNLOAD OF ATTENDANCE RECORDS 14 3 2 REAL TIME DOWNLOAD OF ATTENDANCE RECORDS 15 APP...

Page 3: ...3 A SOFTWARE COMMUNICATOR BUTTON DESCRIPTIONS 17 ...

Page 4: ...time off As well as other features that will allow you to better manage your payroll Our software allows you to export to excel spreadsheets Quickbooks ADP Paycheck even Microsoft Word With such an effective tool and cost effective investment for any company large or small this will be one of your best purchases yet We offer the best Technical support if needed Our representatives will help you wi...

Page 5: ...tes that are needed to install on your pc Installs all that are needed You will be able to see which ones by the action tab on top If it says skip you can go ahead and skip that installation Those will be unchecked But the ones needed to install you will just click on next to do so See picture below ...

Page 6: ...6 III When the installation finishes you will then hit the finish button to begin the extraction of the software itself ...

Page 7: ...The installer will automatically choose the folder in which the software will be install If you would like to choose a different folder you can do so by either entering it in the text box or by clicking on browse Then we will click on next to continue the installation ...

Page 8: ...p Start Menu Programs folder Startup folder Then click You will then click on next after selecting your shortcuts that you would like to create See picture below VI The installer will then be finalizing the finishing steps in the your installation of the Bio Office Standard software We recommend checking off to check on the View read me file and Launch Bio Office Standard edition boxes Then click ...

Page 9: ...nection or TCP IP Network At any time these connections can be changed Via USB Cable connection The A300 time clock can be connected to the PC using the USB cable that was provided with your purchase Via TCP IP Network Connection The A300 can also connect to your network router or switch with an Ethernet cord not included Please identify your network settings prior to configuring a TCP IP network ...

Page 10: ...mputer s desktop screen double click on the icon to open the software the icon should look like the picture below II Enter the Password The software s default password is 12345 and can be changed on the settings tab after logging in III Once the Bio Office Standard software is opened go to the reports tab and click on the Device to PC communicator button see picture below ...

Page 11: ...11 IV Once the Device to PC communicator is opened click on Add Time Clock see picture below V The following window will display where you may enter the following connection settings ...

Page 12: ...Example Time clock Main Reception Warehouse etc Clock s Group You can assign a time clock to a specific group when there is more than one time clock connection Select group 1 Select the communication method Select USB if you are going to connect the clock via USB cable or select TCP IP or RS485 If you select TCP IP also enter the IP address assigned to the time clock The next page will show you ho...

Page 13: ...2 Press the M key Pressing the M key will take you to the menu options the menu since the time clock is brand new it comes unlocked from factory once you record new users with cards any of these users can be added as an administrator once an administrator is added to the system he will be the only user able to unlock the menu in the future YOU CAN HAVE MORE THAN ONE ADMINISTRATOR ON THE CLOCK ...

Page 14: ...onfirmation will be followed IP ADDRESS Enter here the IP address you wish to assign the time clock SUBNET MASK Enter the mask number of the network where the time clock will be connected to MAC ADDRESS Do not make changes on this field as this is the unique network identifier for the network adapter in the A300 time clock GATE Enter here the gateway IP of the network where the time clock will be ...

Page 15: ...15 CHAPTER 2 ADDING EMPLOYEE INFORMATION 2 1 Adding Employee Information via Time Clock I Turn the time clock on and press M II Select User from the Menu and press OK ...

Page 16: ...he first time you enroll an employee Each employee must be assigned a unique 1 6 digit ID number If you wish to change the employee s ID number please do so in this step and press OK If you would like to continue with the ID number assigned by the time clock you can press OK See picture below ...

Page 17: ...e the same finger one more time directly in the center of the scanner Then press OK to save the employee fingerprint V The A300 has the option of enrolling 2 fingerprints per employee To enroll a second fingerprints to an existed employee follow the instructions above Once you are in step IV Highlight Finger 2 and continues with the enrollment of the fingerprints Note We recommend keeping record o...

Page 18: ... Office Standard software II Type in the password default 12345 and press Accept as shown on the picture below III Once the Bio Office Standard is opened go to the Reports tab and click on the Device to PC communicator button to open the time clock connection software ...

Page 19: ...PC communicator is opened make sure that the connection s icon is blue if the icon is orange you will not able to transfer any information from or to the time clock Then click on Download Employee Information See picture below ...

Page 20: ...n downloaded go to the Employee Settings tab then click Search Employee see next picture The list of ID and card numbers enrolled on the time clock will display on the software see next picture This is a wrong picture with out the card numbers ...

Page 21: ...lds See picture below Basic Information Tab For purposes in not causing any confusion in your employees we advice to always keep your ID card Employee ID from the time clock the same ID This number can t be edited as this is the employee identification number Card This is the number to track the card the employee will use to clock in or out ...

Page 22: ...assigned on the clock this person will be the only user that will unlock the main menu and to be able to enroll more employees or to make any changes on the A300 time clock To assign one or more users employees as an administrator it can be done either through the software or on the clock To assign an administrator through the software do the following I Open the communications software Device to ...

Page 23: ...take effect the employee information needs to be uploaded to the A300 time clock V Highlight the employee you assigned as an Administrator and click on Upload Employee Data See picture below Wrong picture just highlight one employee ...

Page 24: ...24 2 4 Assigning an Administrator via the Time Clock I Turn the time clock on and press M II Press OK on User ...

Page 25: ...25 III Scroll down to Manager Setup and press OK IV Press OK to add the ID number for the employee you wish to assign a Manager Administrator and then press OK to save your selection ...

Page 26: ...on you will be able to create your attendance reports and timesheets The download of the attendance records is a manual process which could be automated also 3 1 Manual Attendance Records Download I Open the Bio Office Standard software II Go to the Reports tab and click on the communication software Device to PC Communicator III Once the communication software is open make sure the connection ico...

Page 27: ...ds in real time rather than downloading these manually To do this do the following I Close the Bio Office Standard software II Open the Communications software from the desktop icon III Once the communication software is opened go to Attendance Records In Real Time IV Click enable real time download Once the real time download is enabled your employees will be able to record attendance records sca...

Page 28: ...der for the real time feature to work the connection has to be through a TCP IP network connection Also the communication software must remain opened at all times and the feature should also be enabled at all times ...

Page 29: ...tions 3 Synchronize Date Time With PC Use this button to sync the computer s date and time to the time clock 4 Reset time clock to factory settings By pressing this button the time clock will return to factory settings and all data on its memory will be erased This process cannot be undone and will erase all data such as names fingerprints cards attendance records IP settings etc 5 Time clock Sett...

Page 30: ...lock NOTE You will be able to send and distribute this data to other time clocks connected to the same software or just to create a back up of the employee related information and fingerprints 9 Upload employee information Use this button to upload the employee s information and fingerprint s to the clock s connected to the software B TAB 2 Attendance Records in Real Time 1 Enable Real Time This b...

Page 31: ... users added to the software 3 Transfer to department This option is used to add an employee or a batch of employees to a department To do this select the employee s then click on transfer to department and select the department you wish to add the users to and click OK to save your selection 4 Set Privilege Use this feature allows you to assign which time clock s the employee will use 5 Copy Priv...

Page 32: ... employees from the time clock s you selected from the Bio Office Standard software 9 Search employee If you want to search for a specific employee enter the information on the required file and click on this button to look for the employee in reference For steps by step instructions on how to use the Bio Office Standard software and its features you must click on the Help button on the Bio Office...

Reviews: