background image

MUFFIN TOASTER MT-12

11

P/N 1010918 11/05

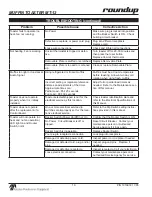
TROUBLESHOOTING (continued)

Problem

Possible Cause

Corrective Action

Toaster not heating (but fan is work-

ing.)

Hi-Limit control is tripped or defec-

tive.

Turn toaster off for 30 minutes and 

then reset.  If the Hi-Limit control 

trips repeatedly, contact your mainte-

nance person or Authorized Service 

Agency.

Loose/defective electronic connec-

tions.

Contact your maintenance person or 

Authorized Service Agency.

Heating element/coil is broken/open.
Solid State Heater Relay is defec-

tive.
Control Board is defective.

Fan not running but toaster is heat-

ing.

Fan is dirty or defective.

Clean or replace defective fan.

No Audio Signal, but Ready Light 

works.

Defective Audio Signal.

If Audio Diagnostic LED is on but 

there is no Audio Signal, replace the 

Audio Signal.

No Ready Light but Audio Signal 

works.

Defective Ready Light.

If Ready Light Diagnostic LED is on, 

but the ready light is not, replace the 

ready light.

No Audio Signal or Ready light on 

either Full or Partial Load cycles.

Control Board is Defective.

Replace the Control Board.

Front Door will not open or close 

properly.

Door Push Rod is Damaged.

Remove left cover and check Door 

Push rod for free movement of 

door. Straighten or replace rod as 

required.
Have your maintenance person or 

Authorized Service Agency straight-

en or replace the Door Push Rod as 

required.

Heating element/coil is on continu-

ously

Defective Solid State Relay.

Contact your maintenance person or 

your Authorized Service Agency.

Defective Control board.

Only Half the element coil is working Loose/defective electrical wiring con-

nection.

Check wiring connections at ele-

ment/coil

Heating element/coil is broken/open

Replace the heating element/coil.

Summary of Contents for Roundup MT-12

Page 1: ...FIN TOASTER Model MT 12 Owner s Manual P N 1010918 Rev A 05 06 MANUFACTURING NUMBERS 9200139 9200146 9200148 C T I S L US E D A S D L I S T E CM O I N NIT A T Testing Certification ITS geprufte Sicherheit ...

Page 2: ...quipment Warranty Information Please read the full text of the Limited Warranty in this manual If the unit arrives damaged contact the carrier imme diately and file a damage claim with them Save all packing materials when filing a claim Freight damage claims are the responsibility of the purchaser and are not covered under warranty The warranty does not extend to Damages caused in shipment or dama...

Page 3: ...nt and parts Failure to observe caution could result in personal injury IMPORTANT SAFETY INFORMATION Service Technical Assistance If you experience any problems with the installation or operation of your unit contact your local Roundup Authorized Service Agency Fill in the information below and have it handy when calling your authorized service agency for assistance The serial number is on the spe...

Page 4: ...it The procedures in this manual may include the use of chemical products These chemical products will be highlighted with bold face let ters followed by the abbreviated HCS Hazard Communication Standard See Hazard Communication Standard manual for the appro priated Material Safety Data Sheets MSDS The equipment should be grounded according to local electrical codes to prevent the possibility of e...

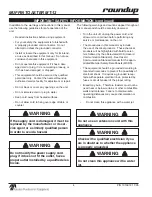
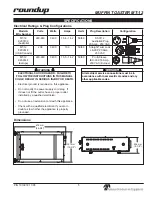
Page 5: ...tlet installed by a qualified electrician Do not use an extension cord with this appliance Check with a qualified electrician if you are in doubt as to whether the appliance is properly grounded Electrical Ratings Plug Configurations Dimensions 676 mm 26 5 8 397 mm 15 5 8 206 mm 8 1 8 Model Mfg Number Volts Watts Amps Hertz Plug Description Configuration MT 12 9200139 Australia 220 240 3400 15 4 14...

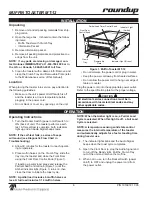
Page 6: ...ol Knob Indicator Light Amber Indicator Light Green Removable Plate Partial Load Timer Control Knob OPERATION NOTE When the Amber light is on a Partial Load Cycle is selected When this light is off a Full Load Cycle is selected NOTE A temperature sensing solid state control measures the internal temperature of the toaster and automatically adjusts for a faster toasting time during heavier use 4 Th...

Page 7: ...mended for maintenance of your stainless steel equipment Always use soft damp cloth for cleaning rinse with clear water and wipe dry When required always rub in direction of metal polish lines Stains and spots should be sponged using a vinegar solution Finger marks and smears should be rubbed off using soap and water CAUTION If a chemical cleaner is used be sure it is safe to use on cast aluminum ...

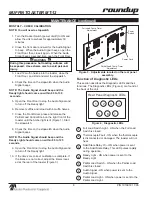
Page 8: ...ght is lit Figure 1 Start the stopwatch 8 Check the time on the stopwatch when the Audio Signal beeps NOTE The Audio Signal should beep and the Ready Light should come on within 85 to 125 seconds 9 Open the Front Door to stop the Audio Signal and to turn off the Ready light 10 If the times are correct calibration is complete If the times are not correct adjust the timers locat ed at the rear of th...

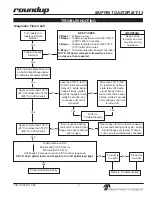
Page 9: ...ps 4 times waits 2 seconds beeps 4 times waits 2 seconds and continues until unit is turned off More than 750 F 400 C control turns solid state relay off Audio signal beeps 3 times waits 2 seconds beeps 3 times waits 2 seconds and continues until unit is turned off Refer to Troubleshooting Yes Yes Yes No No No Heats to more than 105 F 65 C but less than 750 F 400 C in 30 minutes Yes Door is opened...

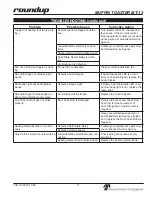
Page 10: ...d timers as needed Refer to the Maintenance sec tion of this manual Toaster does not operate properly when it is initially installed Toaster selected shipped is not for the electrical service as this location Check toaster identification plate and refer to the Electrical Specifications of this Manual Toaster does not operate after the replacement of a Control Board One or more electrical service d...

Page 11: ...o Audio Signal replace the Audio Signal No Ready Light but Audio Signal works Defective Ready Light If Ready Light Diagnostic LED is on but the ready light is not replace the ready light No Audio Signal or Ready light on either Full or Partial Load cycles Control Board is Defective Replace the Control Board Front Door will not open or close properly Door Push Rod is Damaged Remove left cover and c...

Page 12: ...00344 Hi Limit Kit 1 32 0502873 Bracket Hi Limit 1 33 4010171 Switch Push Push 1 34 7000348 Thermocouple 1 35 406K006 Terminal Block Kit 1 36 4010170 Transformer 1 37 1000936 Label Front Panel 1 38 0600113 Spring Front Door 1 39 040P119 Bushing Shorty 5 8 1 40 7000401 Bushing Retainer Kit 1 41 301P106 Weld Nut 1 42 306P102 Lockwasher 6 1 43 306P115 Screw 6 32 x 1 1 44 306P123 Screw 6 32 x 7 8 1 45...

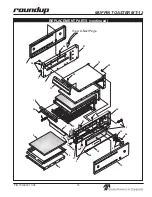
Page 13: ...MUFFIN TOASTER MT 12 13 P N 1010918 11 05 Partial Load 1 3 5 6 7 8 9 10 11 12 13 14 15 28 28 30 31 32 33 56 40 40 46 46 H 50 50 50 50 50 50 52 53 57 37 7 5 REPLACEMENT PARTS continued ...

Page 14: ...PARTS continued 1 2 3 4 5 7 16 17 18 22 23 24 25 26 27 34 35 36 20 38 39 40 40 41 42 43 44 45 46 46 48 49 50 57 50 50 50 50 50 51 52 54 19 55 View A NOTE Refer to the Replacement Parts list in this manual for a complete list of cord and plug configurations ...

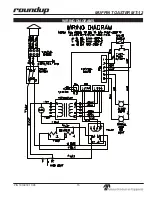
Page 15: ...MUFFIN TOASTER MT 12 15 P N 1010918 11 05 WIRING DIAGRAMS ...

Page 16: ...n 2 Roundup reserves the right to make changes in design or add any improvements on any product The right is always reserved to modify equipment because of factors beyond our control and government regulations Changes to update equipment do not constitute a warranty charge 3 If shipment is damaged in transit the purchaser should make a claim directly upon the carrier Careful inspection should be m...

Reviews: