XP-3
ANTIGRAVITY BATTERIES
//
310 527 2330
//
Page 3 of 8
USER MANUAL
Product Use
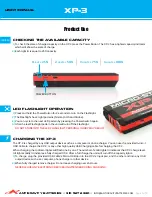
CHECKING THE AVAILABLE CAPACITY
To check the state of charge/capacity on the XP-3 press the Power Button. The XP-3 has a lighted capacity indicator
which will show the state of charge.
Each light lit is equal to 25% capacity.
1 L
IghT
= 25%
2
LIghTS
= 50%
3
LIghTS
= 75%
4
LIghTS
= 100%
LED FLASHLIGHT OPERATION
Press and hold the Power Button for 3 seconds to turn on the Flashlight.
The Flashlight has 3 light patterns (Normal, SOS and Strobe).
You can cycle to the next LED pattern by pressing the Power Switch again.
After the last Flashlight pattern the unit will turn off the Flashlight.
DO NOT STARE INTO THE LED FLASHLIGHT, PERSONAL INJURY MAY RESULT.
CHARGING THE XP-3
The XP-3 is charged by any USB output device such as a computer or phone charger. You can use the provided 4-into-1
USB Cable to charge the XP-3, or any other high quality USB Charging cable for charging the XP-3.
When charging, the indicator lights will flash one by one. The number of solid lights lit indicates the XP-3 charge level.
All lights solidly lit indicates a fully charged XP-3. After a full charge the unit will turn off the capacity lights.
To charge, plug the provided USB Cable’s Micro-USB tip into the XP-3’s Input port, and the other end into any USB
output device such as a computer, phone charger or other device.
When fully charged remove charger. Do not leave charging over 24 Hours.
NEVER LEAVE ANY ELECTRONIC DEVICES UNATTENDED DURING CHARGING.
POwER BUTTON
1)
2)
1)
2)
3)
4)
1)
2)


