4
Questions? Call us at
800.325.3841
or visit
anthro.com
. We’re happy to walk you through the assembly!
300-5610-00
300-5611-00
Anthro Corporation
®
10450 SW Manhasset Dr. | Tualatin, OR 97062
Toll-free: 800.325.3841 | Fax: 800.325.0045
email: [email protected] | anthro.com
Outside the U.S. | Tel: 503.691.2556
Warranty:
For warranty information, please visit:
http://www.anthro.com/support/warranty
Notices:
Technology Furniture and The Peanut
TM
are trademarks of
Anthro Corporation. Anthro reserves the right to modify
the design and specifications without prior notice.
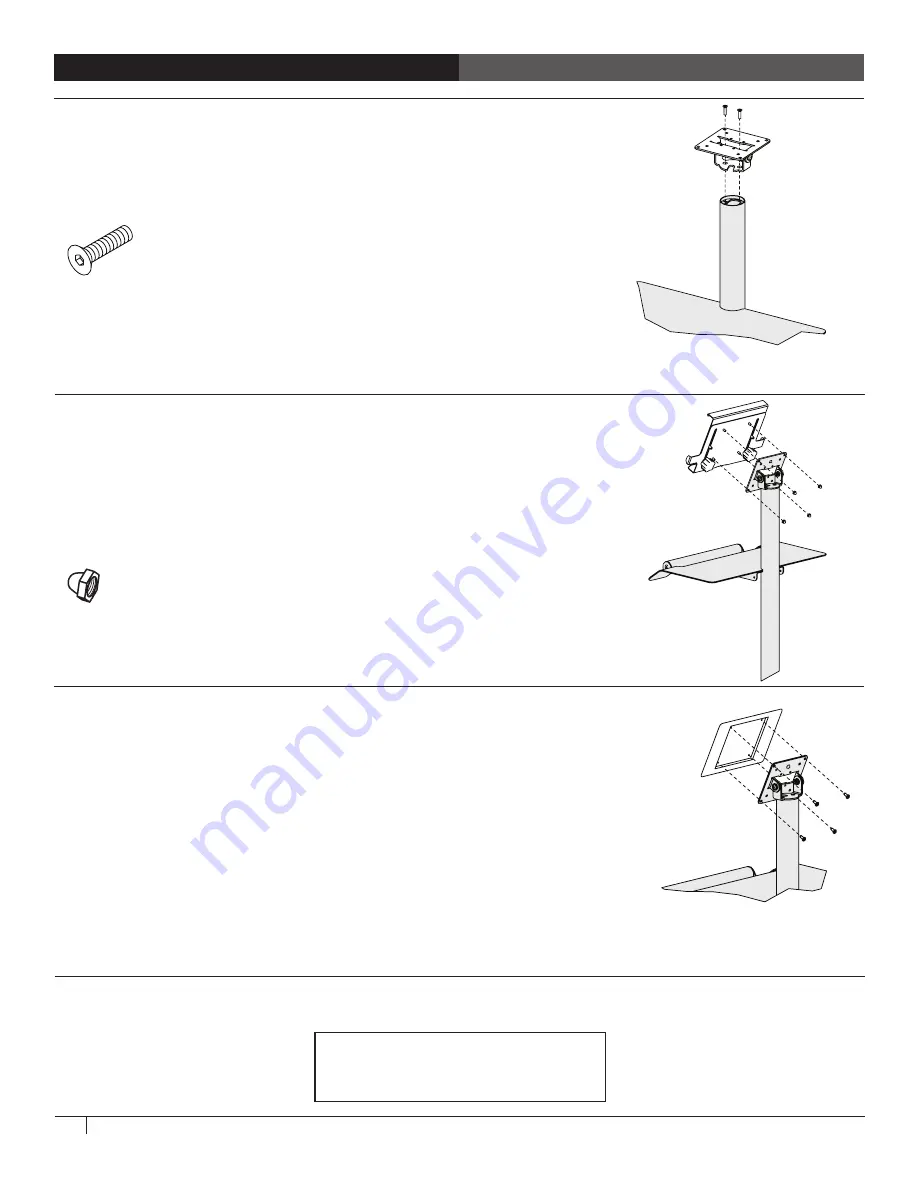
STEP 5A - ATTACH DEVICE HOLDER TO VESA PLATE
Align device holder with the VESA plate so the four threaded studs on the
holder line up with four holes on the plate.
Attach the device holder to the plate with four acorn nuts using your 3/8"
driver.
To adjust the device holder, loosen the adjustment knobs at the back of the
device holder, slide the top of the holder into position, then tighten the knobs.
STEP 5B - ATTACH TABLET CASE TO VESA PLATE
Align the holes in the back of your tablet case with the four outer holes in the
VESA mount.
Attach monitor with mounting screws that come with the case.
CONGRATULATIONS! YOUR CART ASSEMBLY IS COMPLETE!
STEP 4 - ATTACH VESA MOUNT TO COLUMN
Rotate VESA plate on mounting assembly so it can lay flat.
Align mounting holes in mounting assembly with holes in top of column.
Attach VESA mounting assembly with two hex bolts using 1/8" hex key.
#10-24 x 0.75” Flat-hd Screw
325-5270-00
3/8” Acorn Nut
325-5023-00


