

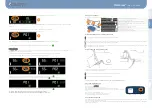
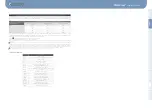


When the motor is rotating, the torque displayed on the screen is the instantaneous torque (Screen B).
When the motor stops, the last torque remains displayed
for 30 seconds
, before the display returns to the maximum torque programmed
(Screen A).
* To re-display the last torque,
long
press on the torque shown on the setpoint screen (Screen A).
The last torque obtained is displayed with the active patient No. (Screen C).
When
long
pressing on the value of the torque,
the value of the torque is saved
(a confirmation beep is heard).
To return to the setpoint screen without saving the torque value with the patient number, press
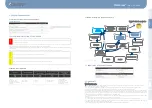
Patient numbering
To make it easier to identify the saved torques, you can enter the patient number corresponding to the saved torques. This information
will appear in the data exported with the mobile app.
To edit the patient number, press on the
PXX
area. This area will start flashing and the
+
and
-
buttons will appear.
Once adjusted, press on the
PXX
area to validate or wait 3 seconds without doing anything.
To return to the setpoint screen without saving the torque value with the patient number, press
You may also edit the patient number after the setpoint screen (Screen A) by pressing
if this is already lit.
To return to the setpoint screen without saving the torque value with the patient number, press
IMPORTANT : EACH TIME THE PEDAL IS PRESSED, THE LAST TORQUE OBTAINED IS ERASED.
IMPORTANT : EACH TIME THE EQUIPMENT IS TURNED ON, THE PATIENT NUMBER GOES BACK TO P01.
B
C
a
®
-
EN -
USER GUIDE
Fr
an
çais
Engli
sh
D
eu
tsc
h
Esp
añ
ol
Ita
li
an
o
Portu
gu
ês
Ne
d
erl
an
d
s
中国的
رع
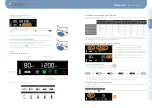
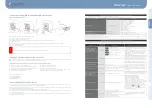
8.5. USE OF THE PEDAL
Description of pressing different buttons and lever
8.6. BACKUP POWER FOR THE WIRELESS PEDAL
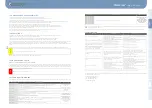
This pictogram symbolises the charge level of the battery of the pedal.
When the battery charge level has reached 25%, at least one day of use of the pedal will remain. The device beeps and the pictogram
flashes, indicating the need to recharge soon (see instructions below).
When charge level of the battery reaches 0%, the device will beep every 30 seconds and it is not possible to use the motor. Recharge
according to the following instructions.
8.7. RECHARGING THE PEDAL BATTERY
Connect the charging adapter to the pedal through the connector located at the rear of the pedal.
Connect the adapter to the mains to power it.
On screen, this logo is animated to indicate that the charging is in progress.
When this logo is displayed, the battery is fully charged.
→
The motor can be used in a normal manner during the charging of the pedal battery.
8.8 STOPPING THE MOTOR
At the end of the dental procedure :
→
Set the switch to position 0.
→
Remove the tool fixed to the contra-angle.
→
Remove the bottle or the bag of physiological liquid from the bracket.
→
Remove the drill of the irrigation line from the bottle or the bag of physiological
liquid.
→
Remove the clips for irrigation lines.
→
Disconnect the contra-angle from the micromotor.
→
Lay the micromotor on the micromotor support.
8.9 STOPPING THE MOTOR
If used in a proper manner, the micromotor and its cable have a lifecycle corresponding to 250 cleaning and sterilisation cycles; the pedal
has a lifecycle corresponding to 5 years of use.
However, these indications are not a warranty because wear may appear prematurely, depending on how the device is maintained
(cleaning and sterilisation).
Pressing lever (D)
Variation in the rotation speed of the micromotor
Pushing lever (D)
Illumination of the light for 3 seconds
Short pressing on the left button (A)
Irrigation ON / OFF (the flow rate set on the screen is preserved)
Long pressing on the left button (A)
Startup of the pump at the maximum flow rate without the micromotor
rotating (rinsing function)
Short pressing on the middle button (B)
Activation / deactivation of the reverse mode
Long pressing on the middle button (B)
Torque reduction in 5 increments
Short pressing on the right button (C)
Moving from one sequence to the next
Long pressing on the right button (C)
Torque increase increased in 5 increments
A
B
C
D
Summary of Contents for Xpert Unit
Page 1: ...bcdef ghij EN User manual ...


