background image

3

Connecting the USB Ports

You will find a single 10-pin connector on a cable attached to the front USB ports. 
This is an Intel standard connector which is keyed so that it can’t be accidentally, 
reversed as long as it is connected to a proper Intel standard motherboard header. 
Connect the 10-pin connector to the motherboard headers so that the blocked pin 
fits over the missing header pin. 

Note:

 Please check the motherboard manual for the USB header pin layout and 

make sure it matches the table below. If it does not match this Intel® standard, 
please visit Antec’s web store at http://www.antec.com/StoreFront.bok and 
search for part number 30095 to order a USB Internal Adapter Cable. This adapter 
will allow you to connect the front USB to your motherboard on a pin-by-pin basis.

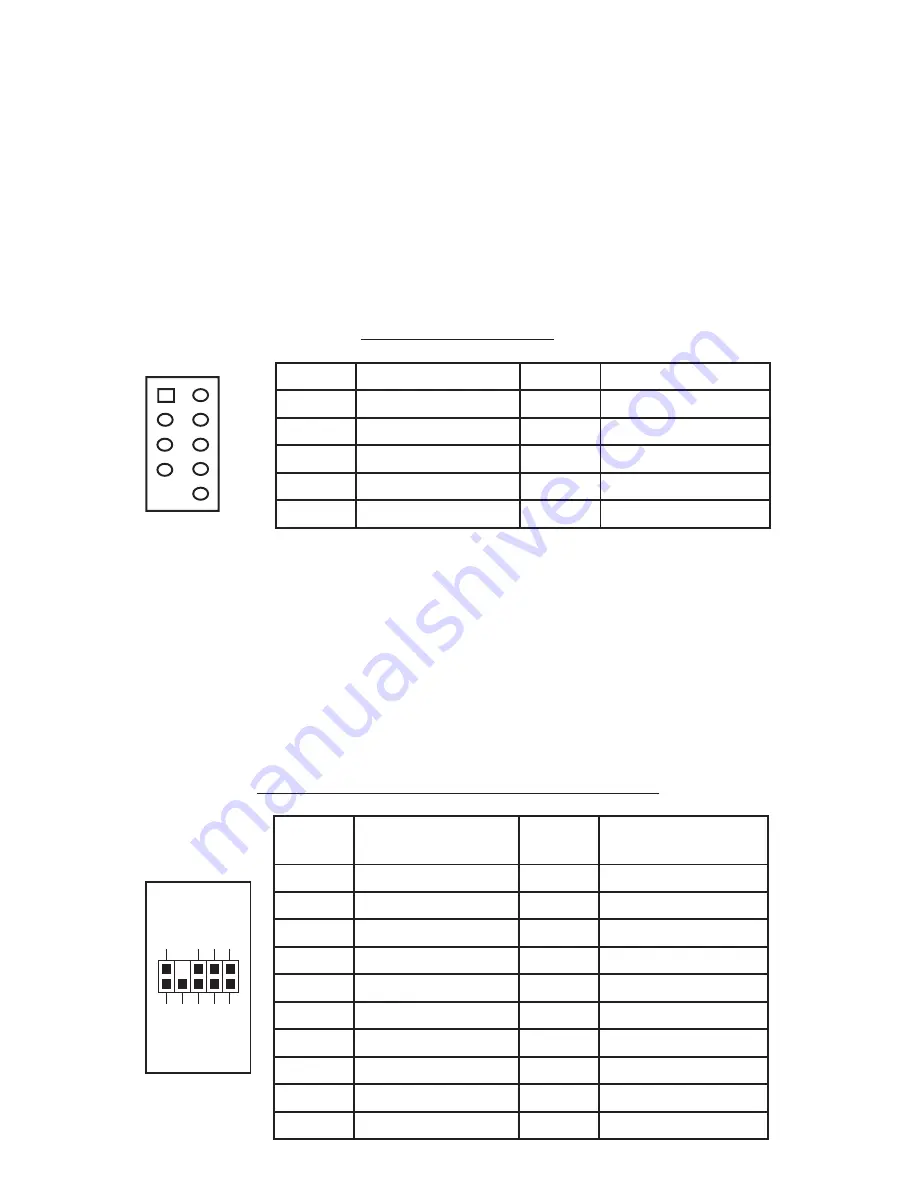
Motherboard Pin Layout

Connecting the Audio Ports (AC’ 97 and HDA)

There is an Intel standard 10-pin AC’ 97 connector and an Intel 10-pin HDA (High 
Definition Audio) connector, you can connect either the AC’ 97 or the HDA connector 
to your motherboard depending on the spec of the motherboard. If your motherboard 
supports Intel’s standard onboard AC’ 97 audio connector, plug the AC’ 97 
connector directly onto the board. If your motherboard supports Intel’s High Definition 
Audio, plug the HDA connector onto the board. Locate the internal audio connectors 
from your motherboard or sound card. Consult your motherboard or sound card 
manual for the pin-out positions.

Pin Assignment for Audio Ports (HDA and AC’97)

Pin

Signal Names

Pin

Signal Names

1

USB Power 1

2

USB Power 2

3

Negative Signal 1

4

Negative Signal 2

5

Positive Signal 1

6

Positive Signal 2

7

Ground 1

8

Ground 2

9

Key (No Connection)

10

Empty Pin

1

2

10

9

Pin

Signal Names 

(HDA)

Pin

Signal Names 

(AC’97)

1

MIC2 L

1

MIC In 

2

AGND

2

GND

3

MIC2 R 

3

MIC Power 

4

AVCC

4

NC

5

FRO-R

5

Line Out (R) 

6

MIC2_JD

6

Line Out (R)

7

F_IO_SEN

7

NC

8

Key (no pin)

8

Key (no pin)

9

FRO-L

9

Line Out (L)

10

LINE2_JD

10

Line Out (L)

1

2

3

5

7

9

4

6

10

Summary of Contents for New Solution Series

Page 1: ...New Solution Series NSK2480 User s Manual Manuel de l utilisateur Anwenderhandbuch Manuale per l operatore Manual del usuario পᡅ䂀ᯢ ...

Page 2: ... a soft on off feature This lets you turn the computer on and off by using the soft switch on the computer case If the computer crashes and you can t shut it down using the soft switch you can switch the main power to the OFF O position to shut the system down Then turn the switch back to the ON I position and reboot Although care has been taken to prevent sharp edges in your Antec case we strongl...

Page 3: ...s with the provided Phillips head screws 8 The motherboard is now installed Connecting the Power and LED The power supply conforms to the ATX12V Version 2 2 standard Before you connect the power supply to any of the devices please consult the appropriate user manuals for the motherboard and other peripherals 1 Connect the 24 pin Main Power Connector and the 4 pin 12V connector to the motherboard a...

Page 4: ...0 pin AC 97 connector and an Intel 10 pin HDA High Definition Audio connector you can connect either the AC 97 or the HDA connector to your motherboard depending on the spec of the motherboard If your motherboard supports Intel s standard onboard AC 97 audio connector plug the AC 97 connector directly onto the board If your motherboard supports Intel s High Definition Audio plug the HDA connector ...

Page 5: ...tes a rapid release Flip Up Drive Cage inside the power supply chamber for easy drive installation The cage can hold two 5 25 devices To install an external 5 25 device 1 Remove the flip up drive cage 2 Remove the corresponding drive bay cover to which you intend to install the device 3 Insert the 5 25 device into the cage Fasten the drive with the screws included See Picture 4 4 Find a 4 pin Mole...

Page 6: ...will block the bottom air vents The Upper Air Intake There are vents on the top panel above the PCI expansion slots Fresh air will flow through them into the motherboard chamber to cool the VGA card Note Do not place anything on top of the NSK2480 that will block the top air vents The Rear Air Intake There are vents right above the rear I O panel and on the PCI expansion slot covers to bring in fr...

Page 7: ...ower supplies Achieve energy savings up to 70 over the life of a desktop computer Reduce a room s cooling load increasing comfort and saving up to 30 Increase computer system reliability and save on maintenance costs by as much as 40 Minimize the need for noisy fans creating a quieter environment Save on construction saves hundreds of dollars in electrical system upgrades Allow more computers on t...

Page 8: ...0 10 462 2060 fax 31 0 10 437 1752 Customer Support US Canada 1 800 22ANTEC customersupport antec com Europe 31 0 10 462 2060 europe techsupport antec com www antec com Copyright 2007 Antec Inc All rights reserved All trademarks are the property of their respective owners Reproduction in whole or in part without written permission is prohibited Printed in China ...

Reviews: