
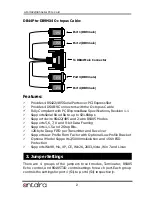


4-Port RS422/485 Serial PCIe Card
5
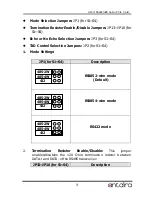
one is “MAN” (manually) the other one is “AUT” (automatically,
factory default), please keep it at “AUT” in all cases.
JP2 (for S1~S4)
Description
TXD Control is Automatic
(Default)
TXD Control is Manual
(Needs to be Configured
Manually in the Device
Manager)
5.
Factory Use Only Connector (J2):
This connector is only used for factory production purpose, please
don’t install any jumper or cable on it!
1.
Turn the system power OFF before installation!
2.
Remove the chassis cover from your computer
3.
Locate an unused PCI Express slot (typically smaller than PCI) and
remove the corresponding slot cover from computer chassis.
4.
Plug the RS422/485 PCIe card to the unused PCI Express
expansion slot and attached the I/O card bracket to the
computer chassis screw.
5.
Put the chassis cover back on the computer.
6.
Install the Octopus Cable, connect the RS422 or RS485 Devices to
the DB9M Connectors of the cable.
7.
Turn ON the power of your computer and peripherals.
8.
Proceed with Software Driver Installation.
4. Installing the RS422/485 PCIe Card
5. Software Installation
485TR
MAN AUT
485TR
MAN AUT


