background image

EN

15

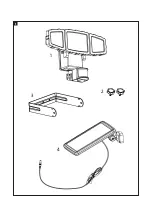
DESCRIPTION

1.  Floodlight
2.  Star knob
3.  Mounting bracket
4.  Solar panel

     FIG.   1

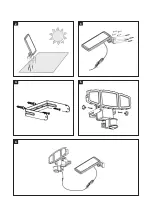
MOUNTING

1.   Make sure to put the solar panel where 

it will get as much sunlight as possible. 
Note that trees and buildings etc. can put 
the solar panel in the shade and affect its 
charging capacity. Adjust the solar panel 
by undoing the wing nut, putting the 
panel in the required position and then 
tightening the wing nut. 

     FIG.   2

2.   Mark out where to drill the holes for 

the solar panel. Check that there are no 
cables or conduits under the markings. 
Drill holes for the supplied plugs and 
screws. Put the plugs in the drilled holes 
and screw on the solar panel with the 
screws.

     FIG.   3

3.  Place the mounting bracket for the 

floodlight at a height of 180 to 240 cm 
above the ground on a stable surface 
that can support the weight of floodlight 
and which is not exposed to vibrations or 
wind. The floodlight must be high enough 
to detect movement and to disperse the 
light.

     FIG.   4

4.   Mark out where to drill the holes for the 

mounting bracket. Check that there are 
no cables or conduits under the markings. 
Drill holes for the supplied plugs and 
screws. Put the plugs in the drilled holes 
and screw on the solar panel with the 

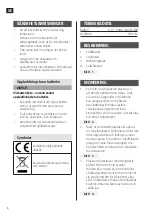
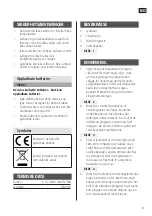
SAFETY INSTRUCTIONS

•   Do not expose the battery to naked flames 

or high temperatures.

•   The lamp and solar panel are weather 

resistant, but do not immerse them in 
water or any other liquid.

•   Do not look directly into the lamp when it 

is switched on.

•  Do not use the lamp if the chimney is 

damaged.

•  The light sources are not replaceable.  

If the lamp stops working it must be 
discarded.

Rechargeable batteries

     IMPORTANT:   
When replacing batteries – only use 
rechargeable batteries.

•   Always buy the correct size and type of 

battery intended for this purpose.

•   Remove the battery from the product if it 

is not going to be used for some time.

•   Recycle used batteries in accordance with 

local regulations. 

Symbols

Approved as per  
applicable directives.

Recycle discarded product  
as electrical waste.

TECHNICAL DATA

Battery 

6 V / 2000 mAh Ni-MH

Luminous flux 

1500 lm

Summary of Contents for 004584

Page 1: ...ngen noggrant innan anv ndning Spara den f r framtida behov SOLCELLSBELYSNING SE EN SOLAR CELL LIGHTING Operating instructions Translation of the original instructions Important Read the user instruct...

Page 2: ...y zagro eniem dla rodowiska i dla zdrowia Produkt nale y odda do odpowiedniego punktu sk adowania lub przynie go do jednego ze sklep w gdzie przy zakupie nowego sprz tu bezp atnie przyjmiemy stary teg...

Page 3: ...1 1 2 3 4...

Page 4: ...2 4 6 3 5...

Page 5: ...7 8...

Page 6: ...marken p en stabil yta som han h lla str lkastarenhetens vikt och som inte r r sig om den uts tts f r vibrationer eller vind Str lkastaren m ste sitta tillr ckligt h gt f r att kunna k nna av r relser...

Page 7: ...llningarna 30 60 eller 120 sekunder 3 N r str mbrytaren s tts i l ge I AUTO t nds str lkastaren automatiskt n r r relse detekteras 4 N r str mbrytaren st lls i l ge II ON lyser str lkastaren kontinue...

Page 8: ...n t cker in nskat omr de Str lkastaren blinkar Urladdat batteri S tt str mbrytaren i avst ngt l ge och l t solcellspanelen ladda i direkt solljus i 8 12 timmar innan den anv nds p nytt V rme som refle...

Page 9: ...ser og spre lys BILDE 4 4 Merk hvor hullene til monteringsfestet skal lages Kontroller at det ikke finnes noen kabler eller ledninger under merkene Bor hull til de inkluderte pluggene og skruene Sett...

Page 10: ...eren hele tiden BILDE 7 MERK Unng rette sensoren mot Gjenstander som raskt kan skifte temperatur som ventilasjons pninger og klimaanlegg aggregat Gjenstander som beveger seg som trekroner og gatetrafi...

Page 11: ...ri Sett str mbryteren i avsl tt posisjon og la solcellepanelet lade i direkte sollys i 8 12 timer f r lyskasteren brukes igjen Varme som reflekteres fra gjenstander kan aktivere bevegelsessensoren Jus...

Page 12: ...wietli miejsce RYS 4 4 Zaznacz miejsca wywiercenia otwor w monta owych na uchwyt monta owy Upewnij si e w zaznaczonych miejscach nie przechodz adne przewody Wywier otwory na do czone do zestawu wkr ty...

Page 13: ...e wieci stale RYS 7 UWAGA Unikaj kierowania czujnika w stron przedmiot w kt re mog szybko zmieni temperatur np otwor w wentylacyjnych i agregatu klimatyzatora przedmiot w kt re si poruszaj np koron dr...

Page 14: ...umulator Przed ponownym u yciem ustaw prze cznik w po o eniu wy czonym i poczekaj 8 12 godzin a panel s oneczny na aduje akumulator w pe nym wietle s onecznym Ciep o emitowane przez przedmioty mo e wz...

Page 15: ...ent and to disperse the light FIG 4 4 Mark out where to drill the holes for the mounting bracket Check that there are no cables or conduits under the markings Drill holes for the supplied plugs and sc...

Page 16: ...sly FIG 7 NOTE Avoid pointing the sensor at Objects that can quickly change temperature e g ventilation openings and air conditioning units Things that move such as treetops and traffic MAINTENANCE Ch...

Page 17: ...ttery Put the switch in the Off position and allow the solar panel to charge in direct sunlight for 8 12 hours before using it again Heat reflected from objects can activate the motion detector Adjust...

Reviews: