background image

16

Cleaning & Maintenance

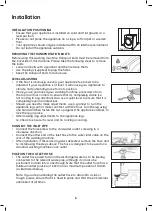
CLEANING PROCEDURES

WARNING: Before beginning any cleaning or maintenance, always ensure the appliance is 

switched off, the power plug is removed from the power outlet and the water supply has been 

closed.

CLEANING THE WASHING MACHINE

Proper maintenance of your washing machine will keep it looking as new and extend its working 

life.

•  The exterior surface can be cleaned with household cleaners and a soft damp cleaning cloth.

•  If there is any residual water at the completion of a washing program, please use a cloth to 

wipe it off immediately.

Note: Never use solvents or harsh cleaning chemicals on your washing machine’s exterior.

CLEANING THE INTERNAL DRUM

Should any rust form on the inside drum (i.e. water was left to sit for an extended period of time), 

please remove immediately using a chlorine free detergent. Never use  

steel wool or a harsh abrasive. 

CLEANING THE DOOR SEAL AND GLASS

Wipe the glass and seal after each wash to remove lint and stains. If lint builds up it can cause 

leaks. Remove any coins, buttons and other objects from the seal after each wash.

CLEANING THE DETERGENT DRAWER

You should periodically follow these steps to ensure the detergent drawer remains clean.

•  Press down on the arrow, located on the cover for the fabric softener compartment of the 

detergent drawer.

•  Clean the dispenser drawer under warm water.

•  Wash all grooves with warm water.

•  Re-install the fabric softener compartment cover into the detergent drawer, and push the 

drawer back  into position.

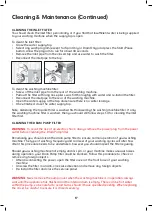
Washing the filter in the tap
1.Close the tap.
2.Remove the water supply hose from the tap.
3.clean the filter.
4.Reconnect the 

.

water supply hose

Cleaning The Inlet Filter

•  Inlet filter must be cleaned if there is  less water.


•  If the brush is not clean, you can pull out the filter washed separately;

•  Reconnect, turn on the tap.

Washing the filter in washing machine:
1.

Screw off the inlet pipe from the backside 

   of the machine.

2.Pull out the filter with long nose pliers 
   and reinstall it back after being washed.
3.Use 

 to clean the filter.

4.Reconnect the inlet pipe.

the brush

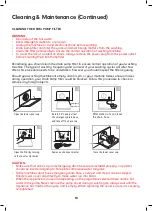
      Clean The Detergent Dispenser


Do not use alcohol,solvents or chemical products to clean the machine.

•  

A

Pull out the dispenser 
drawer with press the A

Clean the dispenser 
drawer under water

Clean inside the recess 
with an old toothbrush

Insert the dispenser 
drawer

1

2

3

4

Note!

Note!

Note!

1.Press down the arrow location on softener cover inside the dispenser drawer.
2.Lift the clip up and take out softener cover and wash all grooves with water.
3.Restore the softener cover and push the drawer into position.


MAINTENANCES

22

Summary of Contents for AFLW60G

Page 1: ...W75G Rev 03 To ensure proper operation of this device please read this instruction manual carefully before using the device and keep it for future reference Instruction Manual Front Load Drum type Washing Machine 6kg 7 5kg ...

Page 2: ...the following information which can be found on the rating plate and the date of purchase which can be found on your sales invoice STORE DETAILS STORE NAME ADDRESS TELEPHONE PURCHASE DATE PRODUCT DETAILS MODEL NO SERIAL NO Purchase Details ...

Page 3: ...hase Details 4 Safety Instructions 6 Installation 8 Your Washing Machine 10 Quick Start Guide 11 Operating Instructions 16 Cleaning Maintenance 19 Troubleshooting 20 Technical Specifications 21 Testing Notes 22 Warranty ...

Page 4: ...oor where you install the appliance is flat stable heat resistant and clean Always remove the plug and turn off the water supply to the appliance after every use Sharp and rigid items such as coins nails and screws may cause serious damage to this appliance always ensure pockets of clothing are empty Always ensure that the drum has drained all water before opening the appliance door If water is vi...

Page 5: ...without any clothes inside Do not climb up or sit on top of the appliance Do not change the specification of this appliance If you use fabric softener or similar products obey the instructions on the packaging Do not sit or stand on the open door Obey the maximum load volume of 7 5 kg refer to the Program chart chapter Ensure all objects are removed from clothing pockets such as lighters and match...

Page 6: ... is completely level in all directions Should you need to make adjustments use a spanner to turn the appliance legs until it makes contact with the floor Turn the leg using one hand and then fasten the nut up against the appliance cabinet to lock the leg in place After making any adjustments to the appliance legs re check to ensure it is level and no rocking occurring CONNECT THE INLET PIPE Connec...

Page 7: ...7 This page is intentionally left blank ...

Page 8: ... Control Panel OPERATIONS Off Product is switched off Start Pause Press the button to start or pause the washing cycle Programmes Available according to the laundry type Option This allows you to select an additional function and will light when selected 1 1 3 1 2 4 4 3 2 1 Note The chart is for reference only Please refer to real product as standard 1 3 2 4 4 2 1 3 ...

Page 9: ...aying time is 0 24H It can be set the spin speed to press the button repeatedly Speed The Prewash function can get an extra wash before main wash it is suitable for washing the dust rises to surface of the clothes You need to put detergent into the Case I when select it Pre Wash Programme Option Programme Option Extra Rinse Means optional Some models have intelligent weighing function please refer...

Page 10: ...r washing the dust that rises to surface of the clothes You need to put detergent into Case I when selecting it DELAY START Delays the start of your washing load for 0 24 hours Child Lock To avoid mis operation by children Start Press Delay and 3 sec till buzzer beep Function Delay Choose the Programme Caution Function Speed The speed is 1000 0 400 600 800 1000 1200 0 400 600 800 1000 1200 1400 0 ...

Page 11: ...acket it can cause the appliance to become unbalance during its spin cycle Therefore it s recommended to add one or two more clothing items to help the machine balance Try to remove any pet hair dust and stains from clothing prior to washing Baby clothing should be washed separately Clothing that gets easily fuzzed or loses fibres easily should be washed separately Black clothing items should be w...

Page 12: ...d Finally select your desired spin speed The higher the spin speed the drier the textiles will be at completion however more delicate textiles will be more wrinkled Delicate textiles should be set with a lower spin speed Selecting the main washing program depend on the types of clothing to be washed as follows Cotton Eco This procedure saves energy and limits the washing temperature to 40 C or 60 ...

Page 13: ...he Child Lock press the Temperature Function buttons at the same time for 3 seconds until an audible tone is heard Make sure the program is selected and the cycle has started before using the Child Lock function 6KG MACHINE WASHING PROGRAMS TABLE Washing Programmes Table OPERATIONS Speed the highest speed Other as the default Half load for 6 0Kg machine 3 0Kg Cotton ECO is the standard washing pro...

Page 14: ...t speed Other as the default Half load for 7 5Kg machine 3 75Kg Cotton ECO is the standard washing programs to which the information in the label and the fiche relates Energy test program Cotton ECO and they are suitable to clean normally soiled cotton laundry and that they are the most efficient programmes in terms of combined energy and water consumptions for washing that type of cotton laundry ...

Page 15: ...15 This page is intentionally left blank ...

Page 16: ... remains clean Press down on the arrow located on the cover for the fabric softener compartment of the detergent drawer Clean the dispenser drawer under warm water Wash all grooves with warm water Re install the fabric softener compartment cover into the detergent drawer and push the drawer back into position Washing the filter in the tap 1 Close the tap 2 Remove the water supply hose from the tap...

Page 17: ... inlet filter first CLEANING THE DRUM PUMP FILTER WARNING To avoid the risk of an electric shock always remove the power plug from the power outlet before cleaning the Drain Pump filter Periodically you should clean the drain pump filter to ensure normal operation of your washing machine The type of washing frequency and soil level of your washing cycles will alter how often this procedure needs t...

Page 18: ...pending on the programme selected there can be hot water in the pump Never remove the pump cover during a wash cycle always wait until the appliance has finished the cycle and is empty When replacing the cover ensure it is securely re tightened Cleaning Maintenance Continued Make sure that valve cap and emergency drain hose are reinstalled properly cap plates should be inserted aligning to hole pl...

Page 19: ...that the inlet pipes are connected firmly at the rear of the machine Check that the outlet hose hasn t been damaged Display isn t lighting up Check that the power isn t disconnected PC board may have issues Please contact our customer service team Detergent residues remain in the detergent drawer Ensure you are using a correct amount of detergent Follow the cleaning steps to remove any damp residu...

Page 20: ...estart the washer Note If the above steps don t resolve your issue or you cannot resolve the fault by yourself Press the On Off button Switch off the appliance at the power outlet and remove the plug Call Kmart Customer Service Centre on 1800 124 125 Australia Below outlines the technical specifications for your Washing Machine Model AFLW60G AFLW75G Washing Capacity 6 0kg 7 5kg Dimensions W x D x ...

Page 21: ...antity Default 6 Adding detergent The detergent is dissolved and added as Paragraph B7 3 of AS NZS 2040 1 The detergent shall be dissolved in 1 L of water 7 Anti sudsing agent Max 8 Test load mass 6 0kg 9 Water consumption 61L 10 Test Voltage 220 240V 50Hz 7 5KG WASHING MACHINE ADDITIONAL INFORMATION FOR Standard performance TESTING AS NZS 2040 1 2005 Amdt1 2007 Amdt2 2009 Amdt 3 2010 1 Water conn...

Page 22: ...ty will no longer apply where the defect is a result of alteration accident misuse abuse or neglect Please retain your receipt as proof of purchase and contact our Customer Service Centre on 1800 124 125 Australia or alternatively via Customer Help at Kmart com au for any difficulties with your product Warranty claims and claims for expense incurred in returning this product can be addressed to ou...

Page 23: ...23 This page is intentionally left blank ...

Page 24: ...Model no AFLW60G AFLW75G Rev 03 ...

Reviews: