background image

36

3.4 Using Bluetooth

You


can


launch


Bluetooth


devices


(Bluetooth


printer,


card


reader,


etc.)


separately


from


the


PDA.

Devices


and


connections


of


Bluetooth


can


be


setup.

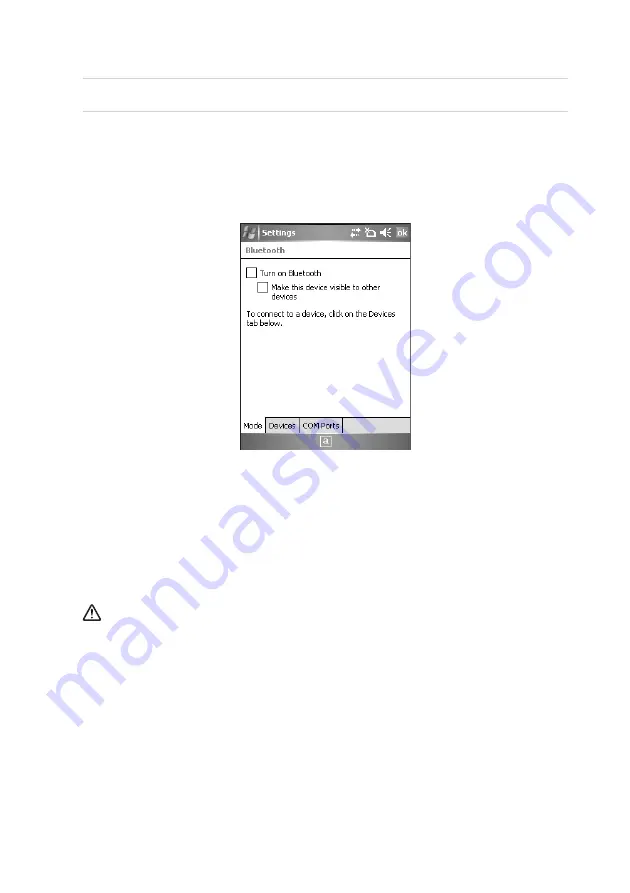
Example of Using Bluetooth

1

Steps: [Start] -> [Settings].

2

Press [Connections] tab and select [Bluetooth].

3

Check ‘Turn on Bluetooth’ from the [Mode] tab, and click [OK].

Turn on Bluetooth

By


checking


or


un

checking


Bluetooth


it


will


indicate


whether


it


is


in


use


or


not.

Please


select


OFF


when


Bluetooth


is


not


in


use


to


conserve


power.

Setting up so other devices can find your device

When


Bluetooth


is


turned


on,


other


devices


can


search


IPT300.

Summary of Contents for IPT300

Page 1: ...1 ...

Page 2: ... interference to radio communications Services related to human security cannot be provided under these circumstances so it is up to the user to take precautions Please read Cautions and Instructions before using the product Model User Manual A Class Machinery Information Communication Device for Business This machinery has been registered for electromagnetic emission sufficiency so the attention ...

Page 3: ...do otherwise there is a risk of explosion or possibilities for shorter durability of the PDA battery and adaptor Plug in the adaptor firmly so it does not jiggle If symptoms such as smoke odor or noise occurs immediately turn the product off and detach the adaptor from the outlet Also in cases of thunder or lightening please detach the adaptor from the outlet as well 2 Precautions for the Phone an...

Page 4: ...mportant data in advance Do not remodel disassemble or try to fix the product by yourself Please contact your distributor reseller for reparations or inquiries If you experience an allergic reaction from the product stop using the PDA immediately and consult your doctor Do not put dye or paint on the PDA It may cause damage to the appearance or screen or may cause the product to malfunction Using ...

Page 5: ... Specification 20 1 10 PDA Specification Communication 21 2 Learning the Basics 22 2 1 Turning On Off 22 2 2 Using the Stylus Pen 22 2 3 Starting the PDA 23 Adjusting the Screen 23 Windows Mobile Starting Screen 23 Starting Windows Mobile 24 2 4 Making Receiving Calls 25 Making Calls 25 Receiving Calls 25 2 5 Typing 26 Keyboard 26 Letter Recognizer 26 Transcriber 27 Selecting Text Input Mode 27 Bl...

Page 6: ... Program 33 Launching the Photo Album 34 3 3 Using Infrared Port IrDA 35 3 4 Using Bluetooth 36 3 5 Using Wireless Manager 38 3 6 Using USB Host 39 3 7 Selecting GSM Bands 40 3 8 Setting GPRS Data Connection 41 4 Connecting ActiveSync 42 4 1 Installing ActiveSync 42 4 2 Downloading Files 44 5 Q A 46 ...

Page 7: ...e contact your distributor reseller The pictures or the figures in this manual may differ from the actual product The content may differ based on specifications and model selection If you would like to purchase an additional or optional version please contact your distributor reseller IPT300 Cradle Battery Stylus Pen Power Cable AC Adaptor USB Cable Stylus Pen Elastic Cord Product CD ...

Page 8: ...8 1 2 Basic Terms Please familiarize yourself with the basic terms of the PDA product Front Bottom Note The features may differ based on specifications and model selection ...

Page 9: ...9 EN Right Side Left Side Note The features may differ based on specifications and model selection ...

Page 10: ...10 Rear View Note The features may differ based on specifications and model selection ...

Page 11: ...he PDA ON OFF You can turn the LCD back light ON OFF by pressing the button for more than 3 seconds Arrows Move to the right menu Move to the left menu Function Execute an event while holding the function key and a numeric key simultaneously Enter Move to the next line or enter signs and characters run programs or activate folders Side Buttons Barcode Camera The side button on the PDA is generally...

Page 12: ...Keyboard Gradually brighten the LCD screen Commend Refresh same feature as the F5 button on the PC Gradually darken the LCD screen Commend Page Down Select the next launched program on Tasks or move 8 spaces to the right in Word Mobile same feature as the Tab key on the PC Commend Page Up Launch Stylus Pen control program Move up Move down F F F F F F F F F F F ...

Page 13: ...ng the battery into position attach the battery cover by sliding it upwards Detaching the Battery 1 When detaching the battery cover press the detach button 2 After detaching from the battery case separate the battery from the case by pressing the detach button and using the groove at the bottom lefthand corner Detach the battery only after you turn off the product Abruptly turning off the product...

Page 14: ...xtra battery place it in the cradle where the extra battery charging space is and press it until you hear a click The battery is not charged when you first purchase a product Please charge it for more than 48 hours before using it If the PDA has not been used for a long period of time you must charge the battery for 48 hours or more When the PDA and extra battery are attached together to the cradl...

Page 15: ...nnected with the adaptor and insert it into the I O port for power connection of the PDA while pressing the buttons on both sides of the connector 3 After charging it completely separate the PDA and adaptor by pressing the buttons on both sides of the connector Use the specified adaptor for the PDA The 9V 3A adaptor must only be used with this PDA If you use it with others PDAs with less voltage i...

Page 16: ... the PDA and extra battery are placed together in the cradle Status of Lamps during Charging Charge Alert Lamp Charging Completed Cases PDA Cradle PDA Cradle PDA Phone Orange Green PDA attached to the Cradle Orange Green Battery attached to the Cradle Orange Green PDA and Battery attached to the Cradle Charging the PDA Orange Orange Green Green PDA and Battery attached to the Cradle Charging Batte...

Page 17: ...ge time drops in half we recommend that you purchase a new battery Batteries are under warranty for 6 months from time of purchase The maximum duration of the battery can be changed according to the service of wireless providers temperature of surroundings when in use and the total period of battery use Batteries will also be drained when using functions like the magnetic card reader printer Conta...

Page 18: ...n is turned on Green Lamp Out GSM connection is turned off Green Lamp Blinking Slowly 2 second intervals GSM connection is on Able to have phone calls in this area Green Lamp Blinking Faster 0 6 second intervals GSM connection is on In between a phone conversation or data communication Green Lamp Blinking very Fast 0 2 second intervals Indicates trouble with GSM connection Green Lamp On The PDA ph...

Page 19: ...ot indicated by the lamp GPRS connection established Green Lamp Out Modem is off or the area is unable to have phone calls Green Lamp Blinking Modem is on and can have phone calls Green Lamp Blinking Faster Sending Receiving of SMS Green Lamp On On the phone in conversation or data communication ...

Page 20: ...Host 1 1 USB Client 1 1 IrDA 1 2 Bluetooth V1 2 Class2 3 SAMs 1 SIM SD Card Slot SDIO Card Reader MSR ISO 7810 Tracks 1 2 3 Bi directions Contact Card Reader ISO7816 EMV Certified Contactless Reader ISO14443 A B Type and Mifare Type Printer 2 Inch Thermal Printer Barcode Engine Optional 1D Laser or 1D 2D only PDF417 Linear Imager Camera Optional 2M Pixels Cradle Optional Charging Battery 7 4V 2000...

Page 21: ...S Multislot Class 12 Class B EDGE Multislot Class 10 Class B WLAN Frequency 2 412MHz 2 472MHz Channels 13 Channels Arial Power 10mW or Less Modulation Method G1D D2D Using Certified Module SWL 2460C Bluetooth Frequency 2 402MHz 2 480MHz Channels 79 Channels Arial Power 0 01mW or Less Modulation Method F1D ...

Page 22: ...k Light is OFF 2 2 Using the Stylus Pen Stylus Pen is an input device that can be used for selecting launching and moving items on the touch screen LCD Pressing the Stylus Pen Tap Select or launch an item by touching an icon on the screen with the tip of the Stylus Pen Dragging the Stylus Pen Drag Used to select multiple items select characters or images by dragging Holding the Stylus Pen Down Tap...

Page 23: ...the Stylus Pen on the LCD screen When you press the middle of the cross in the center using the Stylus Pen the target moves Press it again precisely with the Stylus Pen Windows Mobile Starting Screen Once you complete the initial wizard you will see the starting screen as shown below ...

Page 24: ...24 Starting Windows Mobile When you press the Start button on the upper left hand corner of the title bar the start menu will appear ...

Page 25: ...led 5 The calling time will be initiated once you get connected The calling time will be indicated on the screen Receiving Calls 1 When the PDA rings an Incoming Call message will be shown 2 You can then talk over the phone by pressing the Send button or 3 The call automatically ends when your press the End button or 4 You can turn ON OFF the modem by pressing the End button You have to connect th...

Page 26: ... the stylus pen Letter Recognizer This option allows you to enter texts using your own handwriting The screen is divided into three different sections A capital letter area lowercase letter area and a number area Characters are entered by printing letters in each area The character is then analyzed and typed on the screen automatically ...

Page 27: ...er entire words and sentences using your own handwriting Transcriber supports both printing and cursive writing styles and then automatically types the information on the screen Selecting Text Input Mode There are five different character input methods available 1 Block Recognizer 2 Built in Numeric Keypad 3 Keyboard 4 Letter Recognizer 5 Transcriber ...

Page 28: ...ers and the right side is for number entries Symbols and common functions are located in other smaller boxes located in the right of the writing box area Built in Numeric Keypad Using Keypad you can type letters punctuations numbers and other Special characters into the text entry fields or other applications available on your PDA ...

Page 29: ...n it will partially pop out You can then remove the card by pulling on the exposed part 2 7 Software Reset Initialization When you press the Reset button firmly with the Stylus Pen you will lose all unsaved files and end all opened programs This function is the same as the Reset button on your PC Press the Reset button on the right side of the PDA with the Stylus Pen The PDA will restart You can r...

Page 30: ...button at the same time Reset Button Performing Hardware Reset will cause loss of data and programs so we strongly advise that you backup your data before performing Hardware Reset 2 9 Using SIM Card Detach the battery before using the SIM Card As seen in the picture below the slot located in the upper right section among the 4 slots is the SIM Card Slot Please insert the SIM card in this slot Not...

Page 31: ... corner For PDF417 you have to scan the barcode from top to bottom or vice versa Basic Tests for Barcode Reader 1 Go to Start Settings 2 Select System tab and launch Barcode Setting 3 Go to Start Programs launch Word Mobile 4 Open a new document 5 Push Barcode button towards the Barcode reader in order to read the barcode you need 6 Values of the barcode read will be shown on the new note When you...

Page 32: ...s Go to Start Settings System 2 Launch Barcode Setting 3 Check if it is in Virtual Wedge Enable If it is in Disable set it as Enable and click Yes Or you can launch Barcode Setting with the alternate steps below 1 Steps Start File Explorer 2 On My Devices select Program Store 3 Launch Barcode Setting ...

Page 33: ...below 1 Go to Start Programs File Explorer 2 Select My Devices on the top of the explorer and go to ProgramStore folder 3 Go to CAMERA folder and launch CAMERA program Set Screen 1 Close Camera Program 2 Adjust Brightness 3 Set Resolutions 320 240 1600 1200 4 Special Effects Normal Gray Solaris Aqua Negative 5 Quality High H Medium M Low L 6 Add the Flash Icon Flash On Off 7 Shutter Button 8 Photo...

Page 34: ...ch ImageViewer program Or touch the Viewer button on the upper left corner of the camera screen Set Screen 1 Close Photo Album 2 Previous Image 3 Next Image 4 Actual Size 5 Fit Image 6 Go to the List of Photos 7 Zoom In Out 8 Delete Picture 9 Go back to Camera Mode ...

Page 35: ... Place the IrDA Infrared Port close within 30cm to the IrDA of another device face to face Example of using IrDA 1 Steps Start Settings 2 Press Connections tab and select Beam 3 Check on Accept all incoming beams and click OK 4 Find the other s infrared port 5 Verify the data to be sent and choose OK The closer the ports are the faster the connection will be ...

Page 36: ...teps Start Settings 2 Press Connections tab and select Bluetooth 3 Check Turn on Bluetooth from the Mode tab and click OK Turn on Bluetooth By checking or un checking Bluetooth it will indicate whether it is in use or not Please select OFF when Bluetooth is not in use to conserve power Setting up so other devices can find your device When Bluetooth is turned on other devices can search IPT300 ...

Page 37: ...a windows screen requiring a PIN number The PIN number is different from every Bluetooth device and is used to prove validation Ask the Bluetooth device manufacturer for the PIN number Check if the icon indicates the same device as the device found Double click the device found select menu and type in the PIN number again Once you type in the correct PIN number see if the red mark in front of the ...

Page 38: ...luetooth button The items Wireless Manager supports can differ due to the network spec of the PDA Notes Using the All button you can turn on off all the features simultaneously and you can also turn on off individual features using Wi Fi Bluetooth and send button When you turn on Wi Fi or Bluetooth there will be additional detailed settings shown below the name of the function You can set it indiv...

Page 39: ...ction you need to follow the setup below Example of using USB Host function 1 Click Windows button and follow the steps below 2 Settings System 3 Select USB Setting 4 Check USB Host Enable You can connect multiple USB devices to the PDA by using the USB Host ...

Page 40: ...o use GSM connection Example of setting GSM bands 1 Select Start and follow the steps below 2 Go to Settings Personal tab and select PHONE 3 Select the correct GSM bands on the Band Selection 4 Select GSM bands and press the reset button Require to insert SIM card and turn ON GSM before activating GSM Band Selection ...

Page 41: ... connection 1 Start Settings 2 Click Connections tab 3 Select My ISP Add a new modem connection 4 Select Modem Cellular Line 5 Enter the name and numbers of the network provider of the nation After setting up the GPRS data connection If the data connection pops up when trying to connect to the internet through Internet Explorer you may connect and use its connection ...

Page 42: ... the IPT300 Product CD into the CD ROM drive of your desktop computer The setup file is in the ActiveSync folder E g d IPT300 Product CD ACTIVESYNC WWE setup exe for English version 2 Double click to launch the setup file located at CD ROM drive ActiveSync folder ...

Page 43: ...es in the menu functions features if you use other versions of the product You have to install Microsoft ActiveSync Version 4 0 or higher If you connect the PDA to your PC for the first time the new hardware search wizard will launch on your PC You do not have to install any additional drivers if you already have Microsoft ActiveSync installed You might experience failure when you connect the PDA ...

Page 44: ...ith the USB cable 2 If the PDA is turned on when connecting with the PC the PC automatically detects it and launches ActiveSync 3 Open Mobile devices window by clicking Explore button on ActiveSync window 4 Once you connect the PDA to the PC with ActiveSync you can synchronize features such as Favorites Contact Schedule Tasks E mail Inbox etc You can also copy or paste files and install new progra...

Page 45: ...45 EN 5 Copy desired files by using Explorer on the PC and move them into the folder you want in ProgramStore ...

Page 46: ...setting and if it still does not work please contact your distributor reseller Q I cannot charge the battery using cradle A Check if the PDA and cradle are connected properly and if the lamp is working Clean the charge terminal and if the machine still does not charge either the battery is defective or you need a new battery Warranty period for batteries is 6 months Q How do I request after sales ...

Page 47: ...47 EN ...

Page 48: ...48 ...

Reviews: