background image

UG-477 

Evaluation Board User Guide 


Rev. A | Page 6 of 28 

DEFAULT SWITCH AND JUMPER SETTINGS 

The J8, J10, J12, and J17 jumpers must be connected, and the J3 
jumper must be set to the USB/EXT power setting. The MP pin 
jumpers (J9) can be connected as desired to use the MP push-buttons 
or switches. The microphone bias jumpers, J11 and J14, can be 
inserted if microphone bias is needed on Input 0 and Input 1.


Switch S7 selects whether the board is to be powered up or if audio 
is to be bypassed from input to output with the board powered 
down. For normal operation, slide the switch to the left. S1 selects 
whether the 

ADAU1772

 is powered from 3.3 V or 1.8 V; the 

default is 3.3 V. If powering the board via the USBi, ensure that the 
switch on the bottom of the USBi board is set to the correct voltage 
(1.8 V or 3.3 V). S2 controls self-boot operation. By default, S2 
is slid to the right to disable self-boot operation. 

POWERING UP THE BOARD 

To power up the evaluation board, connect the ribbon cable of 
the USBi to J1 (CONTROL PORT) of the 

EVAL-ADAU1772Z

CONNECTING THE AUDIO CABLES 

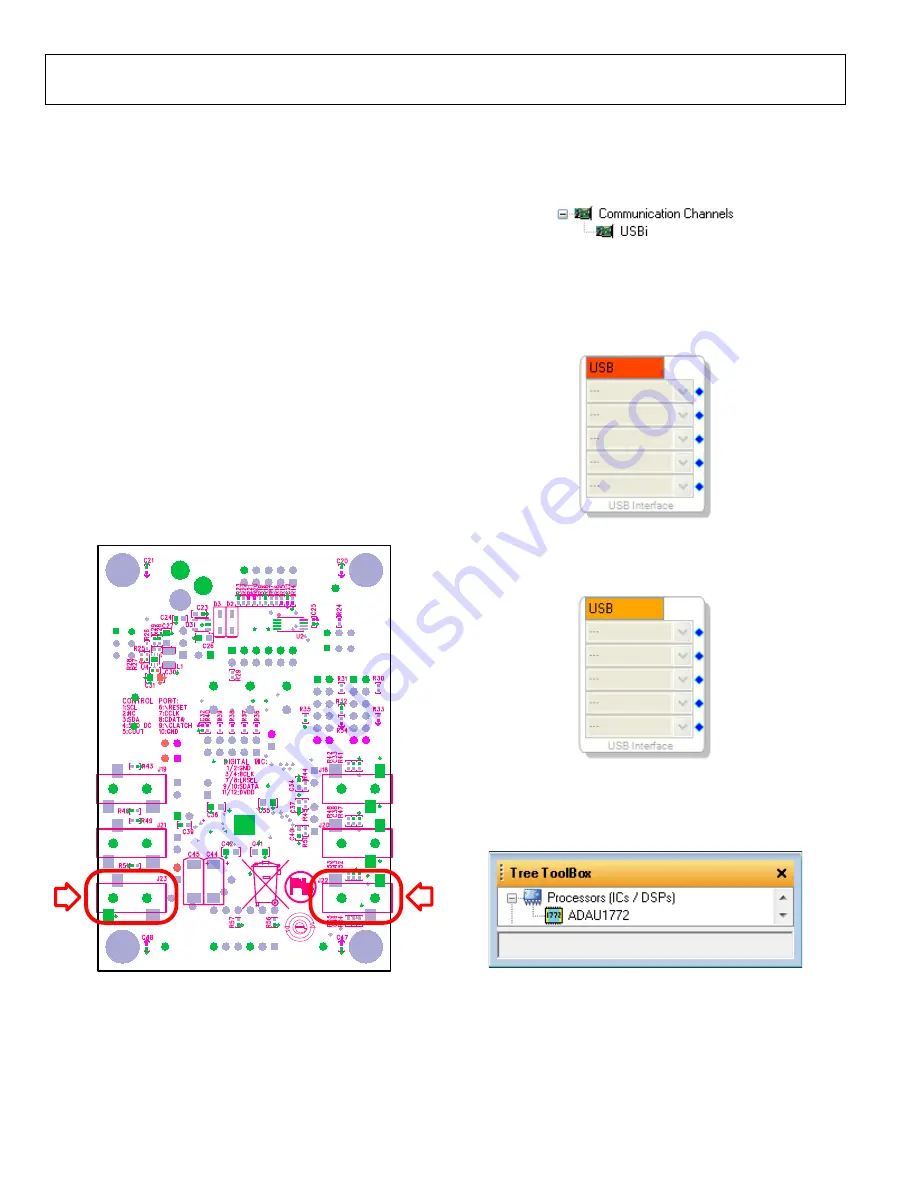
Connect a stereo audio source to J22 (AIN2/3). Connect head-
phones or powered speakers to J23 (STEREO OUTPUT). The 
labels for J22 and J23 are only visible on the bottom of the board. 

1

1023-

11

1


Figure 11. Stereo Out (J23), Left, and Stereo In (J22), Right 

SETTING UP COMMUNICATIONS IN SigmaStudio 

Start SigmaStudio by double-clicking the shortcut on the desktop. 
Click 

File…New Project

 or press 

Ctrl+N

 to create a new project. 

The default view of the new project is called the 

Hardware 

Configuration

 tab. 

To use the USBi in conjunction with SigmaStudio, select it in the 

Communication Channels

 subsection of the toolbox on the left 

side of the 

Hardware Configuration

 tab, and add it to the project 

space by clicking and dragging it to the right (see Figure 12)

1

1023-

0

1

1


Figure 12. Adding the USBi Communication Channel 

If SigmaStudio cannot detect the USBi on the USB port of the PC, 
the background of the 

USB

 label will be red (see Figure 13). This 

can happen when the USBi is not connected or when the drivers 
are incorrectly installed. 

1

1023-

012


Figure 13. USBi Not Detected by SigmaStudio 

If SigmaStudio detects the USBi on the USB port of the PC, the 
background of the 

USB

 label changes to orange (see Figure 14)

1

1023-

013


Figure 14. USBi Detected by SigmaStudio 

To add an 

ADAU1772

 to the project, select it from the 

Processors (ICs / DSPs)

 list and drag it to the project space  

(see Figure 15). 

1

1023-

014


Figure 15. Adding a

ADAU1772


To use the USB interface to communicate with the target integrated 
circuit (IC), connect it by clicking and dragging a wire between the 
blue pin of the USBi and the green pin of the IC (see Figure 16)
The corresponding drop-down box of the USBi automatically 
fills with the default mode and channel for that IC. 
 

Summary of Contents for EVAL-ADAU1772Z

Page 1: ...on the information therein All referenced brands product names service names and trademarks are the property of their respective owners 00000005981LF 000 EOS Power Buy Now We have 45 000 LP502030 PCM...

Page 2: ...772Z evaluation board This evaluation board provides full access to all analog and digital I Os on the ADAU1772 The ADAU1772 core is controlled by Analog Devices Inc SigmaStudio software which interfa...

Page 3: ...ngs 6 Powering Up the Board 6 Connecting the Audio Cables 6 Setting Up Communications in SigmaStudio 6 Creating a Basic Signal Flow 7 Downloading the Program to the DSP 9 Using the Evaluation Board 10...

Page 4: ...RIAL AUDIO CONNECTOR MP PINS DIFFERENTIAL STEREO OUTPUT SINGLE ENDED STEREO OUTPUT XTAL OSCILLATOR MASTER CLOCK ADAU1772 11023 003 Figure 3 Functional Block Diagram MP PINS POWER SUPPLY COMMUNICATIONS...

Page 5: ...UG 477 Evaluation Board User Guide Rev A Page 4 of 28 11023 005 Figure 5 Default Jumper and Switch Settings A Solid Black Rectangle Indicates a Switch or Jumper Position...

Page 6: ...the USBi to an available USB port with the included USB cable At this point Windows XP recognizes the device see Figure 6 and prompts the user to install drivers 11023 006 Figure 6 Found New Hardware...

Page 7: ...eo In J22 Right SETTING UP COMMUNICATIONS IN SigmaStudio Start SigmaStudio by double clicking the shortcut on the desktop Click File New Project or press Ctrl N to create a new project The default vie...

Page 8: ...hin the IO Audio Input folder see Figure 18 11023 017 Figure 18 Input Cell Selection Click and drag the Input cell into the blank schematic space to the right of the Toolbox see Figure 19 11023 018 Fi...

Page 9: ...the bottom left corner the IC 1 ADAU1772 Register Control tab is seen see Figure 25 11023 024 Figure 25 ADAU1772 Register Control Tab Click it and find the Output Serial Port tab in the top right cor...

Page 10: ...ernately press the F7 key 11023 027 Figure 28 Link Compile Download Button If the project does not compile correctly an error displays see Figure 29 If this occurs go back and check your work for mist...

Page 11: ...igure 31 11023 030 Figure 31 Power Jumpers INPUTS AND OUTPUTS The EVAL ADAU1772Z has multiple audio input and output options including digital and analog There are four single ended analog inputs that...

Page 12: ...XTAL To Main Blocks CLOCKOUT Figure 35 Clock Output Enabled Divided Now set the input of the ADAU1772 to be the digital microphones instead of the ADCs by toggling the appropriate Decimator Source set...

Page 13: ...OUT 11023 038 Figure 39 PDM Output and Clock Output Pins MP PINS The MP pin jumpers Header J9 provide access to the MP pins MP0 MP1 MP2 MP3 and MP6 of the ADAU1772 as well as facilitate the use of the...

Page 14: ...The connections can be located on the J4 header The silk screen above the header helps identify where to connect the clocks and data see Figure 42 11023 041 Figure 42 Serial Audio Port Once connected...

Page 15: ...re writing to the E2PROM ensure that it has been erased by clearing it from SigmaStudio To do this right click on E2Prom select the Read Write window and click Clear E2Pro to clear the memory see Figu...

Page 16: ...D VDD Jumper connects IOVDD on the ADAU1772 to VDD 3 3 V board supply on the evaluation board J11 J14 Microphone bias Jumpers used to add a microphone bias to the analog microphone inputs AIN0 and AIN...

Page 17: ...AV DD 11 AGND 1 3 AIN 1 RE F 1 4 AIN1 1 5 AIN 2 RE F 1 6 AIN2 1 2 CM 1 7 AIN 3 RE F 1 8 AIN3 19 AV DD 20 AGND 23 AGND 24 AV DD 2 1 H POU TL N L OU TL N 2 2 H POU TL P L OU TL P 2 5 H POU TRN L OU TRN...

Page 18: ...ion Board Schematic PDM Digital Microphone Interface Serial Audio Interface R29 49R9 1 3 5 7 9 2 4 6 8 10 12 11 J4 HEADER_12WAY_UNSHROUD LRCLK MP3 BCLK MP2 DAC_SDATA MP0 ADC_SDATA0 PDMOUT MP1 ADC_SDAT...

Page 19: ...N 6 VOUT 5 SW 3 FB 7 EP 4 G ND U4 ADP 1607 ACPZ R7 L1 2 2uH 3 EN 2 GND 1 IN 5 OUT 4 BYP U3 ADP 1713 AUJZ 1 5 R7 C26 10 uF C23 10 nF B A J3 C24 VDD BRD_RESET USB _5 V IOVDD EXT_5 V 11023 053 Figure 54...

Page 20: ...Evaluation Board User Guide UG 477 Rev A Page 19 of 28 11023 055 Figure 56 EVAL ADAU1772Z Evaluation Board Layout Top Assembly...

Page 21: ...UG 477 Evaluation Board User Guide Rev A Page 20 of 28 11023 056 Figure 57 EVAL ADAU1772Z Evaluation Board Layout Top Copper...

Page 22: ...Evaluation Board User Guide UG 477 Rev A Page 21 of 28 11023 057 Figure 58 EVAL ADAU1772Z Evaluation Board Layout Power Plane...

Page 23: ...UG 477 Evaluation Board User Guide Rev A Page 22 of 28 11023 058 Figure 59 EVAL ADAU1772Z Evaluation Board Layout Ground Plane...

Page 24: ...Evaluation Board User Guide UG 477 Rev A Page 23 of 28 11023 059 Figure 60 EVAL ADAU1772Z Evaluation Board Layout Bottom Copper...

Page 25: ...UG 477 Evaluation Board User Guide Rev A Page 24 of 28 11023 060 Figure 61 EVAL ADAU1772Z Evaluation Board Layout Bottom Assembly...

Page 26: ...k chip resistor 1 63 mW thick film 0402 CRCW04022K67FKED Vishay Dale 5 R4 to R8 33 2 chip resistor 1 63 mW thick film 0402 RMCF0402FT33R2 Stackpole 1 R27 374 k chip resistor 1 63 mW thick film 0402 E...

Page 27: ...PC722X Switchcraft 2 J6 to J7 12 way socket unshrouded 2 6 PPPC062LFBN RC 3M 2 S1 to S2 SPDT slide switch PC mount EG1271 E Switch 1 S3 2 section SPST SMD switch raised act 219 2LPST CTS Corporation 3...

Page 28: ...Evaluation Board User Guide UG 477 Rev A Page 27 of 28 NOTES...

Page 29: ...y portion of the Evaluation Board to any other party for any reason Upon discontinuation of use of the Evaluation Board or termination of this Agreement Customer agrees to promptly return the Evaluati...

Reviews: