

© 2015 Harman. All rights reserved. Metreau, NetLinx, AMX, AV FOR AN IT WORLD, and HARMAN, and their respective logos are registered
trademarks of HARMAN. Oracle, Java and any other company or brand name referenced may be trademarks/registered trademarks of their
respective companies.
AMX does not assume responsibility for errors or omissions. AMX also reserves the right to alter specifications without prior notice at any time.
The AMX Warranty and Return Policy and related documents can be viewed/downloaded at www.amx.com.
3000 RESEARCH DRIVE, RICHARDSON, TX 75082 AMX.com | 800.222.0193 | 469.624.8000 | +1.469.624.7400 | fax 469.624.7153
AMX (UK) LTD, AMX by HARMAN - Auster Road, Clifton Moor, York, YO30 4GD United Kingdom • +44 1904-343-100 • www.amx.com/eu/
93-5793-01 REV: C
Last Revised: 7/31/2015
5.
Select the check box next to the Master to which you want to bind the keypad. If
there is more than one Master in the system, check the specific Master to which
you want to bind the keypad.
6.
Click
OK
to save changes and close this dialog.
7.
Select
Refresh System
(in the Online Tree context menu). The device should now
appear in the Bound Devices folder.
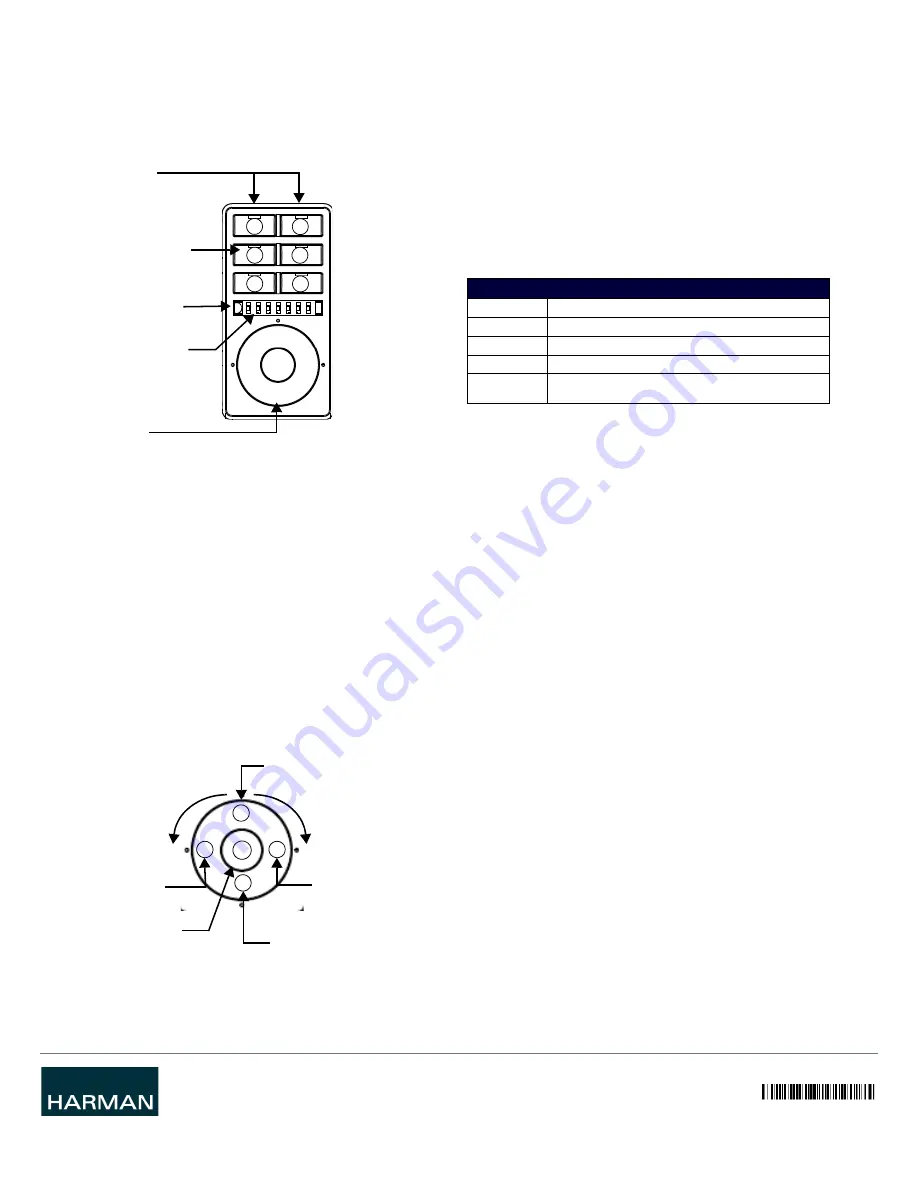
Keypad Layout
FIG. 4 displays the layout of the MET-6NE.
FIG. 4
MET-6NE 6-BUTTON KEYPAD WITH NAVIGATIONS
Simulating the ID Pushbutton
You can press buttons 1 and 2 simultaneously on the keypad to simulate the functions
of a NetLinx device’s ID pushbutton (see FIG. 4).
Toggling Between IP Addressing Modes: DHCP and Static IP
The MET-6NE supports both DHCP and static IP addresses. You can use a static IP
address which you can set via a Telnet command (SET IP), or you can use the factory
default static IP address (192.168.1.2).
With the keypad powered and booted up (or in ID Mode), you can toggle between the
DHCP and Static IP modes by pressing and holding buttons 1 and 2. The LEDs on
buttons 1 and 2 blink while you keep them pressed. Hold them until the LEDs begin
blinking at double the rate (approximately10 seconds), then release the buttons.
When you release the buttons, the keypad toggles either from static to dynamic (DHCP)
IP addressing or vice versa and remains in that mode until you use the buttons to
toggle the IP mode again or you perform a factory reset. The keypad automatically
reboots to complete the process.
NOTE: You must wait until the keypad is finished booting before toggling the IP address.
Pressing the buttons while booting will cause the keypad to restore its factory default
settings.
Navigation Wheel - Pushbuttons
The top, bottom, left, right and center points on the Navigation Wheel are pushbuttons
that provide events on Channels #7, #8, #9, #10 and #11, and can be programmed
like any other keypad button. FIG. 5 shows the button layout of the Navigation Wheel:
FIG. 5
NAVIGATION WHEEL - BUTTON LAYOUT
Navigation Wheel
The Navigation Wheel is a capacitive-touch scroll wheel that can be rotated clockwise
and counterclockwise, and is intended to provide level control (for example volume or
lighting levels).
• When rotated clockwise, the Navigation Wheel provides a channel event on button
#12.
• When rotated counter-clockwise, the Navigation Wheel provides a channel event
on button #13.
• When rotated (clockwise/counter-clockwise), the Navigation wheel provides level
events on Level #2. Refer to the Metreau Keypads Instruction Manual for details
on using Level control with the Navigation Wheel.
Channels
Channels on Metreau keypads correspond to the button numbers on each keypad as
indicated in FIG. 4 and FIG. 5.
Port Numbers
The MET-6NE supports the following port numbers:
Resetting the Keypad
NOTE: When you reset a keypad, the keypad is restored to the factory default, so you will
lose all configuration data as the defaults are restored.
To perform a factory reset of the Keypad, press and hold buttons 1 and 2 for
approximately10 seconds
during the boot process
. The LEDs on buttons 1 and 2 blink
while you keep them pressed. Hold them until the LEDs begin blinking at double the rate
(approximately10 seconds.) Release the buttons and the keypad will reset. During
factory reset, the backlight turns off for all buttons, but all buttons should be back
online after 1-2 minutes. If you do not hold in the reset button until the LEDs begin
blinking faster, the reset does not occur. (There is no soft reboot with the Reset button,
but you can perform a soft reboot from the web pages.)
Additional Documentation
Additional documentation for this device is available at
www.amx.com
. Refer to the
Metreau Keypads Instruction Manual
for additional details on installing, connecting, and
configuring the MET-6NE.
6-pre printed pushbuttons
(with blue LED indicators)
Navigation Wheel
and pushbuttons
IR Sensor located here
(supports AMX IR 38kHz)
LED bargraph
(provides level feedback)
Press to simulate ID
pushbutton functions
1
2
3
4
5
6
Rotate clockwise
Directional pushbutton UP
= button #12
Center pushbutton
7
10
8
9
11
Directional pushbutton DOWN
Directional pushbutton
RIGHT
Directional pushbutton
LEFT
Rotate counter-
clockwise = button #13
PORT NUMBERS
Port Number
Description
1
MET-6NE
2
First daisy-chained keypad (optional)
3
Second daisy-chained keypad (optional)
4
IR Receiver. This port supports PUSH and RELEASE channels
1-255 for the received IR code.