UDM-0102 Configuration - Status Page
26
UDM-0102 and UDM-RX02 Operation/Reference Guide
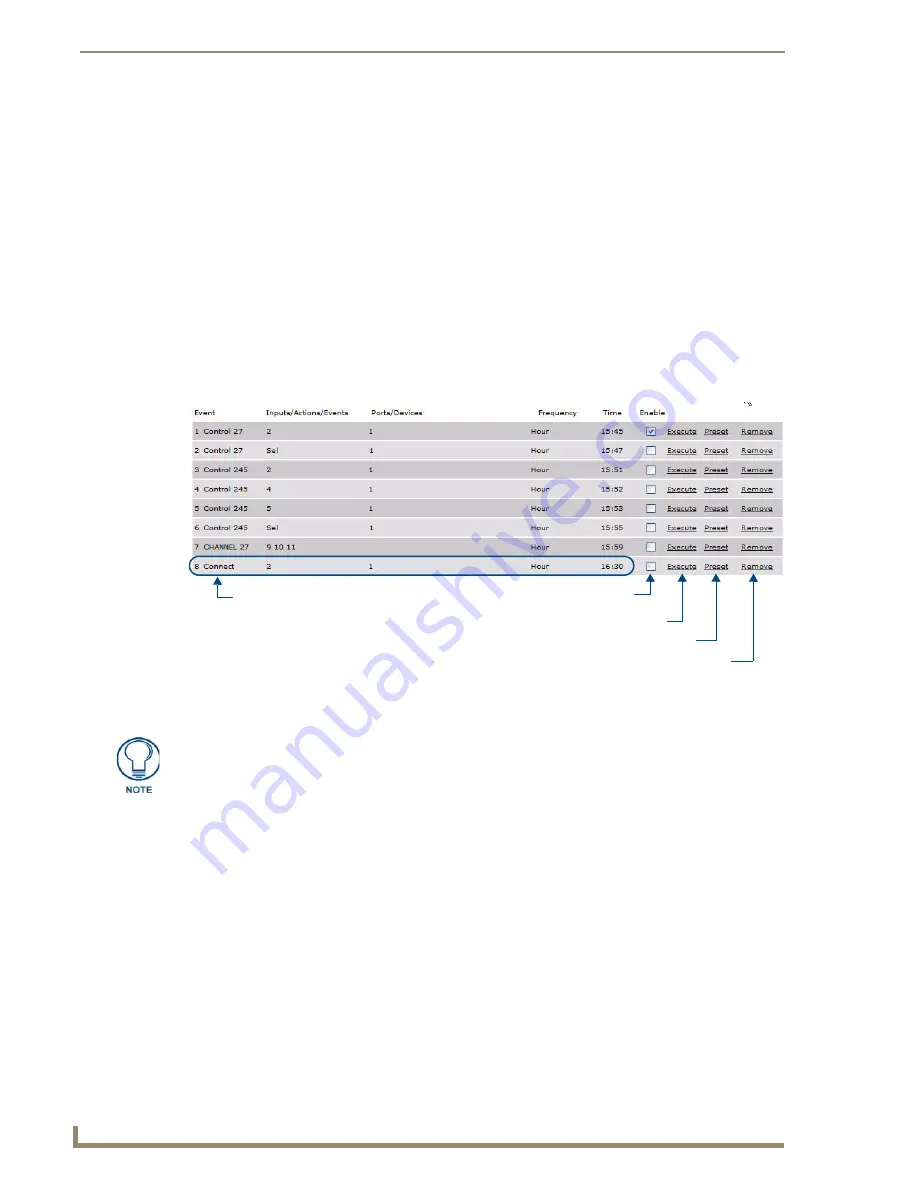
The blue row at the top of the
Schedule
page represents the new scheduled event - in this case, a
scheduled
Connect
. The options in this row (from left to right) are:
Scheduled Event name text box
- this editable field indicates the default name for the new
scheduled event, in this case "Connect".
Selected Input Device
- this read-only field indicates the currently selected Input Device. This is
the Input Device to which the Scheduled Connect will apply.
Time Interval drop-down menu
- this drop-down menu lists the various time intervals that can be
applied to this Scheduled Connect (
Hour
,
Day
,
Weekday
,
Sunday
-
Saturday
).
Hour/Minute text boxes
- these text fields allow you to specify the Hour and Minute (in 24-hour
format) at which this Scheduled Connect should occur.
Add
- this link adds the Scheduled Connect to the list of scheduled events.
2.
Select a time interval from the
Time Interval
drop-down menu.
3.
Enter the hour and minute (in 24-hour format) at which this Scheduled Connect should occur, in the
Hour
/
Minute
text fields.
4.
Click
Add
to add the new Scheduled Connect to the list of scheduled events, in the
Schedule
page
5.
Click in the
Enabled
checkbox to enable this Scheduled Connect.
Click the
Execute
link to execute the associated event immediately.
Click the
Preset
link to add this Scheduled Connect to a Preset Schedule. Multiple scheduled events
can be combined into a single Preset Schedule. For example, you could create a Preset Schedule
that powers up devices 1-2 (connected to the IRTX Ports on the rear panel), then powers up display
devices 1-4 (connected to the RJ-45 Output ports on the front panel), and displays Inputs 1-2 on
Ports 1-4. See the
section on page 46 for details.
Click the
Remove
link to remove the associated event from the scheduled events list.
Defining User Control
The
User Control
feature allows you to assign IR commands to the selected Input Device and associated
remote controller.
The remote controller is selected via the
Remote Type
option in the
Port Configuration
page (see
the
Selecting a Remote Control Type
The IR command which the selected remote controller will issue must first be been learned by the
Hub (refer to the
Creating and Learning an IR Protocol
section on page 59 for information).
FIG. 25
Schedule Page - showing a new Scheduled Connect
Scheduled Connect
Click here (check) to enable
this Scheduled Connect
Click to execute the Connect event
Click to add this Scheduled Connect to a Preset Schedule
Click to remove this Scheduled Connect from the list of scheduled events
Scheduled Events will only be executed if they have been Enabled via this checkbox.
Summary of Contents for Endeleo Multi-Format Receiver UDM-RX02
Page 4: ......
Page 8: ...Important Safety Markings UDM 0102 and UDM RX02 Operation Reference Guide ...
Page 26: ...UDM 0102 Wiring and Connections 12 UDM 0102 and UDM RX02 Operation Reference Guide ...
Page 32: ...UDM RX02 Wiring and Connections 18 UDM 0102 and UDM RX02 Operation Reference Guide ...
Page 50: ...Configuration Setup Page 36 UDM 0102 and UDM RX02 Operation Reference Guide ...
Page 58: ...Configuration Devices Page 44 UDM 0102 and UDM RX02 Operation Reference Guide ...
Page 64: ...Configuration Schedule Page 50 UDM 0102 and UDM RX02 Operation Reference Guide ...
Page 88: ...Advanced Administration 74 UDM 0102 and UDM RX02 Operation Reference Guide ...
Page 90: ...UDM RC10 Remote Control 76 UDM 0102 and UDM RX02 Operation Reference Guide ...
Page 94: ...Video Compensation 80 UDM 0102 and UDM RX02 Operation Reference Guide ...


